
Some crafts take an afternoon of planning and a trip to three different stores. This isn’t one of them! This adorable paper bowl penguin comes together with supplies you probably already have at home, and the star of the show is a soft, fluffy cotton round that becomes his perfect little white belly.
It’s a sweet winter project for preschoolers, a fun classroom activity during an arctic animals unit, or a cozy indoor craft for a snowy afternoon. Kids love the painting part, and they really love the moment the googly eyes go on and their penguin suddenly comes to life. Let’s waddle right in!
Craft Supplies:
Here’s your simple supply list:
- 1 small round paper bowl
- Black acrylic paint
- Paintbrush
- 1 white cotton round
- 2 googly eyes (small or medium size)
- Yellow construction paper
- Scissors
- Craft glue or a glue stick
- Newspaper or a plastic tablecloth (to protect your work surface)
- Paint smock or an old T-shirt (trust us on this one!)
Directions:
Step 1: Set Up Your Craft Space
Cover your table with newspaper or a plastic tablecloth. Black paint is bold and beautiful, but it’s not so beautiful on a kitchen table. Pop a smock on your little crafter, and pour a small amount of black paint onto a paper plate or palette.
Step 2: Flip and Paint the Bowl
Turn the paper bowl upside down so the rounded bottom faces up. This dome shape becomes your penguin’s chubby body.
Paint the entire outside of the bowl black. Encourage kids to use long, smooth strokes and cover every bit of white. It’s totally fine if a little white peeks through around the bottom rim. It adds charm!
Step 3: Let It Dry
Set the bowl aside to dry completely. Acrylic paint usually dries in about 20 to 30 minutes, depending on how thick it was applied.
While you wait, move on to the beak so little hands stay busy.
Step 4: Cut Out the Beak
Cut a small triangle from yellow construction paper. It should be about an inch wide, small enough to fit neatly between the eyes and the belly.
Older kids can cut their own beaks. For younger ones, you can draw the triangle and let them try cutting along the lines, or cut it out ahead of time.
Step 5: Add the Cotton Round Belly
Once the paint is dry, it’s time for the best part! Add a few dots of glue to the back of the cotton round. Press it onto the center of the bowl, placing it slightly toward the top so there’s room for the eyes above it.
Hold it in place for a few seconds so it sticks well. Kids love how soft and squishy this belly feels. Expect lots of gentle pokes!
Step 6: Glue On the Googly Eyes
Place a small dot of glue on the back of each googly eye. Press them onto the black paint just above the cotton round belly, side by side.
Watch your child’s face light up here. This is the moment the penguin gets his personality!
Step 7: Attach the Beak
Glue the yellow triangle just below the eyes, with the tip pointing down. Let it overlap the top edge of the cotton round slightly. This ties the whole face together and makes your penguin look extra cute.
Step 8: Let It Set
Give the glue a little time to dry before anyone picks up the penguin to show it off. Then it’s time to name your new feathered friend!
RELATED —> Paper Plate Santa Belly Craft Idea
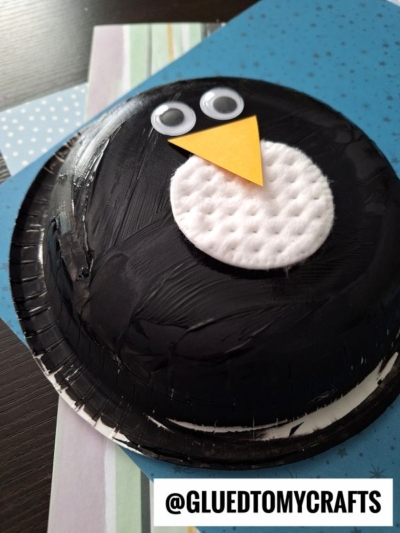
This paper bowl penguin is proof that the simplest crafts often bring the biggest smiles. With a bowl, some paint, and one fluffy cotton round, your kids get to paint, cut, glue, and create a character all their own.
Whether you’re filling a chilly afternoon at home or planning a winter lesson for a whole class, this little guy is sure to be a hit. So grab your supplies, roll up those sleeves, and get ready to welcome a brand-new penguin pal to the family. Happy crafting, my friends!
