
Some of the best holiday crafts start with something already in your kitchen drawer. This fork painted Christmas tree window craft turns a plain plastic fork into a paintbrush that makes perfect, fluffy pine needles in just a few strokes. Then you add a simple paper window frame on top, so the finished piece looks like a cozy Christmas tree glowing on a dark winter night.
It’s easy, a little messy in the best way, and great for little hands. Toddlers love the swish-swish of the fork, while older kids can get creative with ornament placement and window details. It’s a wonderful pick for a classroom party, a snowy afternoon at home, or a holiday activity with grandkids.
Craft Supplies:
- 1 sheet of construction paper
- Green acrylic paint
- 1 plastic fork
- 1 paper plate (for paint)
- Construction paper, cut into strips
- Elmer’s glue stick
- Loose craft sequins or stickers
- Scissors (for grown-ups or older kids)
- Newspaper or a plastic tablecloth to protect your work surface
Directions:
Step 1: Set Up Your Craft Space
Cover your table with newspaper or a plastic tablecloth. Lay the construction paper in front of your child in a vertical (tall) position. Acrylic paint can stain clothes, so a smock or an old T-shirt is a smart idea.
Step 2: Prepare the Paint
Squeeze a dollop of green paint onto the paper plate.
Step 3: Fork Paint the Christmas Tree
This is the fun part!
- Dip the back of the fork tines into the paint. You want a good coat, but not so much that it drips.
- Start near the top center of the black paper. Press the fork down gently and drag it downward to make short strokes.
- Keep the top of the tree narrow, then make your strokes wider as you work your way down. Before long, you’ll have a classic triangle tree shape.
- Reload the fork often and layer strokes on top of each other. Going in slightly different directions adds even more texture.
Tip for little ones: Lightly sketch a triangle on the paper with a pencil or chalk first. This gives kids a guide to fill in without worrying about the shape.
Step 4: Add the Brown Paper Trunk
For this step you can either draw on a tree trunk or cut one out of brown cardstock paper to glue on.
Now set the painting aside to dry. Acrylic paint dries fairly quickly, usually within 15 to 30 minutes depending on how thick it is.
Step 5: Create the 4-Pane Window Frame
Once the tree is dry, it’s time to turn your painting into a winter window scene.
Cut four strips from the construction paper:
- Two long strips for the left and right edges of the paper
- One long strip for the vertical center line
- One strip for the horizontal center line
Glue the strips on in this order:
- Run glue along the back of each side strip and press them down the left and right edges of the black paper.
- Glue the center vertical strip straight down the middle, right over the tree.
- Glue the horizontal strip across the middle so it crosses the center strip. You’ll now see four window panes!
Trim any strips that hang over the edge. The tree now peeks through the panes, just like a Christmas tree glowing inside a cozy house.
Step 6: Decorate With Sequins or Stickers
Time to make it sparkle! Kids can add sequins and stickers ornaments on the visible parts of the tree.
When done decorating, allow it to dry completely before displaying proudly for all to see!
RELATED —> Torn Paper Winter Tree Craft

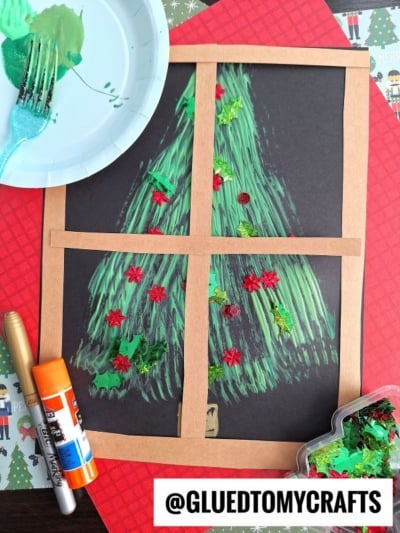
This fork painted Christmas tree window craft proves that you don’t need fancy supplies to make something magical. A fork, some paint, and a few sparkly sequins are all it takes to create a holiday masterpiece your kids will be proud of. Best of all, it gives you a chance to slow down, sit together, and make memories during the busy holiday season.
So grab a plastic fork, clear off the kitchen table, and give this craft a try at home or in the classroom this week. Don’t forget to snap a photo of your little artist’s finished tree. And for more simple, joyful craft ideas like this one, be sure to check out @GLUEDTOMYCRAFTS, the creative inspiration behind this project.
Happy crafting, and merry Christmas!
