
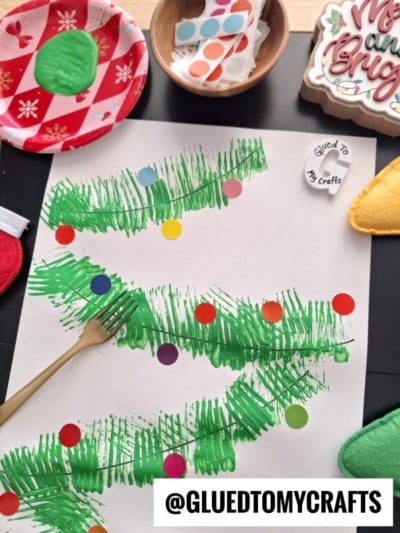
A plain plastic fork can turn into the best paintbrush in your craft drawer. With one dollop of green paint and a handful of colorful dot stickers, little hands can make a cheerful Christmas garland that looks like it belongs on the mantel.
This craft is quick, low-mess, and very forgiving. Messy strokes just look like fluffy pine branches. Kids get to paint, press, peel, and stick, and every finished garland looks a little different. It’s perfect for a cozy afternoon at home, a classroom holiday party, or a snow-day activity with toddlers and preschoolers.
Craft Supplies:
- Extra large construction paper (white or a light color works best so the green pops)
- Green acrylic paint (washable kids’ paint works too)
- A plastic fork
- A paper plate for your paint
- Colorful dot stickers for the ornaments and lights
- A black marker
Why extra large paper? It gives kids plenty of room to swoop and drag the fork. You also get longer garland strands and more space for stickers, which kids love.
Directions:
Step 1: Set Up Your Craft Space
Cover your table with newspaper or a plastic tablecloth. Lay the construction paper in front of your child in a vertical position. Pop a smock or old T-shirt on your little artist, too.
Step 2: Draw the Garland String Lines
Use the black marker to draw 4 gently curved lines across the paper from side to side. Space them evenly from top to bottom. These lines are the “string” your garland will hang from.
Tip: Older kids can draw the lines themselves. For toddlers, draw them ahead of time so they can jump right into painting.
Step 3: Squeeze Out the Paint
Squeeze a quarter-sized dollop of green paint onto the paper plate. Start small. You can always add more.
Step 4: Load the Fork
Show your child how to dip the back of the fork tines into the paint. Have them tap off any extra on the plate. You want a thin coat, not big drips.
Step 5: Press and Drag Along the Lines
Place the painted fork on one of the black lines. Gently press it down, then drag it a short way to make little “pine needle” streaks. Lift and repeat all the way across the line.
Watch for this: If the marks look blobby, there’s too much paint on the fork. Tap it off and try again. If the marks look faint, dip again.
Step 6: Keep Going Until Every Line Is Fluffy
Repeat on each string line until all 4 garlands are covered in green branches. Encourage kids to angle the fork in different directions. Overlapping strokes make the garland look extra full and fluffy.
Step 7: Let It Dry
Set the artwork flat somewhere safe to dry for about 20 to 30 minutes. Acrylic paint dries fast, but thick spots may need a bit longer.
Waiting tip: Use this time to let kids pick out their favorite sticker colors. It builds excitement for the best part!
Step 8: Add Dot Sticker Ornaments
Once the paint is dry, it’s time to decorate! Have your child peel colorful dot stickers and press them along the green branches. Mix reds, blues, yellows, pinks, and greens to make it look like a twinkling string of Christmas lights.
Peeling stickers is great fine motor practice for little fingers. If your child finds it tricky, bend the sticker sheet so the edges lift up for easy grabbing.
When done decorating, display it proudly for ALL to see during the holiday season!
RELATED —> Fingerprint Christmas Lights & String Height Ornament

BTW – for a unique twist on our craft idea, you can bring in your trusty “potato masher” to stamp ornaments instead!
On that note, we hope you give this fork painted Christmas garland a try this week. When you do give it try, we’d love to see your little artists’ creations! Share a photo and tag @gluedtomycrafts on Facebook or Instagram. Happy crafting, my friends! 🎄
