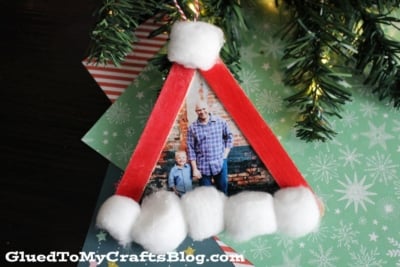
Follow this simple tutorial to learn how to make a festive Santa hat photo ornament out of jumbo popsicle sticks and cotton balls!

Get your kids in the Christmas spirit with this easy-to-make Santa Hat Photo Ornament craft! Just add family photos and ribbon, and your little ones will have a personalized holiday keepsake they’ll treasure for years to come.

DIY this adorable photo ornament with your little ones for the perfect addition to your holiday tree! These make fun family memories that last a lifetime!
Craft Supplies:
- Jumbo Popsicle Sticks – 3 per craft
- Hot Glue Gun
- Red Craft Paint
- Foam Paint Brush
- Small Paper Plate
- White Cotton Balls
- Scissors
- String or Ribbon
- 4×6″ Printed Picture
Directions:
- First things first – grab your three jumbo popsicle sticks and glue them together to look like a triangle.
- Set aside to let it dry completely.
- Repeat for each Santa hat ornament you want to make today.
- Now grab your small paper plate, craft paint and foam paint brush.
- Squirt the paint on the paper plate.
- Paint your popsicle stick triangle shape completely red.
- Set it aside again, to allow the paint to dry.
- While that is drying, grab your printed picture and scissors.
- Cut out a simple triangle shape, to make the inner part of the hat {trim it down slightly to be a smaller triangle than your popsicle sticks}
- Now glue it to the back of your ornament.
- To finish off the Popsicle Stick Santa Hat – hot glue a line of cotton balls on side of the triangle. Go ahead and also glue one cotton ball to the tip.
- At this point in time you can also hot glue your “hanger” on the back as well.
- Allow it to dry completely before displaying proudly for all to see!
RELATED —> Reindeer Snow Globe Photo Ornament

Don’t let the crafty fun stop here with this tutorial!!!
We absolutely LOVE sharing Christmas crafts at Glued To My Crafts and we are BURSTING with so many unique ideas!
Check out our Christmas Trucks, Christmas Trains and Christmas Tree craft posts! #gluedtomycrafts

Santa Hat Photo Ornament
Follow this simple tutorial to learn how to make a festive Santa hat photo ornament out of jumbo popsicle sticks and cotton balls!
Here’s your checklist of supplies to bring this craft to life:
- 3 Jumbo Popsicle Sticks
- White Cotton Balls
- Craft Paint
- Craft Ribbon
- 1 Printed Picture
Prepare your creative haven by laying down a protective cover before the crafting magic begins!
Directions:
- First things first - grab your three jumbo popsicle sticks and glue them together to look like a triangle.
- Set aside to let it dry completely.
- Repeat for each Santa hat ornament you want to make today.
- Now grab your small paper plate, craft paint and foam paint brush.
- Squirt the paint on the paper plate.
- Paint your popsicle stick triangle shape completely red.
- Set it aside again, to allow the paint to dry.
- While that is drying, grab your printed picture and scissors.
- Cut out a simple triangle shape, to make the inner part of the hat {trim it down slightly to be a smaller triangle than your popsicle sticks}
- Now glue it to the back of your ornament.
- To finish off the Popsicle Stick Santa Hat – hot glue a line of cotton balls on side of the triangle. Go ahead and also glue one cotton ball to the tip.
- At this point in time you can also hot glue your "hanger" on the back as well.
- Allow it to dry completely before displaying proudly for all to see!

CLICK HERE TO PRINT THE DIRECTIONS FOR THIS CRAFT
If you've enjoyed our content or have any thoughts to share, we'd love to hear from you! Mention @gluedtomycrafts or tag #gluedtomycrafts on Instagram!