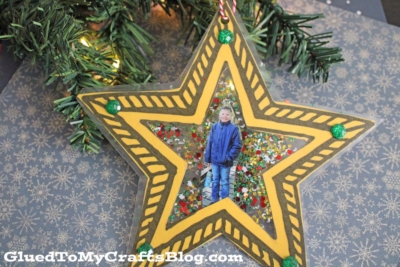
Bright and festive! Make a Christmas star ornament with yellow cardstock paper, clear contact paper, craft glitter, and your favorite photo.
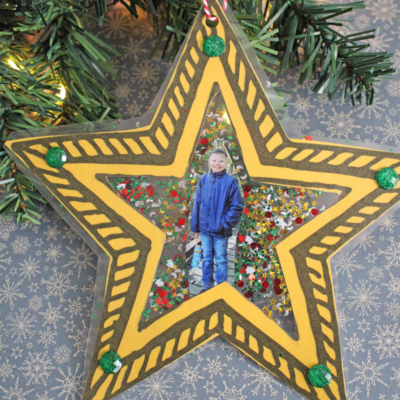
Get creative this holiday season with your little ones and make these adorable Christmas star photo ornaments! Great for the tree, mantel, or to give as gifts too.
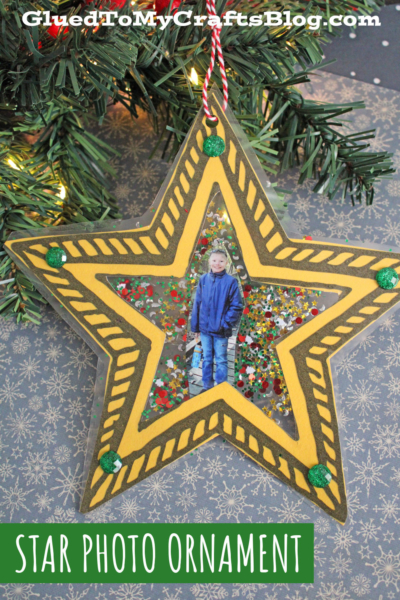
Get the kids into the holiday spirit with this fun and festive star photo Christmas ornament craft! It’s an easy and enjoyable activity that’ll make for a great holiday memory!
Craft Supplies:
- Ornament Printable – on our landing page
- Yellow Cardstock Paper
- Scissors
- Clear Contact Paper
- Loose Craft Glitter
- Single Hole Punch
- Ribbon or String
- Embellishments and Printed Picture
Directions:
- First things first – download the free star printable listed above in the supply list.
- Print out the provided file on a single sheet of yellow cardstock paper.
- Use scissors to trim it out from the paper.
- Go ahead and also cut out the center of the star.
- Next up – cut two equal sized piece of contact paper.
- Peel the backing off of one piece of contact paper and lay it down, sticky side up, on your work surface.
- Lay the star cutout on top.
- Trim down your child’s picture so it fits inside the ornament. Lay it down as well.
- Go ahead and sprinkle some loose craft glitter to fill in the empty spaces.
- Now peel the backing off the second piece of contact paper and lay it on top of the first.
- Use your hand to make sure everything is sealed together and that no bubbles exist.
- When ready, use scissors to trim off the excess contact paper from around the edges.
- Add any other embellishments you see fit.
- Finally, hold punch a hole at the top and string some string through it for easy hanging.
- And that’s it! Don’t forget to use a marker to either write the year or your child’s name on the back.
- Then display/gift away proudly your child’s beautiful Christmas star ornament piece!
RELATED —>Photo Snow Globe Craft

Overall, this Yellow Christmas Star Photo Ornament craft is an easy and fun activity for you and your family to make together.
Plus, it’s so unique that you can guarantee it’ll be the most special ornament on your Christmas tree!
So what are you waiting for? Gather some supplies and get crafting today! You’ll have beautiful memories to remember each year as you hang up your personalized star decorations. Happy crafting, my friends!

Christmas Star Photo Ornament Craft
Bright and festive! Make a Christmas star ornament with yellow cardstock paper, clear contact paper, craft glitter, and your favorite photo.
Here’s your checklist of supplies to bring this craft to life:
- Cardstock Paper
- Christmas Ornament Printable
- Clear Contact Paper
- Loose Craft Glitter
- Ribbon or String
- Printed Picture
- Embellishments
Prepare your creative haven by laying down a protective cover before the crafting magic begins!
Directions:
- First things first - download the free star printable listed above in the supply list.
- Print out the provided file on a single sheet of yellow cardstock paper.
- Use scissors to trim it out from the paper.
- Go ahead and also cut out the center of the star.
- Next up - cut two equal sized piece of contact paper.
- Peel the backing off of one piece of contact paper and lay it down, sticky side up, on your work surface.
- Lay the star cutout on top.
- Trim down your child's picture so it fits inside the ornament. Lay it down as well.
- Go ahead and sprinkle some loose craft glitter to fill in the empty spaces.
- Now peel the backing off the second piece of contact paper and lay it on top of the first.
- Use your hand to make sure everything is sealed together and that no bubbles exist.
- When ready, use scissors to trim off the excess contact paper from around the edges.
- Add any other embellishments you see fit.
- Finally, hold punch a hole at the top and string some string through it for easy hanging.
- And that's it! Don't forget to use a marker to either write the year or your child's name on the back.
- Then display/gift away proudly your child's beautiful Christmas star ornament piece!


NEED HELP DOWNLOADING OUR FREE PRINTABLES? PLEASE REFER TO OUR FAQ PAGE
If you've enjoyed our content or have any thoughts to share, we'd love to hear from you! Mention @gluedtomycrafts or tag #gluedtomycrafts on Instagram!