
Get crafty with the little ones and make a fun paper bag cowboy puppet! See how it’s done and create memories that will last forever.

Paper Bag Gnome Cowboy
Today’s Lunch Sack Wild Wild West Puppet tutorial is something I’m building off of from the cowboy gnome tutorial that went live on our website a few days ago.
I’ve taken the basic framework of our past paper bag puppet craft ideas but this time I added a simple cowboy hat shape and a white handprint beard to bring it to life! And as always – it’s super easy for any skill level to recreate with basic craft supplies you probably have on hand right already!
So enough chit chat from this gal behind the computer screen…. please be inspired by our latest & greatest cowboy kids craft tutorial. You can find EVERYTHING you need to know below, along with the free cowboy hat printable to get you started even faster!
Happy crafting my friends! Don’t forget to share pictures of your paper bag gnome cowboy creations with us! You can ALWAYS tag us on Facebook or Instagram for easy sharing! I can’t wait to see what you make with your young crafter today! #gluedtomycrafts
RELATED —> Paper Plate Horse
Put your inner cowboy to work and make these super fun paper bag cowboy puppets!
Craft Supplies:
- Brown Paper Bag – 1 per craft
- Red Craft Paint
- Small Paper Plate
- Paint Brush
- Pencil
- Hat Printable – on our landing page
- White Cardstock Paper
- Brown Cardstock Paper
- Scissors
- Adhesive
- Embellishments
Directions:
- First things first – lay the paper bag on a flat surface, with the bottom flap facing you. Just envision that the smaller rectangle area is the face and the larger portion is his body.
- Now grab your RED craft paint and squirt a small amount on the paper plate.
- Use the paint brush to paint the LARGER part of the paper bag completely red. This will be his clothing/body.
- When done painting, set aside the paper bag till later.
- Now grab your cowboy hat printable, that you printed on LIGHT BROWN cardstock paper, along with the scissors.
- Trim out the hat design and discard excess paper.
- Now grab your sheet of white cardstock paper, as well as a pencil.
- Trace BOTH of your hands and trim them out. This is now the cowboy’s beard.
- Next up – cut out a small oval for the nose out of the remaining cardstock paper.
- Now we are ready to finish up the cowboy lunch sack puppet craft. Grab your painted paper bag, all the paper pieces and your choice of adhesive.
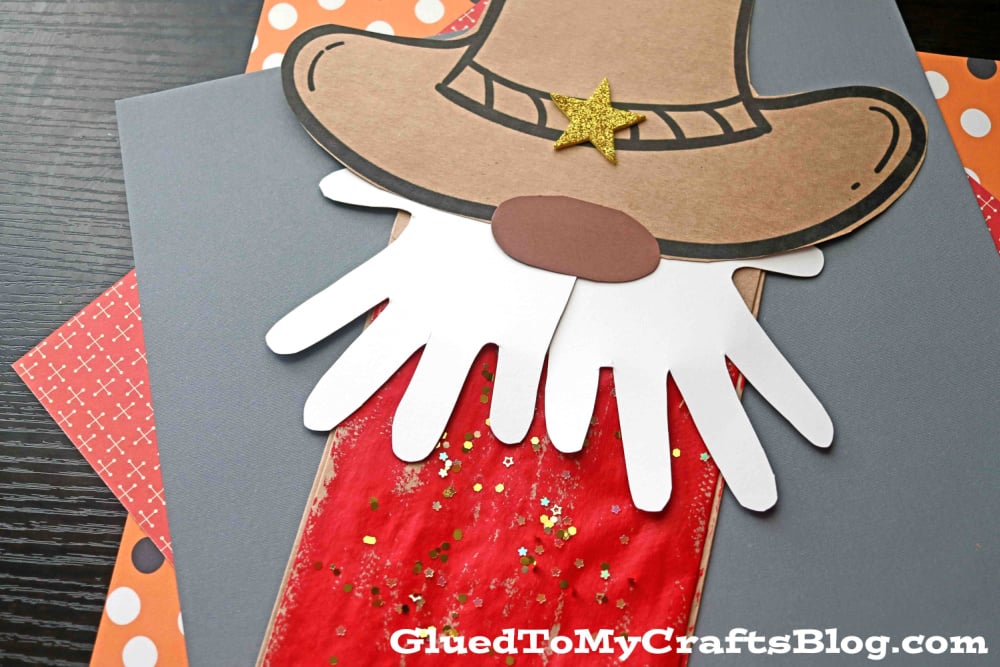
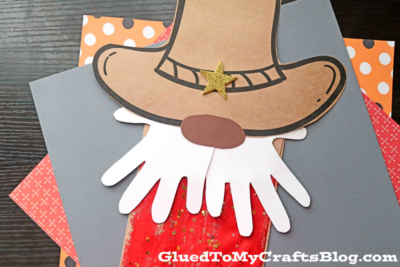
- Go ahead and start off by gluing the handprint beard cutouts, in place, right on the fold of the paper bag. You will want the fingertips facing outward.
- Follow that up with the hat and then the oval nose on top of that.
- And that’s it on this Paper Bag Cowboy craft! Go ahead and add any other embellishments before you display/play with him proudly for all to see!
- BTW – just gently stick your hand inside the decorated brown paper bag to make it into a puppet!
RELATED —> Handprint Horse Keepsake

Don’t let the crafty fun stop here! Be sure to also check out our Paper Bag Pirate Puppet and Paper Scarecrow Gnome craft posts for more DIY fun for the kids!!!

Paper Bag Cowboy Craft Idea For Kids
Here’s your checklist of supplies to bring this craft to life:
- Pencil or Pen
Prepare your creative haven by laying down a protective cover before the crafting magic begins!
Directions:
- First things first - lay the paper bag on a flat surface, with the bottom flap facing you. Just envision that the smaller rectangle area is the face and the larger portion is his body.
- Now grab your RED craft paint and squirt a small amount on the paper plate.
- Use the paint brush to paint the LARGER part of the paper bag completely red. This will be his clothing/body.
- When done painting, set aside the paper bag till later.
- Now grab your cowboy hat printable, that you printed on LIGHT BROWN cardstock paper, along with the scissors.
- Trim out the hat design and discard excess paper.
- Now grab your sheet of white cardstock paper, as well as a pencil.
- Trace BOTH of your hands and trim them out. This is now the cowboy's beard.
- Next up - cut out a small oval for the nose out of the remaining cardstock paper.
- Now we are ready to finish up the cowboy lunch sack puppet craft. Grab your painted paper bag, all the paper pieces and your choice of adhesive.
- Go ahead and start off by gluing the handprint beard cutouts, in place, right on the fold of the paper bag. You will want the fingertips facing outward.
- Follow that up with the hat and then the oval nose on top of that.
- And that's it on this Paper Bag Cowboy craft! Go ahead and add any other embellishments before you display/play with him proudly for all to see!


NEED MORE HELP DOWNLOADING OUR FREE PRINTABLES? PLEASE REFER TO OUR FAQ PAGE