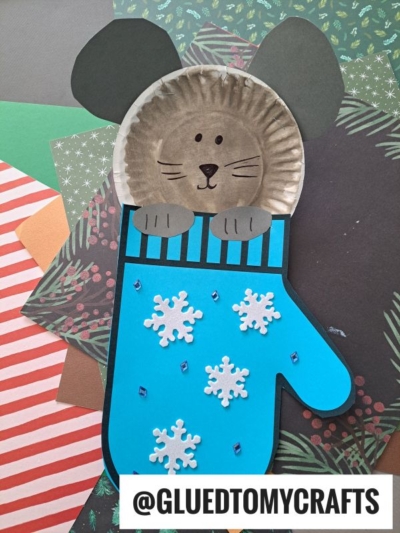
This winter, keep the kids busy with this super easy paper plate and cardstock paper mouse in a mitten craft!

Get the kids involved in preparing the materials, then let them go to town creating their own unique mouse in a mitten. When they’re done, hang their peeking winter mouse artwork up for all to see!

This super easy and fun winter kids craft is perfect for a boredom buster on a cold day! All you need is a paper plate, some cardstock paper, and our free printable template. That’s it!
Once you have those things, you can let your kids get creative and make their own little mouse in a mitten! They can choose what color they want their mitten to be, and they can even add some fun details like buttons or bows.
This craft is so easy that even the littlest ones can do it with just a little help. And when they’re finished, they’ll have a cute decoration for their room or to give as a gift! On that note, find all the details you need to know, along with the free printable, in the full tutorial below! Happy crafting, my friends!

This is a wonderfully easy and festive winter craft idea for kids! All you need is some cardstock paper, a small paper plate and a little bit of creativity. Let your child’s imagination run wild as they bring this adorable Peeking Mouse to life.
Craft Supplies:
- MITTEN printable – on our landing page
- Colored Cardstock Paper
- Gray Cardstock Paper
- Craft Scissors
- Small Paper Plate
- Gray Craft Paint
- Paint Brush
- Stapler
- Sharpie Marker
- Embellishments
Directions:
- First things first – grab your small paper plate, gray craft paint and paint brush.
- Paint the paper plate completely gray.
- Set aside to let it dry completely.
- Next up – download and print the mitten template listed above in the supply list. You only need ONE printable per paper mouse craft.
- Next grab your scissors and trim out the mitten shape. Set it aside.
- Discard excess paper.
- Now grab your gray cardstock paper.
- Cut out TWO large ears and two small oval shaped “paws” for the mouse.
- Once you have ALL your paper pieces done, it’s time to start assembling!
- Grab all your paper pieces {including the mitten cutout} along with your stapler and/or glue.
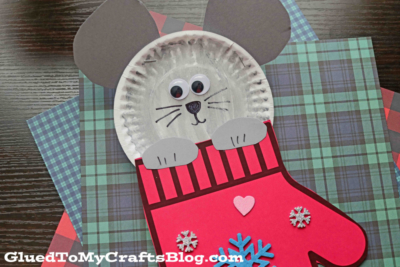
- Staple the painted paper plate piece, to the back of the mitten shape, so it looks like she/he is peeking out from behind it.
- Follow that up by either stapling or gluing the mouse’s paws in place, on the front of the “mitten.”
- Finally – add the ear pieces to the painted plate.
- To finish off your paper peeking winter mouse craft, draw on a face, glue on the eyes and add any other embellishments you see fit {You can even customize this craft by adding other winter elements like snowflakes or a scarf. Get creative and have fun!} before displaying it proudly for all to see!
- Don’t forget to share pictures with us on your social media sites! #gluedtomycrafts
RELATED —> Paper Mitten Craft
The winter months are meant to be magical and full of handmade creations! So don’t let the opportunity of making crafty memories with your child this holiday season, slip away!
We have SEVERAL different Christmas themed craft tutorials that are sure to make you and your child’s day extra fun! All of which are also perfect to add to your holiday plans or story time events!
Just check out our Cold Hands, Warm Heart Keepsake, Christmas Tree Gnome and Paper Plate Gnome tutorial posts on Glued To My Crafts, to see what I’m talking about. They won’t disappoint and they are super unique! Happy crafting!

Peeking Winter Mouse In Mitten Craft
This winter, keep the kids busy with this super easy paper plate and cardstock paper mouse in a mitten craft!
Here’s your checklist of supplies to bring this craft to life:
- School Glue
Prepare your creative haven by laying down a protective cover before the crafting magic begins!
Directions:
- First things first - grab your small paper plate, gray craft paint and paint brush.
- Paint the paper plate completely gray.
- Set aside to let it dry completely.
- Next up - download and print the mitten template listed above in the supply list. You only need ONE printable per paper mouse craft.
- Next grab your scissors and trim out the mitten shape. Set it aside.
- Discard excess paper.
- Now grab your gray cardstock paper.
- Cut out TWO large ears and two small oval shaped "paws" for the mouse.
- Once you have ALL your paper pieces done, it's time to start assembling!
- Grab all your paper pieces {including the mitten cutout} along with your stapler and/or glue.
- Staple the painted paper plate piece, to the back of the mitten shape, so it looks like she/he is peeking out from behind it.
- Follow that up by either stapling or gluing the mouse's paws in place, on the front of the "mitten."
- Finally - add the ear pieces to the painted plate.
- To finish off your paper peeking winter mouse craft, draw on a face, glue on the eyes and add any other embellishments you see fit before displaying it proudly for all to see!


NEED MORE HELP DOWNLOADING OUR FREE PRINTABLES? PLEASE REFER TO OUR FAQ PAGE
If you've enjoyed our content or have any thoughts to share, we'd love to hear from you! Mention @gluedtomycrafts or tag #gluedtomycrafts on Instagram!