Unleash your little one's creative side with this fun and easy craft idea!

Unleash your inner artist and make some adorable paw prints with this fun fork painting craft! Easy enough for kids, but just as enjoyable for adults – create a colorful masterpiece today!

Paper Plate Paw Craft
It’s another unique tutorial from Glued To My Crafts! Today we are merging together a paper plate, Tulip craft paint and a plastic fork, to make this one-of-a-kind Fork Painted & Paper Plate Paw Print kid craft idea within minutes! There’s even a FREE printable in the supply list, to get you started even faster!
No two paw print pieces will be alike and your color choices can be limitless as well! Although I went for “dog paw prints” in my examples, you could also do this for a polar bear or brown bear craft activity as well! The choice is yours!
Ready to make it happen? Keep scrolling for ALL the details so you can recreate it with your young crafter this afternoon!

Unleash your creativity and make something paws-itively adorable with this paw print craft!
Craft Supplies:
- One Plastic Fork
- Tulip Puffy Craft Paint
- Large Paper Plate
- White Cardstock Paper
- Paw Print Printable – on our landing page
- Crayons, Coloring Pencils or Markers
- Scissors
- School Glue
Directions:
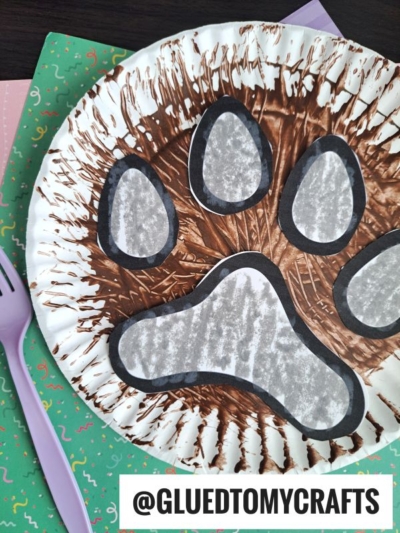
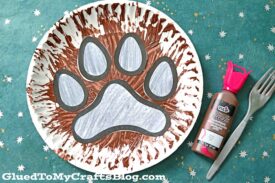
- First squirt some craft paint in the center of your large paper plate. You don’t need a lot. The size of a quarter is a good starting point.
- Take the fork – which is your “paint brush” and spread the paint ALL around to make the fur of your animal. Just make sure though that you keep the paint on the paper plate. You can however move it anywhere and in any design/shape/angle you like. Remember – two or three colors is also awesome to use! Don’t be shy on mixing and blending them to recreate your unique paw print design.
- Once you are done creating the “fur” – set aside the decorated paper plate to let it dry a bit.
- Now grab your printed paw print printable.
- Color in the paw design however you like {I went with basic black crayon.}
- When done coloring in the shapes, trim out each piece with your scissors. Discard excess paper {or save for a rainy day!}
- Finally – the last step of this paint covered paper plate paw print craft. Use the school glue to glue all your cardstock pieces to the center of the paint covered paper plate.
- Set aside to let it dry completely before displaying proudly!
RELATED —> Santa Paws Keepsake
If you LOVE this fork painted & paper plate paw print craft idea, you may also enjoy our Fork Painted Bunny craft tutorial as well!
BE SURE TO FOLLOW US ON PINTEREST SO YOU NEVER MISS A NEW TUTORIAL FROM US!

Fork Painted Paw Print Craft Idea For Kids
Unleash your little one's creative side with this fun and easy craft idea!
Here’s your checklist of supplies to bring this craft to life:
Prepare your creative haven by laying down a protective cover before the crafting magic begins!
Directions:
- First squirt some brown craft paint in the center of your large paper plate. You don't need a lot. The size of a quarter is a good starting point.1 Large Paper Plate, Tulip Puffy Paint
- Take the fork - which is your "paint brush" and spread the paint ALL around to make the fur of your animal.
- Once you are done creating the "fur" - set aside the decorated paper plate to let it dry a bit.
- Now grab your printed paw print printable.Cardstock Paper
- Color in the paw design however you like {I went with basic black crayon.}
- When done coloring in the shapes, trim out each piece with your scissors. Discard excess paper {or save for a rainy day!}
- Finally - the last step of this paint covered paper plate paw print craft. Use the school glue to glue all your cardstock pieces to the center of the paint covered paper plate.
- Set aside to let it dry completely before displaying proudly!


NEED MORE HELP DOWNLOADING OUR FREE PRINTABLES? PLEASE REFER TO OUR FAQ PAGE
If you've enjoyed our content or have any thoughts to share, we'd love to hear from you! Mention @gluedtomycrafts or tag #gluedtomycrafts on Instagram!