
Come celebrate the Thanksgiving season with today’s SUPER EASY Paper Plate Pilgrim Turkey kid craft idea from us!
No need to ruffle your feathers! We even included a few pilgrim hat printable, found below, to get you started even faster!
Keep scrolling for the full how-to from your crafty experts at Glued To My Crafts!

Paper Plate Turkey Pilgrim Craft For Thanksgiving
We all associate the feathered bird with the Thanksgiving holiday, so it’s only fair that I showcase him on the blog today – Glued To My Crafts‘ kid craft style, of course! We even thought of our lovely readers by providing a FREE pilgrim hat printable to get you started with ease! Just download, print and trim out!
So if your child is home on fall break and is already making you pull out your hair – stop what you are doing, grab some craft supplies and recreate this adorable Paper Plate Pilgrim Turkey with them. They will love it and you will love the piece of artwork you can display for all to see!
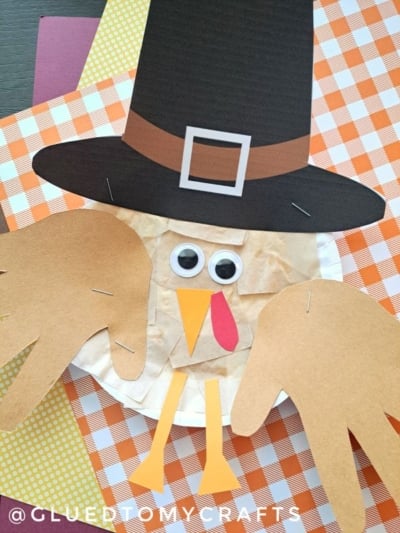
Did I also mention the turkey’s “feathers” are two handprint cutouts so it’s also a great keepsake element?! Oh so fun!
Now enough chit chat from me – I’ll let you get straight to it! Below is ALL you need to do to accomplish the easy paper plate turkey with a pilgrim hat craft with your child! I can’t wait to see what you all come up with, so be sure to share some pictures of the finished turkey art project on our Facebook page!
Happy crafting, my dear friends! I can’t wait to admire your pilgrim paper plate turkeys creations from a far! #gluedtomycrafts
RELATED: Pilgrim Puppet and Turkey Ballerinas


Perfect for kids or a fun afternoon craft activity – your Thanksgiving festivities won’t be complete without it.
Craft Supplies:
- Turkey Printable – on our landing page
- Cardstock Paper
- Scissors
- Black Marker
- Small Paper Plate
- Tan Tissue Paper
- School Glue
- Stapler
- Pen/Pencil
Directions:
- First print out our FREE pilgrim hat printable listed above. You only need one print per turkey craft. Print as many as you like!
- Now go ahead and trim out the pilgrim hat from the provided printable.
- Before you discard the excess white paper, cut out two small eyes for the turkey and color in the pupils with the black marker.
- Set all the paper piece aside.
- Now grab your tan tissue paper, school glue and a small paper plate.
- Cut a handful of small squares from the tan tissue paper.
- Put a few drizzles of school glue all over the small paper plate.
- Take the tissue paper squares and place them all over the paper plate, until it’s completely covered.
- Set it aside.
- Now grab all your colored sheets of paper.
- Trace both hands with the pencil on the brown cardstock.
- Trim out both traced handprints.
- Out of the remaining colored cardstock, cut out a nose, waddle, feet etc.
- Now we are ready to assemble our pilgrim turkey friend! Grab all your paper pieces, the tissue paper covered paper plate, the school glue and the stapler! We are on the final steps!
- To finish off the paper plate pilgrim turkey craft, staple and glue ALL the paper pieces in place. The hat goes on the top of his head and the handprint cutouts on the back for his feathers.
- Add any other embellishments you see fit! Maybe some glitter, holiday themed stickers – whatever you like!
- Then allow it to dry completely before you display it proudly for ALL to see!
- Don’t forget to share pictures with us when you are done crafting! You can tag us on Facebook or Instagram for easy sharing today! #gluedtomycrafts
RELATED —> Thumbprint Turkey Feather

So what fun Thanksgiving and turkey themed crafts are you making with your child this week?
Will it be today’s paper plate pilgrim turkey craft idea? Be sure to share with us in the comment section or come join us on our Facebook page! We LOVE hearing from you!!!
We also have our super popular Turkey Keepsake Poem, Pilgrim Hat and Indian Corn craft posts for you to check out {and recreate} today!

Paper Plate Pilgrim Turkey Craft
Here’s your checklist of supplies to bring this craft to life:
- School Glue
- Pen/Pencil
Prepare your creative haven by laying down a protective cover before the crafting magic begins!
Directions:
- First print out our provided printable, in color, on a single sheet of white cardstock paper. You only need one print per craft.
- Now go ahead and trim out the pilgrim hat from the provided printable.
- Before you discard the excess white paper, cut out two small eyes for the turkey and color in the pupils with the black marker.
- Set all the paper piece aside.
- Now grab your tan tissue paper, school glue and a small paper plate.
- Cut a handful of small squares from the tan tissue paper.
- Put a few drizzles of school glue all over the small paper plate.
- Take the tissue paper squares and place them all over the paper plate, until it's completely covered.
- Set it aside.
- Now grab all your colored sheets of paper.
- Trace both hands with the pencil on the brown cardstock.
- Trim out both traced handprints.
- Out of the remaining colored cardstock, cut out a nose, waddle, feet etc.
- Now we are ready to assemble our pilgrim turkey friend! Grab all your paper pieces, the tissue paper covered paper plate, the school glue and the stapler! We are on the final steps!
- To finish off the paper plate pilgrim turkey craft, staple and glue ALL the paper pieces in place. The hat goes on the top of his head and the handprint cutouts on the back for his feathers.
- Add any other embellishments you see fit! Maybe some glitter, holiday themed stickers - whatever you like!
- Then allow it to dry completely before you display it proudly for ALL to see!


NEED MORE HELP DOWNLOADING OUR FREE PRINTABLES? PLEASE REFER TO OUR FAQ PAGE