Glued To My Crafts

Join thousands of others who have gotten GLUED to our craft tutorials!

  • Home
  • Privacy Policy
  • Craft Safety Guidelines
  • Seasonal Themes
    • New Years
    • Valentine’s Day
    • St. Patrick’s Day
    • Spring
    • Easter
    • Mother’s Day
    • Summer
    • Father’s Day
    • Patriotic
    • Halloween
    • Thanksgiving
    • Fall
    • Winter
    • Christmas
    • Snowmen
    • Story Time
  • Favorite Craft Materials
    • Cupcake Liners
    • Torn Paper Crafts
    • Paper Plates
    • Popsicle Sticks
    • Sidewalk Chalk
    • Clothespin Crafts
    • Tulip Puffy Paint
    • Paper Bags
    • Craft Foam Hearts
    • Puffy Paint
  • About Us
  • Monthly Themes
    • January Craft Ideas
    • February Craft Ideas
    • March Craft Ideas
    • April Craft Ideas
    • May Craft Ideas
    • June Craft Ideas
    • July Craft Ideas
    • August Craft Ideas
    • September Crafts
    • October Crafts
    • November Crafts
    • December Crafts

Fall Butterfly Snack Bags – Perfect For The Classroom!

When engaging in craft activities, it is important for young children to have adult supervision at ALL times. It is also recommended to use supplies that are suitable for your child's age. Feel free to modify materials or steps to meet your specific requirements. Please refer to our safety guidelines for more information.

As an Amazon Associate I earn from qualifying purchases. This post may contain affiliate links. For more information, please see our disclosure policy.

Today’s Fall Butterfly Snack Bags DIY doesn’t require ANY extra crafty skills or elaborate supplies. PROMISE! My son even helped me in the making of these. So take note – this is great to get kids involved in the making, as well!

Fall Butterfly Snack Bags - Perfect For The Classroom!

Fall Butterfly Snack Bags – Perfect For The Classroom!

Today’s Fall Butterfly Snack Bags are such a great way to dress up a quick treat for the autumn season. Perfect for in the classroom during Halloween, Thanksgiving or any day during the upcoming autumn season!

These adorable and completely customizable butterfly snack baggies can be made in less than 5 minutes and with an array of dry finger foods. Think warm hues like golds, browns, yellows etc. Things like pretzels, cereal, candy corn, peanuts, Reese’s pieces and more. If you think your child will eat it – throw it in! I like including a little sweet and salty mixed together in ours. Remember – these snack bags can also be made on a budget if you buy in bulk!

These fall themed butterfly snack bags are sure to bring a smile to any child! Find all the crafty details below and recreate a few for those you love today!

And although I did mention these are perfect for in the classroom, wouldn’t this be fun as something you toss in your child’s {or spouse’s} lunch one day?! Just a thought! I bet ANY one would be surprised to receive one so don’t be afraid to think outside the box!

Happy crafting and gifting your butterfly themed snacks! If you don’t mind, I would love to see your snack bags in action. So be sure to snap a few pictures to share with me before you give them away. You can ALWAYS find us on Facebook or use our special branded #gluedtomycrafts for us to see on your social media sites.

RELATED —> Balloon Butterfly Cards

Fall Butterfly Snack Bags - Perfect For The Classroom!

Our butterfly-shaped bags are perfect for packing nutritious classroom bites and exciting treats!

Snack Supplies:

  • Large Wood Clothespins – 1 per snack bag
  • Black Marker
  • Gold Pipe Cleaners – 1 per snack bag
  • Small Resealable Plastic Baggies – 1 per snack bag
  • Large Bowl For Mixing
  • Dry Finger Foods

Directions:

  • To complete ONE butterfly treat – you will need ONE small sandwich baggie, ONE wooden clothespin and ONE pipe cleaner per snack bag.
  • First start, if you like, start off by decorating your wooden clothespin with some Sharpie markers or craft paint. I personally loved the nude look of my clothespin but you might want to add some color to his body.
  • Once done with that, go ahead and draw on some eyes onto the clothespin so your butterfly friend can see.
  • Set aside to let it dry completely.
  • Repeat for each “butterfly” you want to make per snack.
  • Now you are ready to assemble your treats.
  • Take all your dry ingredients and mix them together in a large bowl.
  • Now take a handful of your dry finger food mixture and place it in a plastic baggie {keep in mind, this is PER SNACK BAG} You don’t want it to be too full.
  • Seal it off, making sure to remove as much air as you can from the inside.
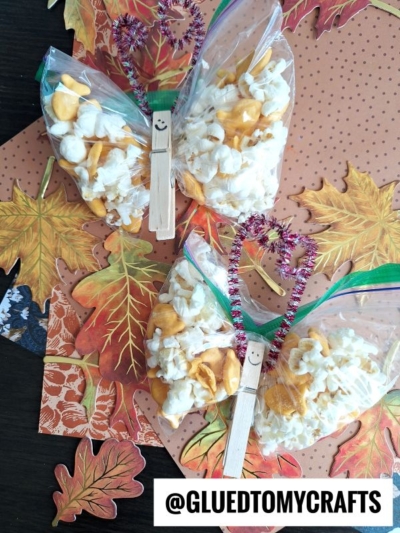
  • Next, using your finger, separate your mixture in two sections. {left/right – see my image for example}
  • Then start scrunching the center of the baggie, so you can “pinch” the clothespin in between. It will look like butterfly wings and/or a bow.
  • To finish off the fall snack baggie idea, bend/fold your gold pipe cleaner to make some antennas for your butterfly. Pinch those into the clothespin on the filled baggie as well.
  • Then give away to enjoy!
  • Don’t forget to snap a few pictures to share of your butterfly snacks with us! #gluedtomycrafts

RELATED —> Sidewalk Chalk Butterfly

Fall Butterfly Snack Bags - Perfect For The Classroom!

It’s better to give than receive! So don’t let the fun stop here!!!

Love this butterfly craft idea? We have tons of other crafty “gift ideas” that you can make and give away this fall season! Just check out our FALL GIFT TAG ROUNDUP post for fresh ideas to inspire you!!

stacey-signature-2023

Craft Activity Safety Guidelines:

Always Ensure Adult Supervision - Young children should be supervised at all times when engaging in craft activities. This is essential to keep them safe and ensure materials are used correctly. Use Age-Appropriate Supplies - Choose craft supplies that are suitable for your child’s age. Check labels for recommendations and avoid items with small parts or sharp edges for younger children. Modify as Needed - Feel free to adapt materials or steps to meet your child's abilities and safety needs. For example, substitute scissors with safety scissors if necessary. Keep an Eye on Allergies - Be mindful of potential allergens in craft materials like glue, paint, or certain fabrics. Opt for non-toxic and hypoallergenic options whenever possible. Organize and Secure Supplies - Keep all craft tools and materials organized. Store sharp objects, small parts, and potentially hazardous items out of reach when not in use. Following these guidelines will ensure that crafts remain fun, creative, and, most importantly, safe for everyone involved!


OUR PRIVACY POLICY

  • Email
  • Facebook
  • Instagram
  • Pinterest
  • Twitter
  • YouTube

LOOKING FOR SOMETHING?

EXPLORE OUR SITE:

© 2012–2025 Glued To My Crafts
All activities should be supervised by an adult at all times. Please refer to our safety guidelines for more information.


Please note that all the content of the website, including printables, are for classroom and personal use only. This means that any digital item you download from our site can be used for non-commercial use only. We kindly request that you do not reproduce or sell our creations. We appreciate your understanding and cooperation in respecting our content and intellectual property rights.