Let your little one become a fashion designer with this princess dress craft idea! There's even a free printable to get them started

Let your little one become a fashion designer with today’s Paper & Chalk Art Dress craft idea! There’s even a free dress top printable that you will find below, to get them started with ease!

Are you looking for a fun and creative activity to do with your kids? Look no further! In today’s fast-paced world, it can be hard for families to slow down and spend quality time together.
But creating something with our hands has always been a great way to bond and spark imagination. That’s why we’re excited to share this super unique paper and chalk dress craft idea that will not only keep your little ones entertained but also allows them to unleash their inner fashion designer.
So grab some craft supplies, gather the kids, and let’s get crafting with some sidewalk chalk and paper!

Get your kids creative with this fun and easy sidewalk chalk art dress craft idea! Just add some color and let their imagination run wild!
Craft Supplies:
- Free Dress Printable {grab it from our landing page}
- White Cardstock Paper
- Crayons, Pencils, Markers etc.
- Scissors
- Dark Colored Paper
- Sidewalk Chalk
- Baby Wipes
- Adhesive
Directions:
- First things first – grab our free dress printable, listed above in the supply list.
- Next, go ahead and find it on your computer, right click and print the file on a single sheet of white cardstock. One print will give you TWO dresses, so you will be able to do the craft TWICE today. Print as many as you like but only use our file for personal use only please.
- Now that you have the printable, go ahead and color in one of “tops” in the printable, however you like. Feel free to make it as elaborate as you like!
- When done coloring in the piece, use your craft scissors to trim it out.
- Set aside the leftover paper piece with the other dress top in it, so you can repeat the craft later!
- Now grab a single sheet of dark colored cardstock paper {think dark purple or a blue} and your choice of adhesive.
- Glue the colored in dress top to the top of the paper.
- Now grab your various pieces of colored chalk.
- Envision your dress.
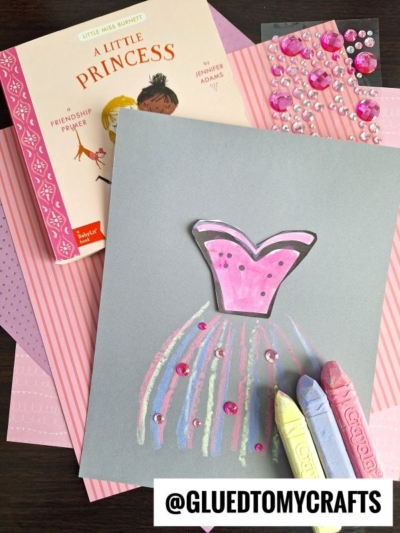
- Make several lines, going outward from the top piece {see our image for example} to make a dress bottom shape. Add as many lines and colors that you like to make it “puffy.” You want it to be nice and “full” so it looks like a dress.
- When done with the chalk, use baby wipes to clean off excess chalk from fingers and hands.
- Add any other embellishments you see fit {maybe some glitter or small rhinestone stickers!}
- Then display your custom one-of-a-kind paper dress piece proudly for all to see!
- Repeat the steps above, the same way, for the second dress piece leftover from earlier!
RELATED —> Popsicle Stick Ballerina
At Glued To My Crafts, we have a “knack” for stepping outside the traditional. It’s kind-of what we strive to do with our website.
So before you leave, if you enjoyed today’s sidewalk chalk art dress tutorial, be sure to also check out our popular Pool Party Unicorn, Handprint Princess Dress Keepsake and Paper Plate Llama craft posts! All three are super unique and sure to impress the crafty fingers that recreate them!

Paper and Chalk Dress Craft Idea For Kids
Let your little one become a fashion designer with this princess dress craft idea! There's even a free printable to get them started
Here’s your checklist of supplies to bring this craft to life:
Prepare your creative haven by laying down a protective cover before the crafting magic begins!
Directions:
- First print out our provided printable, in color, on a single sheet of white cardstock paper. You only need one print per craft.
- Now that you have the printable, go ahead and color in one of "tops" in the printable, however you like. Feel free to make it as elaborate as you like!
- When done coloring in the piece, use your craft scissors to trim it out.
- Set aside the leftover paper piece with the other dress top in it, so you can repeat the craft later!
- Now grab a single sheet of purple colored cardstock paper and your choice of adhesive.
- Glue the colored in dress top to the top of the paper.
- Now grab your various pieces of colored chalk.
- Envision your dress.
- Make several lines, going outward from the top piece {see our image for example} to make a dress bottom shape. Add as many lines and colors that you like to make it "puffy." You want it to be nice and "full" so it looks like a dress.
- When done with the chalk, use baby wipes to clean off excess chalk from fingers and hands.
- Add any other embellishments you see fit {maybe some glitter or small rhinestone stickers!}
- Then display your custom one-of-a-kind paper dress piece proudly for all to see!


NEED MORE HELP DOWNLOADING OUR FREE PRINTABLES? PLEASE REFER TO OUR FAQ PAGE
If you've enjoyed our content or have any thoughts to share, we'd love to hear from you! Mention @gluedtomycrafts or tag #gluedtomycrafts on Instagram!