The holiday season brings a wonderful opportunity to slow down, gather around the kitchen table, and make lasting memories with your family. Crafting together offers a fun, creative outlet that kids absolutely love. It also gives parents a chance to capture a moment in time. This paper and handprint angel keepsake craft serves as the perfect holiday activity to bring everyone together.
This beautiful project combines simple paper crafting with your child’s handprints to create a whimsical, child-friendly angel. The result is a stunning piece of textured art. You can hang it on the fridge, frame it for the living room, or gift it to loved ones. Grandparents especially cherish handprint crafts because they preserve the exact size of little hands during a specific holiday season.
Crafting Supplies You Need:
You likely already have many of these basic art supplies tucked away in your craft closet. Gather the following materials to get started:
- Light blue cardstock: This serves as the sturdy background for your angel.
- Beige or skin-toned paper: You need this to cut out a circle for the angel’s head.
- White printer paper or light cardstock: This will become the accordion-folded dress.
- Silver glitter cardstock: You will use this to trace and cut out the handprint wings.
- Gold tinsel pipe cleaners: These create the sparkling halo.
- Markers or crayons: Grab a few colors for drawing the face and hair.
- Festive stickers or die-cuts: Think foam snowflakes, little red glitter hearts, or small stars.
- Basic tools: You need standard school glue or a glue stick, clear tape, a pencil, and kid-friendly scissors.
Step-by-Step Handprint Angel Tutorial:
Set up your workspace by laying down some newspaper or a plastic tablecloth. This makes cleanup a breeze, especially when working with glittery materials.
Step 1: Prep the Angel’s Head
Start by grabbing your beige or skin-toned paper. Trace a circle roughly three inches in diameter onto the paper and cut it out. This serves as the blank canvas for your angel’s face.
Hand the circle over to your child and let them bring the angel to life. They can draw closed eyes with long eyelashes, a tiny nose, and pink lips. Use an orange or yellow marker to draw fun, whimsical hair around the top edge of the circle. Giving kids control over the facial features ensures every angel has its own unique, charming personality.
Step 2: Create the Sparkling Handprint Wings
This step creates the most important keepsake element of the craft. Take your silver glitter cardstock and flip it over to the smooth, non-glittery side. Have your child place their left hand flat on the paper, spreading their fingers slightly. Carefully trace around their hand with a pencil. Repeat this process with their right hand.
Use your scissors to cut out both handprints. These sparkling cutouts will act as the magnificent wings for your angel. If you do not have glitter paper, you can use plain grey or white cardstock and let your kids decorate the wings with glitter glue later.
Step 3: Fold the Accordion Paper Dress
Next, take a standard sheet of white paper and cut out a large triangle. Starting from the wide bottom base, fold the paper up about half an inch. Flip the triangle over and fold it back another half inch.
Continue this accordion fold all the way to the top point of the triangle. Once completely folded, gently pull the bottom edges apart to reveal a beautiful, textured, pleated dress. This folding technique provides excellent fine motor practice for growing hands.
Step 4: Craft the Golden Halo
Take one gold tinsel pipe cleaner and bend one end into a small circle, twisting it closed to secure the loop. Leave a straight “stem” extending down from the circle. This shape should resemble a bubble wand.
Tape the straight stem securely to the back of the angel’s head so the golden loop peeks out right above the drawn hair. The tinsel material adds a lovely three-dimensional shine to the project.
Step 5: Assemble Your Christmas Angel
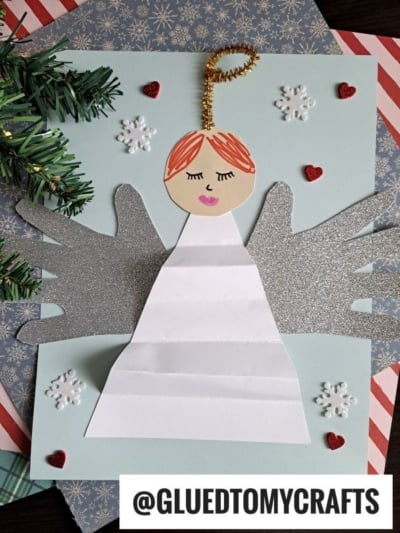
Now it is time to put all the pieces together. Take your light blue background cardstock. Glue the two silver handprints near the center of the page, ensuring the thumbs point upward and the fingers stretch outward.
Next, apply a generous amount of glue down the center of your accordion-folded white dress. Press it firmly over the center overlapping portion of the handprints. Finally, glue the decorated head right at the top point of the dress. Press down on all the pieces for a few seconds to ensure everything sticks firmly.
Step 6: Add Festive Background Details
To make the artwork pop, decorate the surrounding blue space. Let your kids glue small stickers all around the design and around the corners.
RELATED —> “A” is for Angel Ornament
Taking an hour out of your busy schedule to create this paper and handprint angel provides immense value. You get a delightful piece of holiday decor, a beautiful bonding experience, and a keepsake that freezes your child’s tiny handprints in time. Gather your supplies, clear off the table, and enjoy a wonderful afternoon of festive crafting together. Happy crafting, my friends!


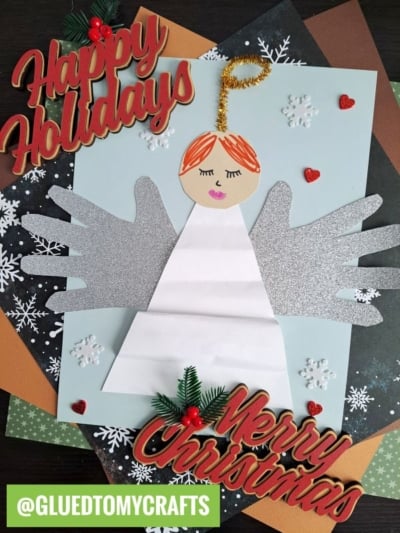
Paper and Handprint Angel Keepsake Craft for Kids
Here’s your checklist of supplies to bring this craft to life:
- Cardstock Paper
- Embellishments
- School Glue
Prepare your creative haven by laying down a protective cover before the crafting magic begins!
Directions:
- Start by grabbing your beige or skin-toned paper. Trace a circle roughly three inches in diameter onto the paper and cut it out. This serves as the blank canvas for your angel's face.
- Hand the circle over to your child and let them bring the angel to life. They can draw closed eyes with long eyelashes, a tiny nose, and pink lips. Use an orange or yellow marker to draw fun, whimsical hair around the top edge of the circle. Giving kids control over the facial features ensures every angel has its own unique, charming personality.
- This step creates the most important keepsake element of the craft. Take your silver glitter cardstock and flip it over to the smooth, non-glittery side. Have your child place their left hand flat on the paper, spreading their fingers slightly. Carefully trace around their hand with a pencil. Repeat this process with their right hand.
- Use your scissors to cut out both handprints. These sparkling cutouts will act as the magnificent wings for your angel. If you do not have glitter paper, you can use plain grey or white cardstock and let your kids decorate the wings with glitter glue later.
- Next, take a standard sheet of white paper and cut out a large triangle. Starting from the wide bottom base, fold the paper up about half an inch. Flip the triangle over and fold it back another half inch.
- Continue this accordion fold all the way to the top point of the triangle. Once completely folded, gently pull the bottom edges apart to reveal a beautiful, textured, pleated dress. This folding technique provides excellent fine motor practice for growing hands.
- Take one gold tinsel pipe cleaner and bend one end into a small circle, twisting it closed to secure the loop. Leave a straight "stem" extending down from the circle. This shape should resemble a bubble wand.
- Tape the straight stem securely to the back of the angel's head so the golden loop peeks out right above the drawn hair. The tinsel material adds a lovely three-dimensional shine to the project.
- Now it is time to put all the pieces together. Take your light blue background cardstock. Glue the two silver handprints near the center of the page, ensuring the thumbs point upward and the fingers stretch outward.
- Next, apply a generous amount of glue down the center of your accordion-folded white dress. Press it firmly over the center overlapping portion of the handprints. Finally, glue the decorated head right at the top point of the dress. Press down on all the pieces for a few seconds to ensure everything sticks firmly.
- To make the artwork pop, decorate the surrounding blue space. Let your kids glue small stickers all around the design and around the corners.
CLICK HERE TO PRINT THE DIRECTIONS FOR THIS CRAFT