
Did you happen to catch my Paper Plate Hen Monster Truck craft tutorial from the other day?!
Well… we are continuing the fun of that particular “monstrous” idea and making a BUNNY version to pair right along side the other!
Our Paper Plate Bunny Monster Truck kid craft idea only requires a few simple supplies but the craftiness you will endear will CRUSH anything else you have ever seen before!

Paper Plate Easter Monster Truck
My dear friends – you are absolutely going to have a SMASHIN’ good time with your child, when you recreate our latest and greatest paper craft tutorial! It’s a TRIPLE THREAT! It’s got easy supplies, steps AND a personalized element too!
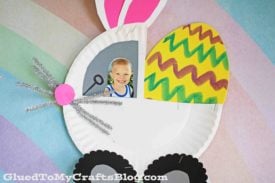
I’ve taken a few of my son’s favorite things and made a PAPER MONSTER TRUCK BUNNY craft tutorial that I’m super excited to be sharing on Glued To My Crafts right now. Hopefully you see my vision in this idea as well. There’s even an foam Easter egg cutout in the back of the truck to pull the “theme” nicely together.
Keep scrolling to see how I made this Paper Plate Bunny Monster Truck come to life with only a few paper pieces and tons of creativity! I even included a picture of my son in the front driver seat for a special touch!
So let’s get ready to have a MONSTER-IFIC time and create some WHEELIE AWESOME pieces together! Don’t forget to share pictures with me! You can tag us on Instagram for easy sharing! Happy crafting, my friends! #gluedtomycrafts
RELATED —> Footprint Monster Truck

You are absolutely going to have a SMASHIN’ good time with your child, when you recreate our latest Paper Plate Bunny Monster Truck craft!
Craft Supplies:
- Large Paper Plate – 1 per craft
- Scissors
- Cardstock Paper
- Glue Stick or School Glue
- Stapler
- Silver Pipe Cleaners
- Large Scallop Paper Punch
- Large Circle Paper Punch
- Large Egg Shape
Directions:
- First things first – envision your paper plate like a pie.
- Cut off a small triangular section from your paper plate, to give a more defined look of the bed of the truck and it’s cab.
- Discard the small piece you just cut off.
- Set aside the large paper plate piece.
- Next up – grab all your paper pieces, paper punches and your scissors.
- Cut out a bunny nose, long ears, large wheels, window, and anything else you can think of to decorate your monster truck.
- Now go ahead and staple and/or use the glue stick to secure them in the designated spots on the paper plate piece you made earlier.
- Take the TWO silver pipe cleaners and cut them in half, before twisting together and stapling to the paper plate to make whiskers.
- When everything is in place, grab the craft foam egg shape, decorate it and staple it to the back of the monster truck, so it looks like it’s being taken for a ride.
- Don’t forget to either draw or add your child’s picture in the window/front seat of the truck!
- Finally – if desired, add anything else you like for that custom look, before displaying proudly for all to see!
RELATED —> Popsicle Stick Valentine Love Truck

Why let the crafty fun stop here?! If you are a new visitor of ours – welcome to our website!
One thing you should know about us, is that we really strive at Glued To My Crafts to stand out from the crowd. Take for example our Easter Bunny Truck, Hatching Baby Dinosaur and Peeking Easter Bunny craft posts!
All of which are super easy {just like today’s paper plate monster truck craft post} and a little outside the box from the norm! Now go ahead and check them out to be inspired! They won’t disappoint!

Paper Plate Bunny Monster Truck Craft
Here’s your checklist of supplies to bring this craft to life:
Prepare your creative haven by laying down a protective cover before the crafting magic begins!
Directions:
- First things first - envision your paper plate like a pie. Cut off a small triangular section from your paper plate, to give a more defined look of the bed of the truck and it's cab.
- Discard the small piece you just cut off.
- Set aside the larger paper plate piece for now.
- Next up - grab all your paper pieces, paper punches and your scissors.
- Cut out a bunny nose, long ears, large wheels, window, and anything else you can think of to decorate your monster truck.
- Now go ahead and staple and/or use the glue stick to secure them in the designated spots on the paper plate piece you made earlier.
- Take the TWO silver pipe cleaners and cut them in half, before twisting together and stapling to the paper plate to make whiskers.
- When everything is in place, grab the craft foam egg shape, decorate it and staple it to the back of the monster truck, so it looks like it's being taken for a ride.
- Don't forget to either draw or add your child's picture in the window/front seat of the truck!
- Finally - if desired, add anything else you like for that custom look, before displaying proudly for all to see!

CLICK HERE TO PRINT THE DIRECTIONS FOR THIS CRAFT