Spring represents new beginnings, blooming flowers, and baby animals. It is the perfect time to engage young children with bright colors and creative textures. If you are looking for a project that combines sensory play, fine motor skill development, and an adorable keepsake, this torn paper baby chick craft is the answer.
This project is specifically designed for toddlers and preschoolers. It moves away from the pressure of “perfect” cutting lines and embraces the chaotic fun of tearing paper. The addition of handprint wings turns a simple art project into a memorable snapshot of how small your child’s hands are right now.
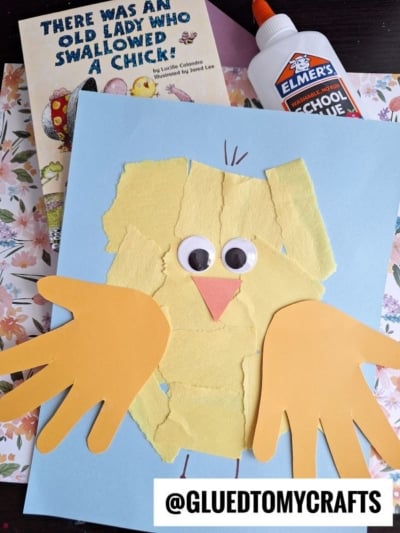
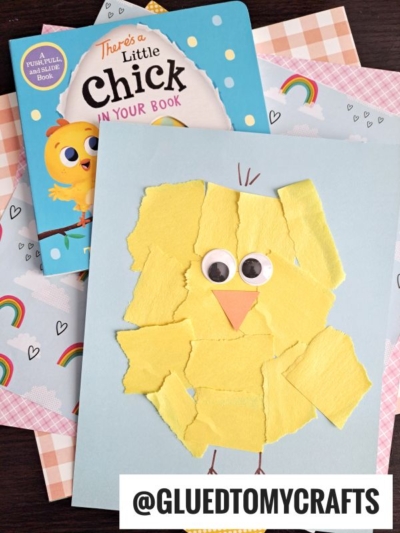
We love pairing this activity with story time. It works wonderfully as a companion to the beloved children’s book, “There Was an Old Lady Who Swallowed a Chick!” by Lucille Colandro. You can read the story together, laugh at the silly rhymes, and then head to the craft table to bring the main character to life.
Materials Needed
Gather these simple supplies before you invite the kids to the table. You likely have most of these in your craft drawer already.
- Construction Paper: You will need bright yellow for the chick, orange for the beak and wings, and a contrasting color for the background (light blue or purple works well).
- School Glue: A bottle of liquid school glue is best for this project, though glue sticks can work for older children who have more patience.
- Scissors: For the adult to cut out the handprints.
- Pencil: To trace the child’s hands.
- Googly Eyes: Large or medium sizes look best.
- Black Marker: To draw the legs and hair.
- Paper Plate or Bowl: Useful for holding the torn paper pieces.
Step-by-Step Instructions
Follow this guide to create your own fuzzy, yellow friend. Remember, the beauty of this craft lies in the imperfections, so let your child lead the way!
1. Trace and Cut the Wings
Start by tracing your child’s hands on the orange construction paper. Use a pencil to trace around their fingers while they hold their hand still. You need two handprints – one for each wing.
Once traced, cut these out carefully with scissors. If your child is older and comfortable with scissors, they can help with this step. Set these aside for later.
2. Prepare the “Feathers”
This is the fun part! Hand your child a few sheets of yellow construction paper. Demonstrate how to tear the paper into small strips and then into squares or irregular shapes. Aim for pieces that are roughly one inch in size.
Encourage them to tear enough paper to fill a cereal bowl. This creates a dedicated “supply station” and keeps the pieces from scattering all over the floor.
3. Create the Chick’s Shape
Take your background paper (we recommend light blue). You can lightly draw a large circle or oval in the center with a pencil to guide your child, or you can let them free-style the shape.
Instruct your child to apply glue to a small section of the background paper. It is often easier to put the glue on the background rather than on each tiny piece of yellow paper.
4. Layer the Paper
Have your child stick the torn yellow pieces onto the glue. Encourage them to overlap the pieces slightly so no blue background shows through the chick’s body. The rough, torn edges will mimic the texture of fluffy down feathers. Continue this process until you have a nice, round yellow body.
5. Attach the Handprint Wings
Once the yellow body is complete and slightly dry, it is time to add the wings. Take the orange handprint cutouts you prepared earlier. Glue one handprint on the left side of the body and one on the right.
Position them so the fingers point outward and slightly upward, looking like flapping wings. The thumbs should point upward or tuck behind the body depending on the look you prefer.
6. Add the Face
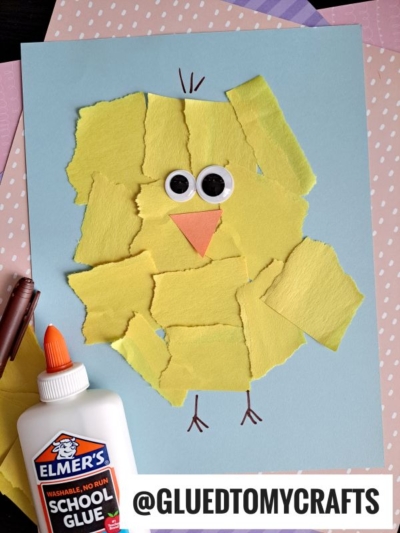
Glue two googly eyes near the top center of the yellow body.
Next, cut a small triangle or diamond shape out of the remaining orange paper for the beak. Glue this just below the eyes.
7. Draw the Details
Using the black marker, draw two stick legs at the bottom of the chick. You can add little feet (three lines) at the bottom of each leg.
Finally, draw a few wispy lines at the very top of the chick’s head to represent those cute tufts of baby feathers.
RELATED —> Popsicle Stick Easter Friends Craft Idea
This Torn Paper Baby Chick is more than just a cute decoration for your fridge. It is a developmental exercise disguised as messy fun. Whether you are celebrating Easter, learning about farm animals, or just enjoying a rainy afternoon indoors, this craft brings bright colors and smiles to your day.
We would love to see your flock of chicks! If you try this craft, pin it to your favorite board or share your creation with us. Grab your glue, get tearing, and make some memories!


Torn Paper Baby Chick Craft with Handprint Wings
Here’s your checklist of supplies to bring this craft to life:
Prepare your creative haven by laying down a protective cover before the crafting magic begins!
Directions:
- Start by tracing your child’s hands on the orange construction paper. Use a pencil to trace around their fingers while they hold their hand still. You need two handprints - one for each wing.
- Once traced, cut these out carefully with scissors. If your child is older and comfortable with scissors, they can help with this step. Set these aside for later.
- This is the fun part! Hand your child a few sheets of yellow construction paper. Demonstrate how to tear the paper into small strips and then into squares or irregular shapes. Aim for pieces that are roughly one inch in size.
- Encourage them to tear enough paper to fill a cereal bowl. This creates a dedicated "supply station" and keeps the pieces from scattering all over the floor.
- Take your background paper (we recommend light blue). You can lightly draw a large circle or oval in the center with a pencil to guide your child, or you can let them free-style the shape.
- Instruct your child to apply glue to a small section of the background paper. It is often easier to put the glue on the background rather than on each tiny piece of yellow paper.
- Have your child stick the torn yellow pieces onto the glue. Encourage them to overlap the pieces slightly so no blue background shows through the chick's body. The rough, torn edges will mimic the texture of fluffy down feathers. Continue this process until you have a nice, round yellow body.
- Once the yellow body is complete and slightly dry, it is time to add the wings. Take the orange handprint cutouts you prepared earlier. Glue one handprint on the left side of the body and one on the right.
- Position them so the fingers point outward and slightly upward, looking like flapping wings. The thumbs should point upward or tuck behind the body depending on the look you prefer.
- Glue two googly eyes near the top center of the yellow body.
- Next, cut a small triangle or diamond shape out of the remaining orange paper for the beak. Glue this just below the eyes.
- Using the black marker, draw two stick legs at the bottom of the chick. You can add little feet (three lines) at the bottom of each leg.
- Finally, draw a few wispy lines at the very top of the chick’s head to represent those cute tufts of baby feathers.
Grab our favorite books via our Amazon affiliate link! In our Amazon storefront you will find books, toys and craft supplies we absolutely love using for our Glued To My Crafts tutorials!