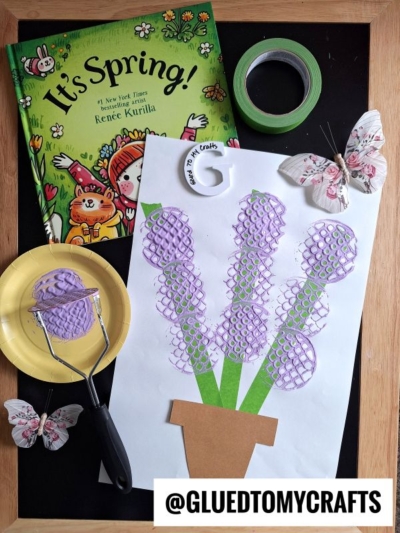
Spring is the perfect time to bring bright colors and blooming flowers into your home or classroom. If you want a fun, hands-on art project for the kids, this potato masher stamped hydrangea craft is a fantastic choice.
Instead of traditional paintbrushes, we use a common kitchen tool—a potato masher—to create the beautiful, textured petals of a hydrangea flower. It is simple enough for toddlers and preschoolers, but older kids will love the unique stamping technique too. Plus, you probably already have most of the supplies in your house!
What You Need
Here are the supplies you need to create this bright spring craft:
- White heavy cardstock or thick construction paper
- Purple craft paint (lavender or light purple works great)
- A small paper plate
- A metal potato masher (one with a grid or zig-zag pattern)
- Green painter’s tape
- Brown construction paper
- Scissors
- Glue stick
Step-by-Step Instructions
Follow these easy steps to build your beautiful spring hydrangeas.
Step 1: Create the Stems
Grab your green painter’s tape and tear off three strips of varying lengths. Stick these vertically onto your white cardstock. These strips serve as the long, vibrant stems for your hydrangeas.
Step 2: Add the Flower Pot
Cut a small flower pot shape out of your brown construction paper. Use your glue stick to attach it to the bottom of the white paper, right over the bottom edges of the green tape stems.
Step 3: Prep Your Paint Station
Squeeze a generous amount of purple paint onto your paper plate. You want a puddle large enough to easily dip the entire base of your potato masher.
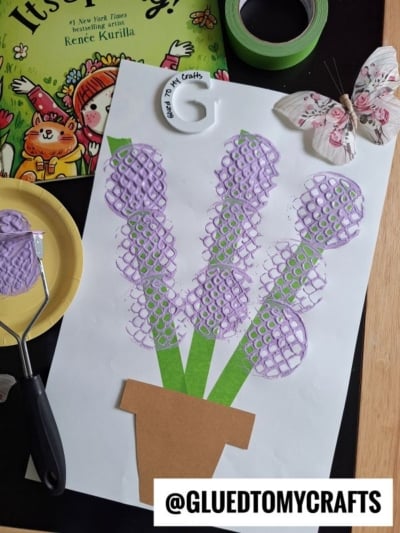
Step 4: Stamp the Hydrangea Flowers
Now for the best part! Have your child dip the flat end of the potato masher into the purple paint. Make sure the grid is evenly coated. Then, press the masher firmly onto the top of each green tape stem. Lift the masher straight up to reveal a beautiful, textured pattern that looks just like a cluster of hydrangea petals. You can stamp a few times around each stem to make the flower heads look full and fluffy.
Step 5: Let It Dry and Display
Once you finish stamping, set the artwork aside to dry completely. When the paint is dry, proudly display your child’s spring masterpiece on the fridge or classroom bulletin board!
RELATED —> Potato Masher Stamped Bunny Craft Idea
We hope you feel inspired to recreate this craft today! Whether you’re a parent looking for a creative afternoon at the kitchen table, a teacher hoping to brighten up your classroom with handmade spring flowers, or a caregiver searching for an easy activity, this project is sure to bring smiles and beautiful results.
Don’t be afraid to experiment with colors or add your own artistic touches – every hydrangea will come out unique! Gather your supplies, let your creativity bloom, and enjoy making happy memories along the way. Happy crafting!


Potato Masher Stamped Hydrangea Plant Craft Idea For Spring
Here’s your checklist of supplies to bring this craft to life:
- Cardstock Paper
- Craft Paint
- Painter's Tape
- Embellishments
Prepare your creative haven by laying down a protective cover before the crafting magic begins!
Directions:
- Grab your green painter's tape and tear off three strips of varying lengths. Stick these vertically onto your white cardstock. These strips serve as the long, vibrant stems for your hydrangeas.
- Cut a small flower pot shape out of your brown construction paper. Use your glue stick to attach it to the bottom of the white paper, right over the bottom edges of the green tape stems.
- Squeeze a generous amount of purple paint onto your paper plate. You want a puddle large enough to easily dip the entire base of your potato masher.
- Now for the best part! Have your child dip the flat end of the potato masher into the purple paint. Make sure the grid is evenly coated. Then, press the masher firmly onto the top of each green tape stem. Lift the masher straight up to reveal a beautiful, textured pattern that looks just like a cluster of hydrangea petals. You can stamp a few times around each stem to make the flower heads look full and fluffy.
- Once you finish stamping, set the artwork aside to dry completely. When the paint is dry, proudly display your child's spring masterpiece on the fridge or classroom bulletin board!
CLICK HERE TO PRINT THE DIRECTIONS FOR THIS CRAFT