Welcome the beauty of spring into your home with a fun and simple craft project! This potato masher dandelion stamp activity is perfect for a creative afternoon with the family.
Using just a few common household items, you can create a beautiful piece of art that captures the whimsical spirit of the season. Let’s gather our supplies and start stamping!
Materials You Will Need
Before you begin, gather these simple supplies. You likely have most of them at home already!
- Paper: A sheet of sturdy paper, like cardstock or construction paper.
- White Craft Paint: Any non-toxic, washable acrylic or tempera paint will work perfectly.
- Potato Masher: A masher with a grid or circular pattern works best for creating the classic dandelion look.
- Green Painter’s Tape: This will be used to create the dandelion stems. You could also use green washi tape or even cut strips of green paper.
- Paper Plate: To hold your paint for easy dipping.
Step-by-Step Stamping Instructions
Follow these easy steps to create your field of dandelions.
Step 1: Prepare Your Stamping Station
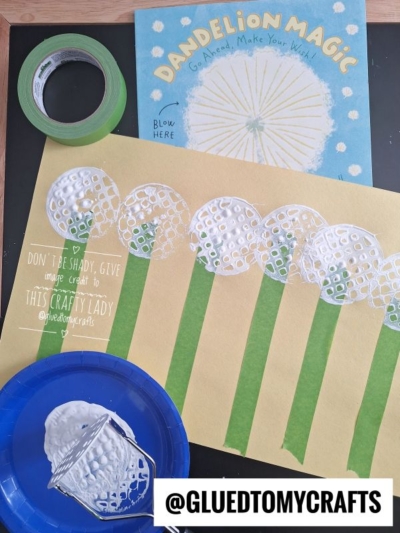
First, set up your crafting area. Lay down some newspaper or a plastic tablecloth to protect your surface from any paint splatters. Squeeze a generous amount of white craft paint onto your paper plate, spreading it out slightly to create an even surface for dipping your potato masher. Place your sheet of paper in the center of your workspace.
Step 2: Stamp the Dandelion Heads
Now for the fun part! Take your potato masher and dip it straight down into the white paint on the paper plate. Make sure the entire surface of the masher is coated evenly, but not dripping with excess paint.
Carefully position the masher over your paper and press down firmly to stamp a white circle. Lift the masher straight up to reveal your first dandelion head! You’ll see a beautiful, textured pattern that looks just like a fluffy dandelion. Repeat this process, stamping as many dandelions as you like across your paper. Feel free to reload the masher with paint for each stamp to keep the impressions bold and clear.
Step 3: Add the Dandelion Stems
Once your white dandelion heads are stamped, it’s time to give them stems. Take your green painter’s tape and tear off strips of various lengths. You don’t need scissors; the torn edges add a rustic, natural look to the stems.
Carefully place one end of a tape strip at the base of a white dandelion stamp and press it down onto the paper, creating a straight line for the stem. Continue adding tape stems for each dandelion you stamped. You can make them all straight or place them at slight angles to create the look of a natural field.
Step 4: Let It Dry and Add Finishing Touches
Allow your artwork to dry completely. The paint and tape should be fully set before you handle it. This usually takes about 30 minutes to an hour, depending on how much paint you used.
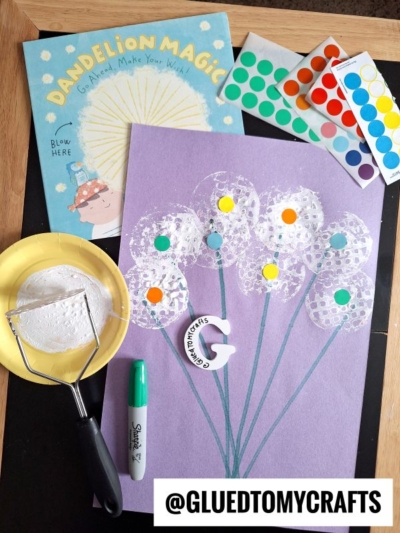
Once dry, your beautiful dandelion craft is complete! You can take it a step further by using a black marker to draw tiny dots or star shapes blowing away from one of the dandelions, as if someone has just made a wish. This adds a magical touch to your creation.
RELATED —> Thumbprint Flower – I’d Pick You Craft
This potato masher dandelion craft is a simple, joyful way to celebrate spring. It encourages creativity and results in a piece of art you can be proud of. So, grab your supplies and get ready to stamp your way to a beautiful field of wishes! Happy crafting, my friends!

Potato Masher Stamped Dandelion Craft Idea For Spring
Here’s your checklist of supplies to bring this craft to life:
- Cardstock Paper
- Craft Paint
- Painter's Tape
- Embellishments
- School Glue
Prepare your creative haven by laying down a protective cover before the crafting magic begins!
Directions:
- First, set up your crafting area. Lay down some newspaper or a plastic tablecloth to protect your surface from any paint splatters. Squeeze a generous amount of white craft paint onto your paper plate, spreading it out slightly to create an even surface for dipping your potato masher. Place your sheet of paper in the center of your workspace.
- Now for the fun part! Take your potato masher and dip it straight down into the white paint on the paper plate. Make sure the entire surface of the masher is coated evenly, but not dripping with excess paint.
- Carefully position the masher over your paper and press down firmly to stamp a white circle. Lift the masher straight up to reveal your first dandelion head! You’ll see a beautiful, textured pattern that looks just like a fluffy dandelion. Repeat this process, stamping as many dandelions as you like across your paper. Feel free to reload the masher with paint for each stamp to keep the impressions bold and clear.
- Once your white dandelion heads are stamped, it’s time to give them stems. Take your green painter's tape and tear off strips of various lengths. You don’t need scissors; the torn edges add a rustic, natural look to the stems.
- Carefully place one end of a tape strip at the base of a white dandelion stamp and press it down onto the paper, creating a straight line for the stem. Continue adding tape stems for each dandelion you stamped. You can make them all straight or place them at slight angles to create the look of a natural field.
- Allow your artwork to dry completely. The paint and tape should be fully set before you handle it. This usually takes about 30 minutes to an hour, depending on how much paint you used.
- Once dry, your beautiful dandelion craft is complete! You can take it a step further by using a black marker to draw tiny dots or star shapes blowing away from one of the dandelions, as if someone has just made a wish. This adds a magical touch to your creation.
CLICK HERE TO PRINT THE DIRECTIONS FOR THIS CRAFT