
Gnomes have taken over the holidays, and we couldn’t be happier about it. These cheerful little guys with their tall hats and hidden faces are adorable, and they’re even more fun when kids make them by hand.
This Christmas tree gnome is a sweet mix of two holiday favorites. His bushy beard doubles as a twinkling tree, stamped with nothing fancier than an empty toilet paper roll. Add a pointy hat, a sparkly gold nose, and a pair of tiny boots, and you’ve got a festive buddy that’s ready to hang on the fridge, tuck into a card, or nestle in the branches of your tree.
It’s a simple, low-mess project that works well at the kitchen table, in a classroom, or during a holiday party. Kids get to paint, cut, glue, and decorate, all in one go.
Craft Supplies:
- Cardstock paper (one sheet per gnome)
- Scrapbook paper (for the hat)
- Gold glitter paper
- Black paper
- Green paint (washable acrylic or tempera works well)
- An empty toilet paper roll
- A paper plate
- Red rhinestone stickers or gems
- Scissors
- Glue (a glue stick for paper and craft glue for gems)
Directions:
Step 1: Cut the Gnome Hat
Start with the star of the show: the hat. On the back of your scrapbook paper, draw a tall, skinny triangle. Cut it out along the lines. Older kids can handle this on their own, while younger crafters may need a grown-up to cut or to draw the lines nice and bold so they can follow along.
Tip: A taller, narrower hat gives your gnome that classic, whimsical look.
Step 2: Make the Gold Glitter Nose
Every gnome needs a big, round nose peeking out from under his hat. Cut a small oval from the gold glitter paper. It should be wider than it is tall, about the size of a large grape.
Set it aside for now. You’ll add it once the hat is in place.
Step 3: Stamp the Christmas Tree Body
Now for the fun part! Squeeze a small puddle of green paint onto your paper plate. Spread it out a little so it’s thin and even. Too much paint can make the circles blobby.
Hold the toilet paper roll upright, dip one end into the paint, and press it straight down onto the gray cardstock. Lift it straight up to reveal a perfect green circle.
Build the tree shape like this:
- Start near the top. Leave space at the top of the cardstock for the hat. Stamp one or two circles just below where the hat will go.
- Widen as you go down. Add a few more circles in each row, letting them overlap.
- Finish with the widest row at the bottom. This creates the classic triangle shape of a Christmas tree, which also looks like a full, fluffy gnome beard.
Re-dip the roll every one or two stamps to keep the color bold. Don’t worry about perfect rows, though. Overlapping circles give the tree a bushy, layered look.
Let the paint dry completely before moving on. This usually takes 10 to 15 minutes.
Step 4: Cut the Black Paper Boots
While the paint dries, make the gnome’s boots. Cut two small “L” shapes from the black paper. Each one should look like a little boot with a toe pointing out.
Flip one boot so the toes point in opposite directions. This makes your gnome look like he’s standing with his feet turned out, ready to dance.
Step 5: Assemble Your Gnome
Once the paint is dry, it’s time to bring your gnome together on the decorated cardstock paper.
- Add the hat. Glue the triangle at the top so its bottom edge slightly overlaps the first row of green circles.
- Place the nose. Glue the gold glitter oval just under the center of the hat’s bottom edge, right on top of the green “beard.”
- Attach the boots. Glue the black boots at the bottom of the tree, one on each side, with the toes pointing outward.
Press each piece down firmly so it stays put.
Step 6: Add the Red Rhinestone Ornaments
The final touch turns this gnome into a true Christmas tree. Stick the red rhinestones across the green circles like shiny ornaments. Scatter them all over, or arrange them in rows like a garland.
If you’re using loose gems instead of stickers, add a tiny dot of craft glue to the back of each one. Little ones can use a fingertip or a cotton swab to help place the gems.
Let everything dry, and your Christmas tree gnome is ready to show off!
RELATED —> Popsicle Stick Santa Boot Ornament Craft Idea
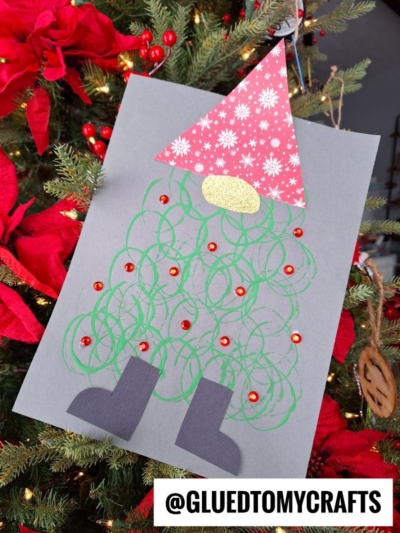

We love seeing what little hands create. Snap a photo of your finished Christmas tree gnome and share it by tagging us on social media. Whether your gnome has a crooked hat, extra ornaments, or a nose that’s slightly off-center, it’s sure to bring a smile.
Happy crafting, and may your holidays be filled with glue, glitter, and plenty of gnome-made joy!
