Glued To My Crafts

Join thousands of others who have gotten GLUED to our craft tutorials!

  • Home
  • About Us
  • Safety Guidelines
  • Seasonal Crafts
    • New Years
    • Valentine’s Day
    • St. Patrick’s Day
    • Spring
    • Easter
    • Mother’s Day
    • Summer
    • Father’s Day
    • Patriotic
    • Halloween
    • Thanksgiving
    • Fall
    • Winter
    • Christmas
    • Snowmen
    • Story Time
  • Monthly Themes
    • January Craft Ideas
    • February Craft Ideas
    • March Craft Ideas
    • April Craft Ideas
    • May Craft Ideas
    • June Craft Ideas
    • July Craft Ideas
    • August Craft Ideas
    • September Crafts
    • October Crafts
    • November Crafts
    • December Crafts
  • Amazon Storefront
  • Privacy Policy

Toilet Paper Roll Stamped Christmas Lights Craft Idea

When engaging in craft activities, it is important for young children to have adult supervision at ALL times. It is also recommended to use supplies that are suitable for your child's age. Feel free to modify materials or steps to meet your specific requirements. Please refer to our safety guidelines for more information.

As an Amazon Associate I earn from qualifying purchases. This post may contain affiliate links. Glued To My Crafts is independent and not affiliated with or endorsed by the publishers of the books featured on our website. For more information, please see our disclosure policy.

UPDATE FOR 2026 - To reduce storage costs and download fees, we recently made some changes to our website. The password for all our files this year is GLUEDTOMYCRAFTS2026. No sign-up is required to download our free printables! You can enjoy our printables without creating an account or paying for Box.com. Simply follow the download instructions on our FAQ PAGE.

Toilet Paper Roll Stamped Christmas Lights

Strings of twinkling lights are one of the best parts of the holiday season. They wrap around trees, frame front porches, and make every room feel a little more magical. Now your kids can make their own glowing strands, and all it takes is paint, paper, and a few empty toilet paper rolls you were about to toss.

This craft is simple, budget-friendly, and great for little hands. The secret is a gentle pinch that turns a round cardboard tube into a perfect bulb-shaped stamp. Kids love watching their colorful “lights” appear with every press, and the finished artwork looks bright enough to hang on the fridge all December long.

It works well at the kitchen table, in a classroom, or during a cozy afternoon at home. Let’s get stamping!

Craft Supplies:

Gather these supplies before you begin:

  • Construction paper in black or white
  • Markers in gold or black (a metallic gold marker looks stunning on black paper)
  • Tempera or acrylic paint in red, yellow and green
  • A paper plate to hold your paint
  • Empty toilet paper rolls (one per paint color works best)
  • Optional: paper towels, a smock, and newspaper or a plastic tablecloth to protect your work surface

Directions:

Step 1: Draw Your Light Strings

Lay your construction paper flat. Use a marker to draw looping lines across the page, from one side to the other. These lines become the wires that hold your Christmas lights.

Make the loops gentle and wavy, like a strand of lights draped across a mantel. Two to four strings per page give you plenty of room for stamping without crowding.

Step 2: Set Up Your Paint Station

Squeeze a small dollop of red, yellow and green paint onto the paper plate. Keep the colors separated so they stay bright and clean. A thin, even layer works better than a big puddle, since too much paint can blur your bulb shapes.

Step 3: Pinch the Tube Into a Bulb Shape

Grab an empty toilet paper roll. Gently squeeze one end between your fingers so the circle bends into an oval with slightly pointed ends, a bit like an almond or a leaf. That shape is your light bulb!

Don’t press too hard. You want a soft bend, not a flat fold. If the tube springs back, give it another light pinch to help it hold its shape.

Step 4: Dip in Paint

Dip the pinched end of the tube into one paint color. Press down lightly and wiggle it just a little so the whole rim gets coated. Lift it straight up and check that the edge is covered all the way around.

Step 5: Stamp Your Bulbs Along the String

Now for the fun part. Press the painted end of the tube onto the paper, right along one of your marker lines. Hold it for a second, then lift it straight up. You’ll see a colorful oval outline that looks just like a Christmas bulb.

Keep stamping along the string, leaving a little space between each bulb. Switch between red, orange, and green to create a festive pattern. Using a separate tube for each color keeps the paint from mixing.

Tip: Tilt the stamp slightly in different directions so the bulbs hang at playful angles, just like real lights on a strand.

Step 6: Let It Dry

Set your artwork somewhere flat to dry. Tempera paint usually dries in 15 to 30 minutes, while acrylic may take a little longer. Once dry, your twinkly masterpiece is ready to display.

RELATED —> Fingerprint Christmas Lights & String Height Ornament
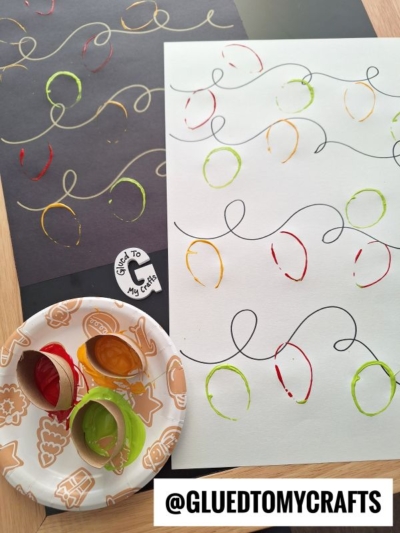
Two sheets of paper featuring hand-drawn loops with colorful stamped paint lightbulbs, next to a paper plate with toilet paper rolls dipped in red, orange, and green paint.

That’s all it takes to turn a simple cardboard tube into a merry and bright work of art. Each stamped strand is one of a kind, and kids feel proud seeing their lights come to life with every press.

We’d love to see how your holiday lights turned out! Snap a photo of your finished artwork and share it on social media. Tag @gluedtomycrafts so we can cheer on your little artists and spread some holiday sparkle together.

Happy crafting, and may your holidays be merry and bright!

A blue text on a white background, perfect for creating a charming the places you'll go keepsake.


OUR PRIVACY POLICY

OUR COPYRIGHT POLICY

  • Email
  • Facebook
  • Instagram
  • Pinterest
  • Twitter
  • YouTube

Love our crafts?

Follow us on Google

Click & check the box to see us more in your search results!

LOOKING FOR SOMETHING?

EXPLORE OUR SITE:

© 2012–2026 Glued To My Crafts

© All Rights Reserved. All images, artwork, and visual materials contained herein are the exclusive property of the copyright holder and are protected under applicable copyright laws and international treaties. No individual, entity, or organization is authorized to reproduce, distribute, or use any of these images in any manner without express written consent from the copyright holder. The following actions are strictly prohibited: copying, pasting, saving, screenshotting, downloading, or otherwise distributing any images, in whole or in part, by any means or method. Furthermore, it is strictly forbidden to input, upload, submit, or process any of these images through any artificial intelligence system, generative model, machine learning algorithm, neural network, or similar technology for the purpose of creating derivative, modified, reproduced, or newly generated works of any kind. Any output, image, or material generated by artificial intelligence or comparable technology that is derived from, trained upon, or based in any way on these images is likewise subject to this prohibition. Claiming, presenting, or asserting any such AI-generated output as one's own original work is expressly prohibited and constitutes a violation of the copyright holder's rights. Any unauthorized use, reproduction, or exploitation of these images, whether by human or automated means, constitutes copyright infringement. Infringement may result in legal action, including but not limited to claims for damages, injunctive relief, and recovery of legal costs. All rights not expressly granted herein are reserved.

All activities should be supervised by an adult at all times. Please refer to our safety guidelines for more information.


Please note that all the content of the website, including printables, are for classroom and personal use only. This means that any digital item you download from our site can be used for non-commercial use only. We kindly request that you do not reproduce or sell our creations. We appreciate your understanding and cooperation in respecting our content and intellectual property rights.

Accessibility Adjustments

Powered by OneTap

How long do you want to hide the toolbar?
Hide Toolbar Duration
Select your accessibility profile
Vision Impaired Mode
Enhances website's visuals
Seizure Safe Profile
Clear flashes & reduces color
ADHD Friendly Mode
Focused browsing, distraction-free
Blindness Mode
Reduces distractions, improves focus
Epilepsy Safe Mode
Dims colors and stops blinking
Content Modules
Font Size

Default

Line Height

Default

Color Modules
Orientation Modules