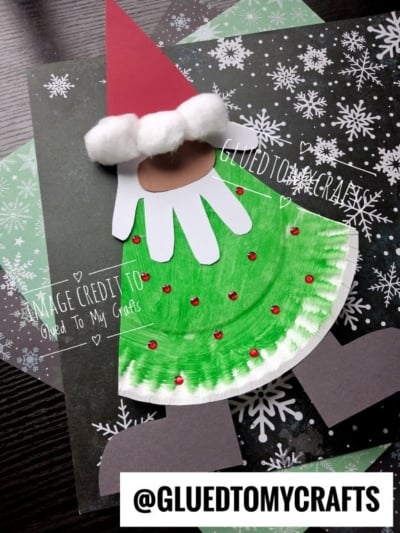
Gnomes have taken over the holidays, and it’s easy to see why. With their tall pointy hats, fluffy beards, and tiny button noses, they’re cute, a little silly, and full of cozy charm. This paper plate Christmas tree gnome brings that charm to your craft table in a way kids can make themselves.
The gnome’s body is a green paper plate wedge that doubles as a Christmas tree. Sparkly gems become ornaments, and your child’s own handprint turns into a big, bushy beard. The result is a sweet holiday keepsake that captures how small those little hands are this year.
This craft works for a rainy afternoon at home, a classroom holiday party, or a library story time. It uses simple supplies, comes together in under an hour, and leaves plenty of room for kids to add their own creative spin.
Craft Supplies:
- 1 large white paper plate
- Green paint (washable tempera or acrylic)
- Paintbrush or sponge
- Red cardstock (for the hat)
- White cardstock (for the handprint beard)
- Brown cardstock (for the oval nose)
- Black cardstock (for the boots)
- White cotton balls (3 to 4)
- Small gems (self-adhesive gems make it even easier)
- Pencil
- Scissors
- Glue (a glue stick for paper and white school glue for cotton balls and gems)
Directions:
Step 1: Paint the Paper Plate Green
Set the paper plate on a covered work surface and let your child paint the whole front green. Don’t worry about perfect coverage. A few brushstrokes and bits of white peeking through along the ridged rim actually give the tree a fun, snowy texture.
Let the plate dry completely before moving on. This usually takes 15 to 20 minutes, depending on the paint. This is a great time to start cutting out the other pieces.
Step 2: Cut the Plate Into a Triangular Wedge
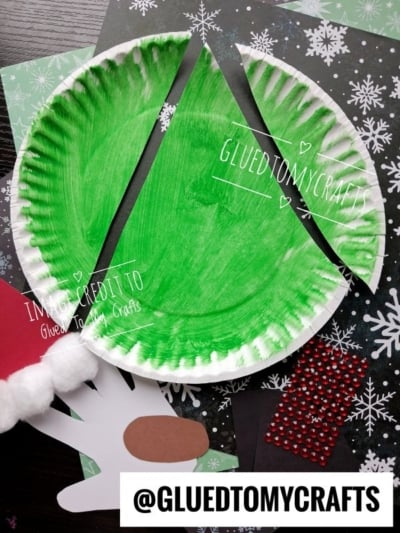
Once the paint is dry, flip the plate over. Use a pencil to draw a tall triangle shape, starting from a point near the top edge and fanning out toward the bottom rim. Cut along the lines to remove a curved slice from each side.
You’ll be left with a large wedge that looks like a Christmas tree, with the ridged rim along the bottom. This becomes your gnome’s body.
Step 3: Make the Red Hat With Cotton Ball Trim
Cut a tall, skinny triangle from the red cardstock. Make the bottom edge about the same width as the top of your plate wedge, or a little wider, so the hat sits nicely on the gnome’s head. The taller the hat, the more gnome-like it looks.
Next, glue 3 or 4 white cotton balls in a row along the bottom edge of the hat. This creates a soft, fluffy trim. White school glue holds the cotton best, so press gently and give it a minute to set.
Step 4: Trace and Cut the Handprint Beard
Have your child place one hand flat on the white cardstock with fingers spread slightly apart. Trace around the hand with a pencil. Kids usually giggle at this part, so expect a few wiggles.
Cut out the handprint. When you flip it upside down, the fingers point down and become the gnome’s long, flowing beard, while the palm sits up near the nose.
Step 5: Cut the Brown Oval Nose
Cut a small oval from the brown cardstock. It should be about the size of a large grape or a little bigger. This round nose is a classic gnome feature, and it peeks out right between the hat and the beard.
Step 6: Cut the Gray Boots
Draw two simple boot shapes on the black cardstock. Think of a rounded “L” shape, with the toes pointing in opposite directions. Cut them out. They don’t need to match perfectly. Slightly mismatched boots only add to the gnome’s quirky personality.
Step 7: Assemble Your Gnome
Now for the fun part. Put your gnome together in this order:
- Add the boots. Glue the boots to the back of the plate wedge so they peek out from the bottom rim, toes pointing outward.
- Attach the beard. Glue the handprint near the top of the wedge with the fingers pointing down over the green “tree.”
- Place the nose. Glue the brown oval on the palm area at the top of the handprint.
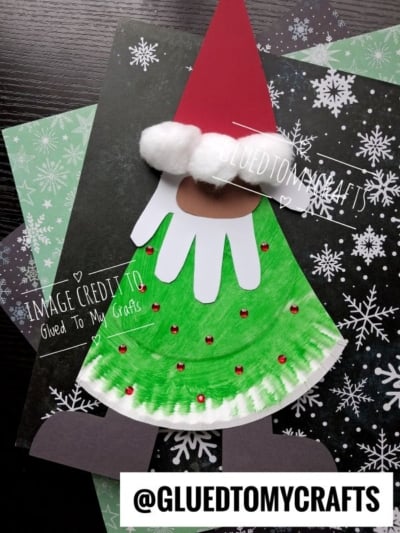
- Top it with the hat. Glue the red hat so the cotton ball trim overlaps the top of the nose slightly. This gives the classic look of a gnome peeking out from under a big, floppy hat.
Step 8: Decorate With Rhinestones
Finish your gnome by adding the rhinestone gems all over the green body. They look like shiny ornaments on a Christmas tree or bright buttons on a gnome’s coat. Let kids place them wherever they like. Some will scatter them freely, while others will line them up in neat rows.
Let everything dry flat for a bit, and your paper plate Christmas tree gnome is ready to show off.
RELATED —> Popsicle Stick Santa Boot Ornament
The best part of this craft isn’t a perfect result. It’s the time spent together, the laughs over wiggly handprints, and the pride on your child’s face when they hold up their finished gnome. Every one turns out a little different, and that’s exactly what makes them special.
So gather your paper plates, pull out the paint, and let the holiday crafting begin. Your new gnome friend is waiting to bring a little extra cheer to your home or classroom this season. Happy crafting, my friends!