Glued To My Crafts

Join thousands of others who have gotten GLUED to our craft tutorials!

  • Home
  • Safety Guidelines
  • Seasonal Themes
    • New Years
    • Valentine’s Day
    • St. Patrick’s Day
    • Spring
    • Easter
    • Mother’s Day
    • Summer
    • Father’s Day
    • Patriotic
    • Halloween
    • Thanksgiving
    • Fall
    • Winter
    • Christmas
    • Snowmen
    • Story Time
  • About Us
  • Amazon Storefront
  • Monthly Themes
    • January Craft Ideas
    • February Craft Ideas
    • March Craft Ideas
    • April Craft Ideas
    • May Craft Ideas
    • June Craft Ideas
    • July Craft Ideas
    • August Craft Ideas
    • September Crafts
    • October Crafts
    • November Crafts
    • December Crafts
  • Collection Posts
    • 20+ Creative Paper Bag Craft Ideas for Kids to Enjoy Today
    • 20+ Plastic Egg Stamp Crafts for Spring Fun
    • 50+ Creative Thumbprint Craft Ideas for Spring Fun
    • Craft Ideas for Kids Using Egg Stickers
    • Thumbs Up! 50+ Creative Thumbprint Crafts for Kids
    • 40+ Insect Craft Ideas For Kids
    • 50+ Craft Ideas For Kids Using A Plastic Fork As A Paint Brush
    • 30+ Puffy Paint Craft Ideas For Kids To Try Today!
    • 20+ Fun and Easy Paper Bowl Crafts for Kids
    • Pete The Cat Craft Ideas: Fun & Easy Projects for Kids
    • Transform Coffee Filters into 40+ Stunning DIY Projects
    • Transform Crepe Paper Streamers into 60+ Stunning Crafts
    • Pie Server Stamped Craft Ideas Kids Will Adore
    • Paint Splat Pie Craft Idea For Kids

Popsicle Stick & Handprint Mermaid Keepsake Craft Idea

When engaging in craft activities, it is important for young children to have adult supervision at ALL times. It is also recommended to use supplies that are suitable for your child's age. Feel free to modify materials or steps to meet your specific requirements. Please refer to our safety guidelines for more information.

As an Amazon Associate I earn from qualifying purchases. This post may contain affiliate links. For more information, please see our disclosure policy.

UPDATE FOR 2026 - To reduce storage costs and download fees, we recently made some changes to our website. The password for all our files this year is GLUEDTOMYCRAFTS2026. No sign-up is required to download our free printables! You can enjoy our printables without creating an account or paying for Box.com. Simply follow the download instructions on our FAQ PAGE.

Create a fun summer keepsake with this easy popsicle stick and handprint mermaid craft for kids! Learn how to make adorable ocean art with our quick tutorial.
SKIP THE FLUFF AND PRINT THE DIRECTIONS
A handmade mermaid craft made from colored paper and a popsicle stick is on a blue sheet with You are mer-mazing! written on it. The scene is decorated with seashells, markers, glue, and @GLUEDTOMYCRAFTS.

A handmade mermaid craft made from colored paper and a popsicle stick is on a blue sheet with You are mer-mazing! written on it. The scene is decorated with seashells, markers, glue, and @GLUEDTOMYCRAFTS.

Summer days bring the perfect chance to create fun memories and get a little crafty. We love projects that double as sweet keepsakes, and this mermaid craft does exactly that. By using your child’s handprint to create flowing mermaid hair, you freeze a tiny moment in time while making an adorable piece of art.

This simple activity uses basic supplies you probably already have in your craft bin. It keeps little hands busy, encourages creativity, and brings a touch of ocean magic right into your home.

Craft Supplies:

Gather these supplies before you sit down to craft:

  • Jumbo Craft Sticks – one per craft
  • Cardstock or Construction Paper
  • Paint Markers
  • School Glue
  • Kid-safe Scissors

Directions:

Step 1: Create the Handprint Hair
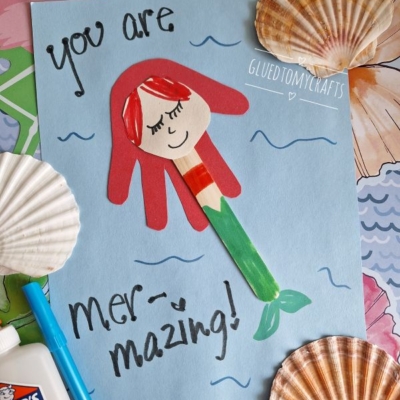
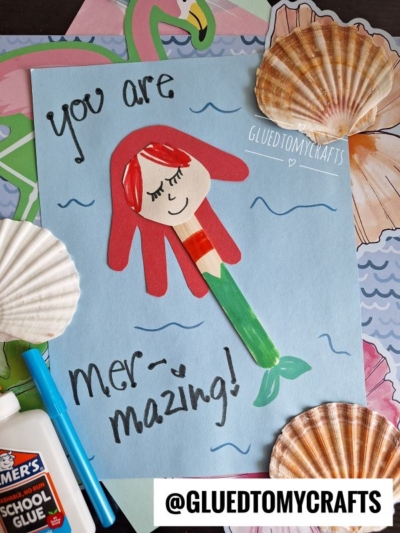
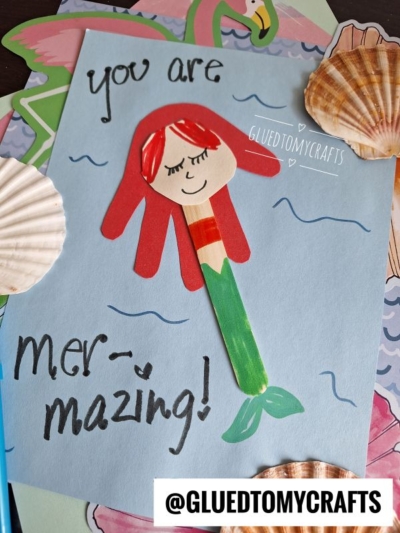
Grab your red cardstock and trace your child’s hand onto the paper. Cut out the handprint carefully. The fingers will act as the mermaid’s beautiful, flowing hair.

Step 2: Paint the Mermaid Body
Take one wooden popsicle stick. Use paint or markers to color the top third of the stick red to create the mermaid’s top. Color the remaining bottom section green to form the mermaid’s tail. Let the stick dry completely.

Step 3: Make the Face and Fin
Cut a small oval shape from the light beige paper for the mermaid’s face. Use your black marker to draw closed eyes with long eyelashes, a cute little nose, and a happy smile. Next, cut a small “V” or heart shape from the green paper to serve as the tail fin. Draw a few lines on the fin to give it texture.

Step 4: Assemble the Mermaid
Place the red handprint upside down or sideways so the fingers flow outward. Glue the beige face right onto the palm area of the handprint. Next, glue the painted popsicle stick just below the chin so the body extends downward. Finally, attach the green paper fin to the very bottom tip of the popsicle stick.

Step 5: Design the Ocean Background
Take your light blue cardstock to build the scene. Glue your fully assembled mermaid right in the center. Use a blue marker to draw simple, wavy lines around her to look like ocean water.

Step 6: Add a Sweet Message
To finish this delightful keepsake, use your black marker to write a fun pun. Write “you are” at the top of the blue paper, and “mer-mazing!” at the bottom. Add any other embellishments you see fit and display proudly for all to see!

RELATED —> Paper Bag Mermaid Puppet

A handmade mermaid craft using a popsicle stick with red paper hair and a drawn face is glued to blue paper with You are mer-mazing! written on it, surrounded by seashells and ocean-themed decorations.

You now have a wonderful summer craft that celebrates the season. Hang this cheerful artwork on the fridge, or send it to a grandparent as a thoughtful, handmade greeting card. Happy crafting, my friends!

A blue text on a white background, perfect for creating a charming the places you'll go keepsake.

A handmade mermaid craft made from colored paper and a popsicle stick is on a blue sheet with You are mer-mazing! written on it. The scene is decorated with seashells, markers, glue, and @GLUEDTOMYCRAFTS.
PRINT

Popsicle Stick & Handprint Mermaid Keepsake Craft Idea

Create a fun summer keepsake with this easy popsicle stick and handprint mermaid craft for kids! Learn how to make adorable ocean art with our quick tutorial.

Here’s your checklist of supplies to bring this craft to life:

  • Jumbo Craft Sticks
  • Cardstock or Construction Paper
  • Embellishments
  • Paint Markers
  • School Glue
  • Scissors

Prepare your creative haven by laying down a protective cover before the crafting magic begins!

Directions: 
Prevent your screen from going dark

  • Grab your red cardstock and trace your child's hand onto the paper. Cut out the handprint carefully. The fingers will act as the mermaid's beautiful, flowing hair.
  • Take one wooden popsicle stick. Use paint or markers to color the top third of the stick red to create the mermaid's top. Color the remaining bottom section green to form the mermaid's tail. Let the stick dry completely.
  • Cut a small oval shape from the light beige paper for the mermaid's face. Use your black marker to draw closed eyes with long eyelashes, a cute little nose, and a happy smile. Next, cut a small "V" or heart shape from the green paper to serve as the tail fin. Draw a few lines on the fin to give it texture.
  • Place the red handprint upside down or sideways so the fingers flow outward. Glue the beige face right onto the palm area of the handprint. Next, glue the painted popsicle stick just below the chin so the body extends downward. Finally, attach the green paper fin to the very bottom tip of the popsicle stick.
  • Take your light blue cardstock to build the scene. Glue your fully assembled mermaid right in the center. Use a blue marker to draw simple, wavy lines around her to look like ocean water.
  • To finish this delightful keepsake, use your black marker to write a fun pun. Write "you are" at the top of the blue paper, and "mer-mazing!" at the bottom. Add any other embellishments you see fit and display proudly for all to see!
MINI-HEARTS-page-separator-logo-gluedtomycrafts

CLICK HERE TO PRINT THE DIRECTIONS FOR THIS CRAFT

If you've enjoyed our content or have any thoughts to share, we'd love to hear from you! Mention @gluedtomycrafts or tag #gluedtomycrafts on Instagram!


OUR PRIVACY POLICY

OUR COPYRIGHT POLICY

  • Email
  • Facebook
  • Instagram
  • Pinterest
  • Twitter
  • YouTube

Love our crafts?

Follow us on Google

Click & check the box to see us more in your search results!

LOOKING FOR SOMETHING?

EXPLORE OUR SITE:

© 2012–2026 Glued To My Crafts
All activities should be supervised by an adult at all times. Please refer to our safety guidelines for more information.


Please note that all the content of the website, including printables, are for classroom and personal use only. This means that any digital item you download from our site can be used for non-commercial use only. We kindly request that you do not reproduce or sell our creations. We appreciate your understanding and cooperation in respecting our content and intellectual property rights.

Accessibility Adjustments

Powered by OneTap

How long do you want to hide the toolbar?
Hide Toolbar Duration
Select your accessibility profile
Vision Impaired Mode
Enhances website's visuals
Seizure Safe Profile
Clear flashes & reduces color
ADHD Friendly Mode
Focused browsing, distraction-free
Blindness Mode
Reduces distractions, improves focus
Epilepsy Safe Mode
Dims colors and stops blinking
Content Modules
Font Size

Default

Line Height

Default

Color Modules
Orientation Modules