Honor Memorial Day with an easy pool noodle stamped poppy craft. Learn how to use a foam noodle to create meaningful art with kids. Get the tutorial!

Memorial Day provides a meaningful moment for us to pause and honor the brave individuals who gave their lives while serving in the U.S. military. The bright red poppy stands as a powerful symbol of this sacrifice. Inspired by the famous World War I poem “In Flanders Fields,” the poppy represents both resilience and remembrance. Creating a poppy craft with children offers an excellent opportunity to discuss the true meaning of the holiday while building something beautiful together.
This pool noodle stamped poppy flower craft uses simple household materials and produces a wonderful textured effect. By turning a basic foam pool noodle into a paint stamp, you can easily create an entire field of vibrant red flowers.
Craft Supplies:
- One Pool Noodle
- Serrated Knife (for adult use only)
- Red Craft Paint
- Small Paper Plates
- Cardstock Paper
- Green Marker
- Black Dot Stickers {for the centers}
Directions:
- Prepare the Stamp (Adult Step): First, an adult needs to prepare the pool noodle stamp. Using a serrated knife, carefully cut a 1-inch thick slice from the end of the pool noodle. This circular piece will be your rose stamp.
- Set Up Your Art Station: Squirt a good amount of red paint onto your paper plate. Place your craft paper or cardstock on a flat, protected surface.
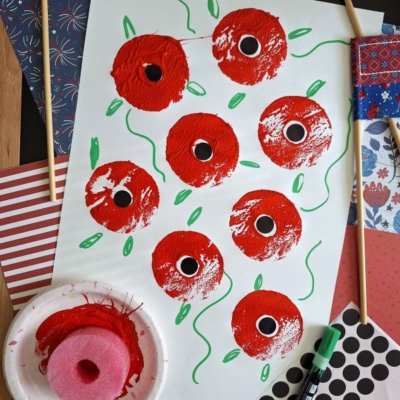
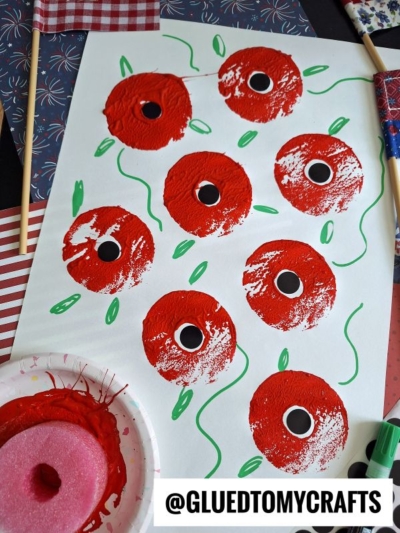
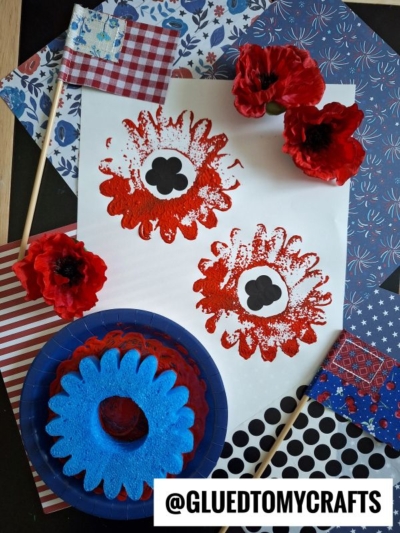
- Stamp the Poppy Flowers: Dip one of the flat sides of the pool noodle slice into the red paint. Make sure it’s evenly coated. Then, press it firmly onto your paper to create a red circular print. This is the main part of your rose. Repeat this step as many times as you like, stamping poppies all over the paper.
- Add the Center: Once the red paint is on the paper, add a black dot sticker in the center of each red stamp. This simple detail really makes the flower pop.
- Paint the Leaves: Now it’s time for the green leaves. Using a green marker, add two simple leaf shapes next to each red poppy. You can place them on opposite sides or have them both coming from one side. There’s no wrong way to do it!
- Let It Dry: Set your masterpiece aside to dry completely.
RELATED —> Paint Splat Memorial Day Craft Idea For Kids
Once the paint dries, you can hang this vibrant poppy field on your refrigerator or display it on a bulletin board alongside small American flags. To truly honor Memorial Day, consider making a few extra paintings with your family.
You can even deliver these bright, cheerful crafts to a local veterans center, a nursing home, or give them to family members who have served. Making and sharing this art provides a touching, hands-on way to express your gratitude and keep the spirit of remembrance alive. Happy crafting, my friends!

Pool Noodle Stamped Poppy Flower Craft Idea for Memorial Day
Honor Memorial Day with an easy pool noodle stamped poppy craft. Learn how to use a foam noodle to create meaningful art with kids. Get the tutorial!
Here’s your checklist of supplies to bring this craft to life:
- Cardstock Paper
- Craft Paint
- Pool Noodle Slice
- Embellishments
- School Glue
Prepare your creative haven by laying down a protective cover before the crafting magic begins!
Directions:
- Prepare the Stamp (Adult Step): First, an adult needs to prepare the pool noodle stamp. Using a serrated knife, carefully cut a 1-inch thick slice from the end of the pool noodle. This circular piece will be your rose stamp.
- Set Up Your Art Station: Squirt a good amount of red paint onto your paper plate. Place your craft paper or cardstock on a flat, protected surface.
- Stamp the Poppy Flowers: Dip one of the flat sides of the pool noodle slice into the red paint. Make sure it's evenly coated. Then, press it firmly onto your paper to create a red circular print. This is the main part of your rose. Repeat this step as many times as you like, stamping poppies all over the paper.
- Add the Center: Once the red paint is on the paper, add a black dot sticker in the center of each red stamp. This simple detail really makes the flower pop.
- Paint the Leaves: Now it’s time for the green leaves. Using a green marker, add two simple leaf shapes next to each red poppy. You can place them on opposite sides or have them both coming from one side. There’s no wrong way to do it!
- Let It Dry: Set your masterpiece aside to dry completely.
Grab our favorite books via our Amazon affiliate link! In our Amazon storefront you will find books, toys and craft supplies we absolutely love using for our Glued To My Crafts tutorials!
If you've enjoyed our content or have any thoughts to share, we'd love to hear from you! Mention @gluedtomycrafts or tag #gluedtomycrafts on Instagram!