Craft a magical wizard hat from a paper plate. Follow our easy tutorial and enjoy a fun crafting activity with the kids.


Crafting is not just a fun activity; it’s a fantastic way for children to exercise their creativity, improve fine motor skills, and enjoy a sense of accomplishment.
If you’re looking for a simple yet magical craft project, making wizard hats from paper plates is perfect. Plus you can use them as a story time activity or even in cooperate it into your Halloween party plans.

This blog post will guide you through every step of creating whimsical wizard hats that’ll make any child feel like they’ve stepped right into a fairy tale. So on that note, are you ready to begin your magical crafting adventure? Gather your supplies, and let’s get started. Happy crafting!
Craft Supplies:
Before we get started, let’s gather all the materials you’ll need. Having everything prepared will make the crafting process smoother and more enjoyable for both you and the kids.
- Large Paper Plate
- Craft Scissors
- Blue Craft Paint
- Paint Brush
- Blue Cardstock Paper
- School Glue
- Gold Star Stickers
Directions:
Now that you have all your materials ready, it’s time to start crafting. Follow these steps to create a magical wizard hat from a simple paper plate.
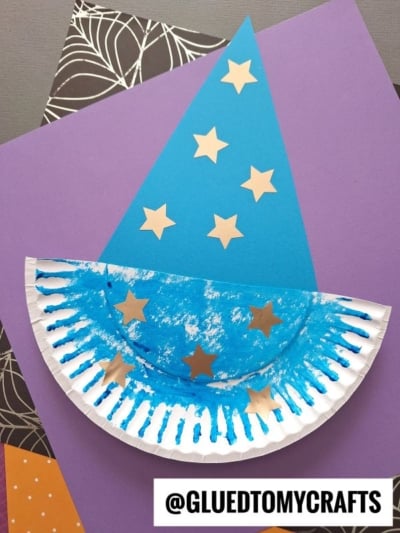
- First things first – take your paper plate and cut it in half. Straight up the center to make TWO equal pieces. You only need one half per craft. Either repeat the craft or save one half for a rainy day.
- Now that you have your paper plate piece, squirt some BLUE craft paint on it.
- Use the foam paint brush to paint the paper plate completely.
- Set it aside to allow it to dry completely.
- Now grab your blue cardstock paper and scissors.
- Cut out a large triangle from the cardstock.
- When the paper plate piece is dry enough to touch, glue the triangle to the back of it.
- To finish off the Paper Plate Wizard Hat craft, add star stickers ALL over the two pieces, to pull the theme together.
- Then display it proudly for ALL to see!
- Don’t forget to share pictures of your paper wizard hats with us on your various social media sites! #gluedtomycrafts
RELATED —> Handprint Wizard Gnome
AFFILIATE LINK – PAIR OUR CRAFT IDEA WITH THE BOOK “MY BUTT IS SO SPOOKTACULAR!”
Get creative with your kids this weekend and make some fun crafts together! It’s an enchanting way to add a little magic to your day! Be sure to also check out our Fox Pumpkin and Scarecrow Gnome tutorials for even more crafty fun for Halloween!

Paper Plate Wizard Hat Craft Idea
Craft a magical wizard hat from a paper plate. Follow our easy tutorial and enjoy a fun crafting activity with the kids.
Here’s your checklist of supplies to bring this craft to life:
Prepare your creative haven by laying down a protective cover before the crafting magic begins!
Directions:
- First things first - take your paper plate and cut it in half. Straight up the center to make TWO equal pieces. You only need one half per craft. Either repeat the craft or save one half for a rainy day.
- Now that you have your paper plate piece, squirt some BLUE craft paint on it.
- Use the foam paint brush to paint the paper plate completely.
- Set it aside to allow it to dry completely.
- Now grab your blue cardstock paper and scissors.
- Cut out a large triangle from the cardstock.
- When the paper plate piece is dry enough to touch, glue the triangle to the back of it.
- To finish off the Paper Plate Wizard Hat craft, add star stickers ALL over the two pieces, to pull the theme together.
- Then display it proudly for ALL to see!


Grab our favorite books via our Amazon affiliate link! In our Amazon storefront you will find books, toys and craft supplies we absolutely love using for our Glued To My Crafts tutorials!
If you've enjoyed our content or have any thoughts to share, we'd love to hear from you! Mention @gluedtomycrafts or tag #gluedtomycrafts on Instagram!