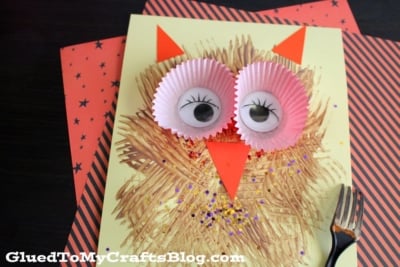
Ready to get creative with the kids this weekend? Take their art project up a notch with this gorgeous fork painted owl craft that is sure to be a hit!
Just in time for fall, inspire your little ones with this creative and fun craft activity: a fork painted owl! With some paint and a few common household utensils, you’ll have all the tools needed to bring this easy project to life.
Perfect for squashing boredom on those chilly autumn days or as an engaging activity during school holidays, children will enjoy putting their own spin on these swooping feathered friends – no two owls can ever be the same!
Have your kids unleash their inner artist as they express themselves through this creative craft idea. Let’s get started!
Put those little fingers to work and keep those creative minds busy! This fork painted & cupcake liner owl craft is the perfect art activity for your kids – give it a try today!
Craft Supplies:
- Plastic Fork
- Brown Craft Paint
- Choice of Colored Cardstock Paper
- Orange Cardstock Paper
- Large Cupcake Liner {two per owl craft}
- Paper Scissors
- School Glue
- Large Wiggle Eyes {two per owl craft}
- optional – loose craft glitter
Directions:
- First squirt some brown paint in the center of your choice of colored cardstock {I did yellow.} You don’t need a lot. Maybe the size of a quarter.
- Now take your fork – which is your “paint brush” and spread the paint ALL around to make the owl’s body come to life on the paper. Add more paint if you like. It doesn’t have to be perfect at all so feel free to change it up.
- If desired, sprinkle some loose craft glitter on top of the wet paint for extra sparkle.
- Once you are done creating the “feathers” on the paper, set it aside for now.
- Next grab your orange cardstock paper and the scissors.
- Cut out two pointy ears, two heart shaped feet and one triangle beak for the owl from the orange paper.
- Go ahead and also glue one large wiggle eye in each of the cupcake liners, to create the owl eyes.
- Finally – the last step of this fork painted owl craft is to glue your cardstock pieces, cupcake liners and wiggle eyes to the painted piece of paper. I highly suggest starting with the two liners in the center and then working from there.
- Set aside to let it dry completely before displaying proudly!
- BTW – you can change the brown paint to white paint for a SNOWY OWL instead!
RELATED —> Toilet Paper Roll Owl
AFFILIATE LINK – PAIR OUR CRAFT IDEA WITH THIS BOOK RECOMMENDATION
We also have a paint splat version of this craft. Check it out at our Paint Splat Owl Face tutorial! You use the same materials as today’s tutorial but there is a step twist for this one!
Fork Painted Owl Craft Idea For Kids
Here’s your checklist of supplies to bring this craft to life:
Prepare your creative haven by laying down a protective cover before the crafting magic begins!
Directions:
- First squirt some brown paint in the center of your choice of colored cardstock {I did yellow.} You don't need a lot. Maybe the size of a quarter.
- Now take your fork - which is your "paint brush" and spread the paint ALL around to make the owl's body come to life on the paper. Add more paint if you like. It doesn't have to be perfect at all so feel free to change it up.
- If desired, sprinkle some loose craft glitter on top of the wet paint for extra sparkle.
- Once you are done creating the "feathers" on the paper, set it aside for now.
- Next grab your orange cardstock paper and the scissors.
- Cut out two pointy ears, two heart shaped feet and one triangle beak for the owl from the orange paper.
- Go ahead and also glue one large wiggle eye in each of the cupcake liners, to create the owl eyes.
- Finally - the last step of this fork painted owl craft is to glue your cardstock pieces, cupcake liners and wiggle eyes to the painted piece of paper. I highly suggest starting with the two liners in the center and then working from there.
- Set aside to let it dry completely before displaying proudly!
- BTW - you can change the brown paint to white paint for a SNOWY OWL instead!

CLICK HERE TO PRINT THE DIRECTIONS FOR THIS CRAFT


