
Get creative this summer by making some fun and unique artwork with your kids! Show them how to paint a campfire scene with forks to make awesome art that they can proudly hang up on the fridge all season long!

Campfire Fork Painted Craft Idea For Kids
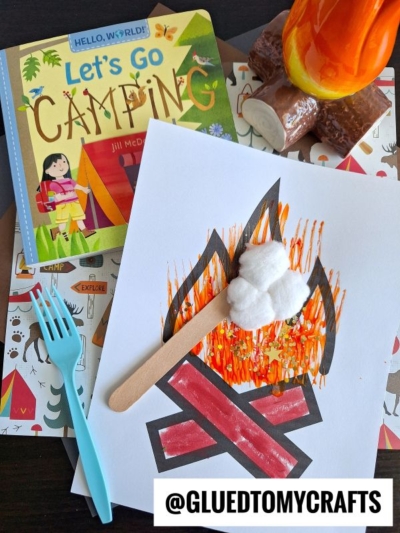
An inexpensive plastic fork and our favorite Tulip craft paint, merge together {once again!} on white cardstock paper, for this Fork Painted Campfire kid craft idea.
It’s a first seen here idea for Glued To My Crafts and we sure hope you are inspired to recreate it this summer or fall season! We even added a “smores” element to really try the camping theme together!
On that note, are you ready to bring it to “roast” it to life in your home?! Keep scrolling for ALL the details, as well as the FREE campfire printable, so you can recreate it with your young crafter this afternoon! Happy crafting, my dear friends!
What did the campers say about the campfire?
They gave it GLOWING reviews!

Even the simplest things can be turned into something beautiful with a little creativity! So grab some paint and a plastic fork so you can recreate this campfire craft with your child today!
Craft Supplies:
- Plastic Fork
- Brown Puffy Paint
- Red Puffy Paint
- Yellow Puffy Paint
- Small Paper Plate
- White Cardstock Paper
- Free Printable – ON OUR LANDING PAGE
- Brown Crayon or Marker
- Jumbo Popsicle Sticks
- White Cotton Balls
- School Glue
- Loose Craft Glitter
RELATED —> Popsicle Stick Camping Tent
Directions:
- First things first – print out the blank campfire printable, listed above, on a single sheet of white cardstock paper. You only need ONE print per campfire craft.
- Now that you have it printed out, use a marker or crayon to color in the two “logs” in the design.
- Next up – squirt the THREE different colored Tulip puffy craft paints on your small paper plate.
- Now take your fork, which is now your paint brush, to make “flames” all over the fire design on your printable.
- When ready, shake some loose craft glitter on top of the wet paint for some dimension and extra sparkle. Go ahead and shake off the excess when done.
- Finally – the last step of this fork painted fire craft is to glue on the “smores” by gluing down the jumbo popsicle stick {the roasting fork} and the cotton ball {marshmallow} as well.
- When done decorating the paper, set it aside to let it dry completely before displaying proudly!
RELATED —> Daddy’s Grilling Partner Keepsake

Do you by chance love this painted firepit craft idea? Then be se sure to also check out our Handprint Campfire Keepsake post! It’s another great craft idea for summer AND fall camping trips!
Now what are you waiting for?! Let the crafty fun begin! Happy crafting, my friends!!! Don’t forget to FOLLOW US ON PINTEREST, so you never miss a new tutorial from us! #gluedtomycrafts

Fork Painted Campfire Craft Idea
Here’s your checklist of supplies to bring this craft to life:
Prepare your creative haven by laying down a protective cover before the crafting magic begins!
Directions:
- First things first - print out the blank campfire printable on a single sheet of white cardstock paper. You only need ONE print per campfire craft.White Cardstock Paper
- Now that you have it printed out, use a marker or crayon to color in the two "logs" in the design.
- Next up - squirt the THREE different colored Tulip puffy craft paints on your small paper plate.Tulip Puffy Paint
- Now take your fork, which is now your paint brush, to make "flames" all over the fire design on your printable.
- When ready, shake some loose craft glitter on top of the wet paint for some dimension and extra sparkle. Go ahead and shake off the excess when done.Loose Craft Glitter
- Finally - the last step of this fork painted fire craft is to glue on the "smores" by gluing down the jumbo popsicle stick {the roasting fork} and the cotton ball {marshmallow} as well.1 Jumbo Popsicle Sticks, 1 White Cotton Balls
- When done decorating the paper, set it aside to let it dry completely before displaying proudly!


NEED MORE HELP DOWNLOADING OUR FREE PRINTABLES? PLEASE REFER TO OUR FAQ PAGE