It's PERFECT for summer camps, vacation bible schools or just something to pass the time with!
Our Paint Splat Campfire kid craft idea is PERFECT for summer camps, vacation bible schools or just something to pass the time with, in the comfort of your own home!

Trying something new and getting messy with paint is always a good time! Be sure to try this fun paint splat campfire craft idea with the kids.
Craft Materials:
- Large or Small Paper Plate
- Brown Tulip Puffy Paint
- Orange Tulip Puffy Paint
- Yellow Tulip Puffy Paint
- Red Tulip Puffy Paint
- Brown Cardstock Paper
- Basic Craft Scissors
- Hand-Held Office Stapler
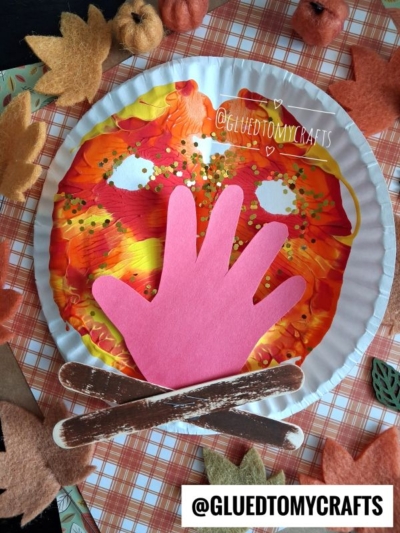
RELATED —> Handprint Campfire Keepsake

Ready to bring the campfire vibes indoors this summer? Get creative with this easy paint splat campfire craft – an activity sure to make your summer extra sparkly!
Directions:
- Please make sure you have a good working area that can get dirty because paint will squeeze out of the sides of this craft!!!
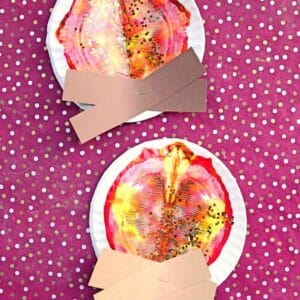
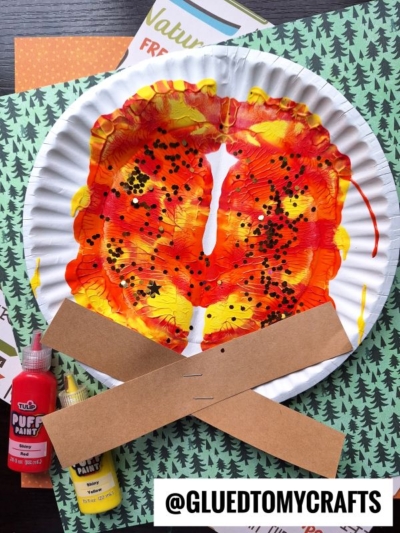
- First fold your paper plate, straight in half {one per campfire craft you want to make today.}
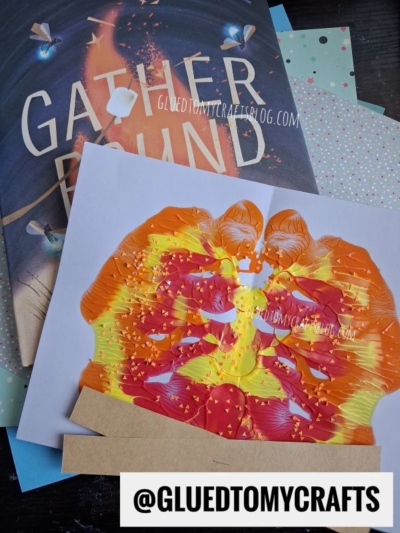
- Unfold and squirt a few squiggles of red, orange, yellow and brown colored Tulip puffy paint on one side of the folded paper plate {I like the Tulip Puffy Paint for this particular step since it’s in a nice controlled squirt bottle} Be sure to keep the paint inside the paper plate and not place too much down either.
- Once the paint is down, go ahead and fold up/squish your paper plate together again.
- Be sure to rub your hand all over the folded paper plate piece, so the paint will cover the inside nicely and make an even marbled look {paint WILL more than likely squeeze out the sides, so be sure to pay attention to that and clean up with baby wipes!}
- Now carefully unfold your piece to reveal your “marbled campfire” design inside.
- If desired, sprinkle some loose craft glitter/rhinestones on top of the wet paint, to create more texture and sparkle.
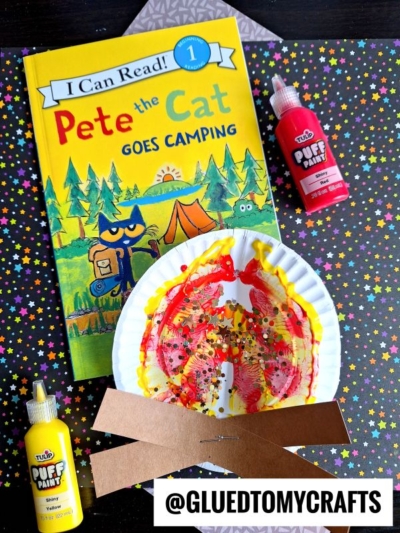
- To finish the Paper Plate Marbled Campfire – cut out a TWO long rectangle “logs” from your brown cardstock paper.
- Go ahead and staple those two pieces {in a crossed design} onto the paper plate.
- Then step aside your decorated paper plate piece to allow it to dry completely.
- When ready – display it proudly for ALL to see and come share pictures with us if you can. You can find us on Instagram for easy tagging! #gluedtomycrafts
RELATED —> Happy Camper Keepsake
Don’t let the fun stop here! Keep the crafty “fire” burning in the creative department, by checking out our Chalk Art Campfire, Fork Painted Campfire and Lava You Keepsake craft posts!
We also have a HUGE camping craft roundup for you to check out and bookmark from!

Paint Splat Campfire Craft For Summer Camp
It's PERFECT for summer camps, vacation bible schools or just something to pass the time with!
Here’s your checklist of supplies to bring this craft to life:
Prepare your creative haven by laying down a protective cover before the crafting magic begins!
Directions:
- First fold your paper plate, straight in half.Paper Plate
- Unfold and squirt a few squiggles of red, orange, yellow and brown colored Tulip puffy paint on one side of the folded paper plate. Be sure to keep the paint inside the paper plate and not place too much down either.Tulip Puffy Paint
- Once the paint is down, go ahead and fold up/squish your paper plate together again.
- Be sure to rub your hand all over the folded paper plate piece, so the paint will cover the inside nicely and make an even marbled look.
- Now carefully unfold your piece to reveal your "marbled campfire" design inside.
- If desired, sprinkle some loose craft glitter/rhinestones on top of the wet paint, to create more texture and sparkle.Loose Craft Glitter
- To finish the Paper Plate Marbled Campfire - cut out a TWO long rectangle "logs" from your brown cardstock paper.
- Go ahead and staple those two pieces {in a crossed design} onto the paper plate.Cardstock Paper
- Then step aside your decorated paper plate piece to allow it to dry completely.
- When ready - display it proudly for ALL to see.

Grab our favorite books via our Amazon affiliate link! In our Amazon storefront you will find books, toys and craft supplies we absolutely love using for our Glued To My Crafts tutorials!
If you've enjoyed our content or have any thoughts to share, we'd love to hear from you! Mention @gluedtomycrafts or tag #gluedtomycrafts on Instagram!