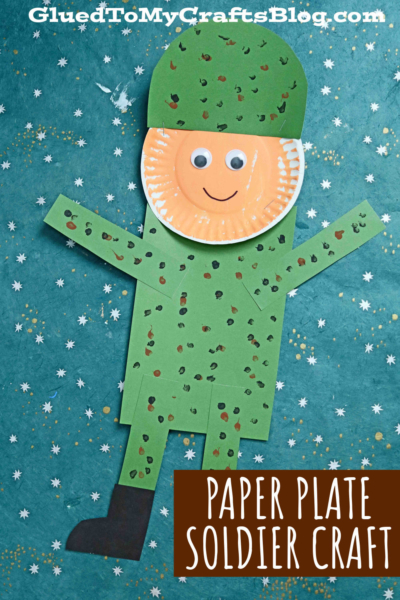
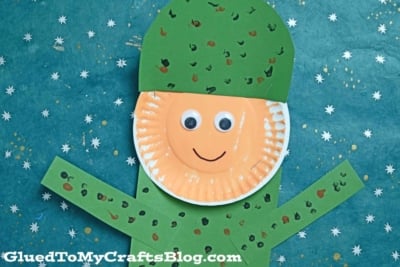
Whether for Veteran's Day holiday or just because you want to honor our nation's heroes, we hope our Paper Plate Soldier craft inspires you!

Celebrate Veterans Day by creating a special paper plate soldier with your little ones! It’s the perfect way to honor our brave troops and teach children about gratitude and patriotism.
Veteran’s Day Soldier Craft Idea
Whether for the upcoming Veteran’s Day holiday or just because you want to honor our nation’s heroes, we hope our SUPER EASY Paper Soldier kid craft idea comes in handy for you!
It’s a mixed media soldier craft that is fun, inexpensive and can be customized with different colors for different military branches.
Keep scrolling for ALL the details! Don’t forget to share pictures of your finished soldier made from paper, on our Facebook page to admire from a far afterwards! #gluedtomycrafts
RELATED —> Chalk Art Flower On Black Paper

Looking for an easy and fun craft idea to celebrate Veteran’s Day with kids? Look no further! Try this paper plate soldier craft today.
Craft Supplies:
- Green Paper
- Black Paper
- Small Paper Plates
- Skin Tone Craft Paint
- Brown Craft Paint
- Black Craft Paint
- Paint Brush
- Q-Tips
- Scissors
- Stapler
- Wiggle Eyes
- Black Marker
- School Glue
Directions:
- First things first – paint one of your small paper plates with the skin tone paint, completely.
- Once done, set that piece aside to let it dry a bit.
- Next take your green construction paper and fold it in half. Unfold it again.
- Take the scissors and now cut straight up, on the folded line you just made. You now have two pieces. One piece will the body of the paper plate soldier kid craft, while the other piece will be cut up for his body embellishments.
- Now take the black cardstock and remaining green cardstock & cut out boots, arms, legs and a half circle “helmet” for your soldier.
- Once the green pieces are cut out, lay them on a flat surface {place the boots aside for the last step.}
- Squirt some black and brown craft paint on the second paper plate you have. Place a qtip in each paint blob.
- Using the q-tips as your paint brush, make “dots” for the camo all over the green paper. Add as much color and/or dots as you like!
- Once done, let these pieces dry a bit.
- When dry enough, grab the stapler and staple your pieces in place. My suggestion is to start with the paper plate head and go from there.
- Finally, glue on the wiggle eyes on the paper plate for him to see and draw on a simple smile with the black Sharpie marker, as well.
- Then display your solider piece proudly for ALL to see!
- Don’t forget to share pictures your paper plate and cardstock paper soldier, on our Facebook page to see from a far!
Make it your own! Remember how I said this idea can be altered for different branches? Just change out the construction paper colors and craft paint to make it reflect ANY soldier’s uniform you had in mind!
We used green but you can also use tan or blue for the other branches!

Love this paper soldier kid craft tutorial? We also have a POPSICLE STICK SOLDIER craft on Glued To My Crafts, that is absolutely perfect to pair along with today’s DIY Veteran’s Day post! Go check it out and let me know what you think!

Paper Plate Soldier - Veteran's Day Craft
Whether for Veteran's Day holiday or just because you want to honor our nation's heroes, we hope our Paper Plate Soldier craft inspires you!
Here’s your checklist of supplies to bring this craft to life:
Prepare your creative haven by laying down a protective cover before the crafting magic begins!
Directions:
- First things first - paint one of your small paper plates with the skin tone paint, completely.
- Once done, set that piece aside to let it dry a bit.
- Next take your green construction paper and fold it in half. Unfold it again.
- Take the scissors and now cut straight up, on the folded line you just made. You now have two pieces. One piece will the body of the paper plate soldier kid craft, while the other piece will be cut up for his body embellishments.
- Now take the black cardstock and remaining green cardstock & cut out boots, arms, legs and a half circle "helmet" for your soldier.
- Once the green pieces are cut out, lay them on a flat surface {place the boots aside for the last step.}
- Squirt some black and brown craft paint on the second paper plate you have. Place a qtip in each paint blob.
- Using the q-tips as your paint brush, make "dots" for the camo all over the green paper. Add as much color and/or dots as you like!
- Once done, let these pieces dry a bit.
- When dry enough, grab the stapler and staple your pieces in place. My suggestion is to start with the paper plate head and go from there.
- Finally, glue on the wiggle eyes on the paper plate for him to see and draw on a simple smile with the black Sharpie marker, as well.
- Then display your solider piece proudly for ALL to see!

CLICK HERE TO PRINT THE DIRECTIONS FOR THIS CRAFT
If you've enjoyed our content or have any thoughts to share, we'd love to hear from you! Mention @gluedtomycrafts or tag #gluedtomycrafts on Instagram!