With our tutorial, your child can make one-of-a-kind paper pieces that ANYONE will love to receive in the mail

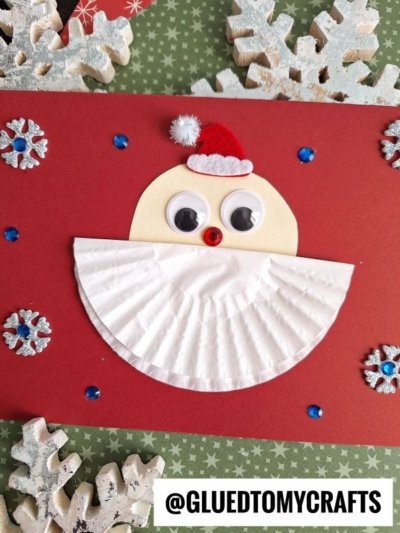
Make holiday crafting even more fun with these Cupcake Liner Santa Beard cards! So easy to make, so much fun to share!

There’s something magical about crafting with kids during the holidays. The kitchen table covered in scraps of paper, little hands reaching for the glue, and the giggles that come when a googly eye lands somewhere it shouldn’t.
These are the messy, wonderful moments that turn into some of our favorite Christmas memories. And the best part? You don’t need fancy supplies or special skills to make them happen.
That’s exactly why we love this Cupcake Liner Santa Beard Cards craft. It takes a humble white cupcake liner and turns it into the fluffiest, most charming Santa beard you’ve ever seen. Kids get to fold, snip, and decorate their way to a cheerful Santa face, and they’ll be so proud of what they create.
It’s the kind of project that keeps small hands busy and big imaginations happy on a cozy December afternoon!

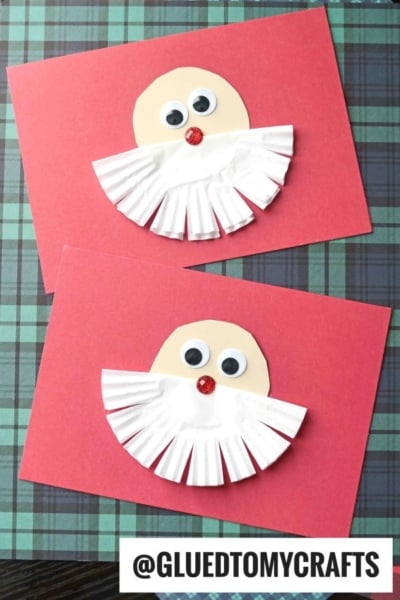
These cupcake liner Santa beard cards are a fun and easy Christmas craft for kids. Using just a few simple supplies, children can create festive handmade cards that are perfect for gifting, displaying, or mailing to family and friends.
Craft Supplies:
- White Cupcake Liners
- Tan Cardstock Paper
- Red Cardstock Cards
- Adhesive
- Craft Scissors
- Small Wiggle Eyes
- Small Red Buttons
- Embellishments
Directions:
- First fold in half a white cupcake liner {one per card} straight up the center.
- Glue it together so it won’t come apart.
- Next grab scissors and cut some stripes in the folded white cupcake liner {towards the circular part} to make a fringed aka Santa beard.
- Now glue your cupcake liner piece to the center of a cardstock card front.
- Grab your tan cardstock and scissors.
- Go ahead and cut out a half circle to be glued next to the cupcake liner piece and be Santa’s head.
- To finish it all off – glue your wiggle eyes and red button nose on.
- Then add other embellishments you see fit and mail away!!
- Don’t forget to snap a few pictures to share with us on your various social media sites! #gluedtomycrafts
RELATED —> Paper Plate Christmas Gnome
Celebrate this festive time of year with our easy step-by-step tutorials & make memories that will last a lifetime!
Be sure to check out these fun posts, listed below, for even MORE crafty inspiration from Glued To My Crafts!
And as always – if one of our crafts inspires you, be sure to share it on our Facebook page. We love seeing our inspiration come to life in your home!
Paper Plate Santa
Thumbprint Christmas Reindeer
Handprint Christmas Tree Cards
Paper Plate Nutcracker
Handprint Santa’s Reindeer
Reindeer Clothespin Ornaments
Fork Painted Santa Beard
Cotton Ball & Popsicle Stick Santa
Chalk Art Santa Craft

Cupcake Liner Santa Beard Cards
With our tutorial, your child can make one-of-a-kind paper pieces that ANYONE will love to receive in the mail
Here’s your checklist of supplies to bring this craft to life:
Prepare your creative haven by laying down a protective cover before the crafting magic begins!
Directions:
- First fold in half a white cupcake liner {one per card} straight up the center.Cupcake Liners
- Glue it together so it won't come apart.
- Next grab scissors and cut some stripes in the folded white cupcake liner {towards the circular part} to make a fringed aka Santa beard.
- Now glue your cupcake liner piece to the center of a cardstock card front.
- Grab your tan cardstock and scissors.Cardstock Paper
- Go ahead and cut out a half circle to be glued next to the cupcake liner piece and be Santa's head.
- To finish it all off – glue your wiggle eyes and red button nose on.2 Wiggle Eyes, Craft Buttons
- Then add other embellishments you see fit and mail away!!! {psst - this Cupcake Liner Bearded Santa idea is awesome to frame and use as Christmas decorations as well!}


CLICK HERE TO PRINT THE DIRECTIONS FOR THIS CRAFT
If you've enjoyed our content or have any thoughts to share, we'd love to hear from you! Mention @gluedtomycrafts or tag #gluedtomycrafts on Instagram!