Glued To My Crafts

Join thousands of others who have gotten GLUED to our craft tutorials!

  • Home
  • Safety Guidelines
  • Seasonal Themes
    • New Years
    • Valentine’s Day
    • St. Patrick’s Day
    • Spring
    • Easter
    • Mother’s Day
    • Summer
    • Father’s Day
    • Patriotic
    • Halloween
    • Thanksgiving
    • Fall
    • Winter
    • Christmas
    • Snowmen
    • Story Time
  • About Us
  • Amazon Storefront
  • Monthly Themes
    • January Craft Ideas
    • February Craft Ideas
    • March Craft Ideas
    • April Craft Ideas
    • May Craft Ideas
    • June Craft Ideas
    • July Craft Ideas
    • August Craft Ideas
    • September Crafts
    • October Crafts
    • November Crafts
    • December Crafts
  • Collection Posts
    • 20+ Creative Paper Bag Craft Ideas for Kids to Enjoy Today
    • 20+ Plastic Egg Stamp Crafts for Spring Fun
    • 50+ Creative Thumbprint Craft Ideas for Spring Fun
    • Craft Ideas for Kids Using Egg Stickers
    • Thumbs Up! 50+ Creative Thumbprint Crafts for Kids
    • 40+ Insect Craft Ideas For Kids
    • 50+ Craft Ideas For Kids Using A Plastic Fork As A Paint Brush
    • 30+ Puffy Paint Craft Ideas For Kids To Try Today!
    • 20+ Fun and Easy Paper Bowl Crafts for Kids
    • Pete The Cat Craft Ideas: Fun & Easy Projects for Kids
    • Transform Coffee Filters into 40+ Stunning DIY Projects
    • Transform Crepe Paper Streamers into 60+ Stunning Crafts
    • Pie Server Stamped Craft Ideas Kids Will Adore
    • Paint Splat Pie Craft Idea For Kids

Simple Air-Dry Clay Snowflake Ornaments for Kids

Handmade white clay snowflake ornaments with colorful rhinestones and string, displayed on a dark surface with frosted decorative branches. A label reads @GLUEDTOMYCRAFTS at the bottom.

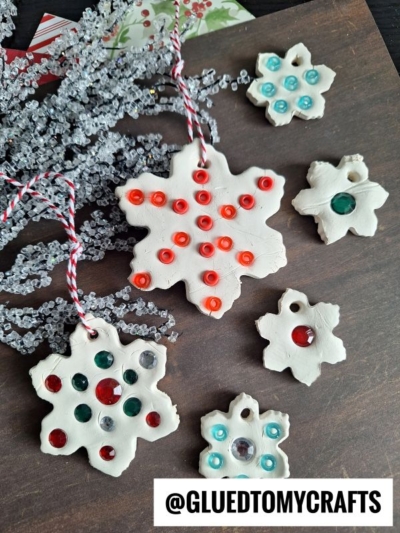
Winter crafting is a wonderful way to spend a chilly afternoon indoors. These air-dry clay snowflake ornaments are fun, easy, and perfect for kids of all ages.

You only need a few basic supplies to make beautiful, colorful keepsakes that look great on a tree or tied to a gift.
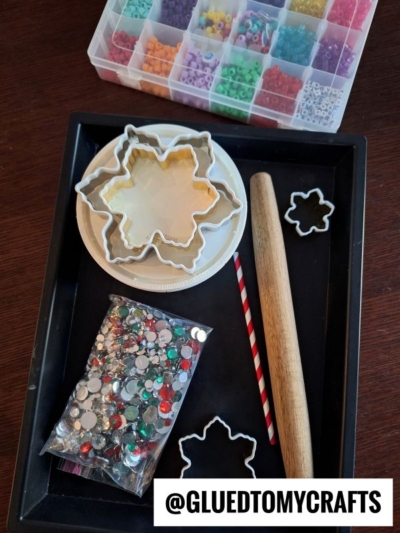
A tray holds snowflake cookie cutters, a rolling pin, a straw, a plate, a bag of colorful rhinestones, and a box of assorted beads. @GLUEDTOMYCRAFTS is written at the bottom.

Craft Supplies:

  • Air-dry clay
  • Snowflake cookie cutters (various sizes)
  • Colorful pony beads or flat-backed craft rhinestones
  • A wooden rolling pin
  • Parchment paper
  • A paper straw
  • Baker’s twine or ribbon

Directions:

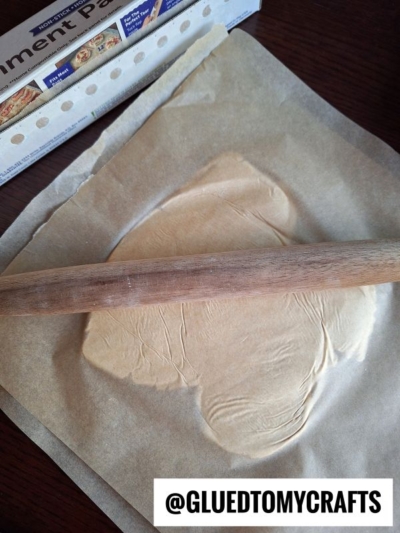
1. Prep your workspace
Lay down a large piece of parchment paper on your table. You can also place another sheet of parchment paper on top of the clay before you roll it. This clever trick stops the clay from sticking to your rolling pin.

2. Roll out the clay
Take a handful of air-dry clay and roll it out flat. Aim for about a quarter-inch thickness. If the clay is too thin, the ornaments might break when they dry.

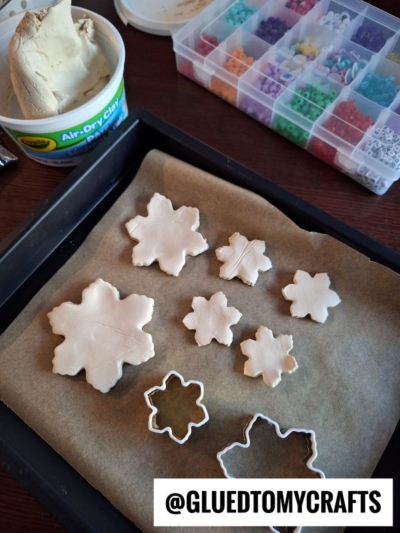
3. Cut out your snowflakes
Press your snowflake cookie cutters firmly into the flattened clay. Pull away the excess dough from the edges. You can roll the leftover clay into a ball and use it again for your next batch.

4. Decorate your shapes
Now comes the most exciting part for the kids! Press pony beads and craft rhinestones gently into the soft clay. You can create colorful patterns or just scatter them around.

5. Punch a hole for hanging
Take your paper straw and press it through the top of each snowflake to make a small hole. Make sure you leave enough room at the edge so the clay does not tear.

6. Let them dry
Leave your decorated ornaments flat on the parchment paper to dry. It usually takes 24 to 48 hours for the clay to harden completely. Once the ornaments feel solid, thread a piece of baker’s twine through the hole and tie a tight knot.

RELATED —> Handprint Clay Ornament Craft Ideas

A rolling pin flattens dough on parchment paper, with a box of parchment paper visible in the background. Text at the bottom reads @GLUETOMYCRAFTS. Air-dry clay snowflakes are cut out on parchment paper in a baking tray, with a snowflake-shaped cutter, a tub of clay, and a box of colorful beads visible nearby. The text @GLUEDTOMYCRAFTS is at the bottom. Five unbaked salt dough ornaments shaped like snowflakes, decorated with red, green, and clear beads, are arranged on a parchment-lined baking tray. Text @GLUEDTOMYCRAFTS is visible in the bottom right corner.

Crafting gives children a wonderful chance to express themselves and build fine motor skills. We hope you enjoy making these vibrant snowflakes together.

Try mixing up the bead colors or experimenting with different cutter shapes. Hang your finished ornaments proudly around your home, or gift them to family and friends to spread some holiday cheer!

A blue text on a white background, perfect for creating a charming the places you'll go keepsake.

Handmade white clay snowflake ornaments with colorful rhinestones and string, displayed on a dark surface with frosted decorative branches. A label reads @GLUEDTOMYCRAFTS at the bottom.
PRINT

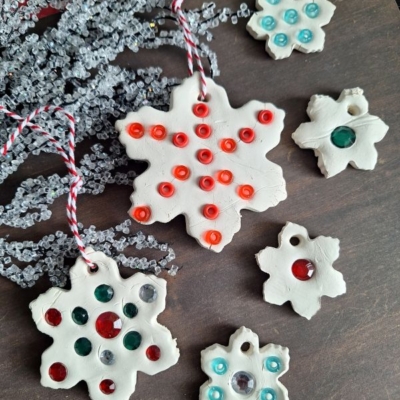
Pony Bead and Air Dry Clay Snowflake Craft Idea for Kids

Make fun and easy air-dry clay snowflake ornaments with kids! Use pony beads and cookie cutters for a simple winter craft. Read our step-by-step tutorial.

Here’s your checklist of supplies to bring this craft to life:

  • Air-dry clay
  • Pony beads
  • Ribbon or String
  • Craft Tray
  • Snowflake Cookie Cutters
  • Parchment Paper
  • Rolling Pin
  • Plastic Straw

Prepare your creative haven by laying down a protective cover before the crafting magic begins!

Directions: 
Prevent your screen from going dark

  • Lay down a large piece of parchment paper on your table. You can also place another sheet of parchment paper on top of the clay before you roll it. This clever trick stops the clay from sticking to your rolling pin.
  • Take a handful of air-dry clay and roll it out flat. Aim for about a quarter-inch thickness. If the clay is too thin, the ornaments might break when they dry.
  • Press your snowflake cookie cutters firmly into the flattened clay. Pull away the excess dough from the edges. You can roll the leftover clay into a ball and use it again for your next batch.
  • Now comes the most exciting part for the kids! Press pony beads and craft rhinestones gently into the soft clay. You can create colorful patterns or just scatter them around.
  • Take your paper straw and press it through the top of each snowflake to make a small hole. Make sure you leave enough room at the edge so the clay does not tear.
  • Leave your decorated ornaments flat on the parchment paper to dry. It usually takes 24 to 48 hours for the clay to harden completely. Once the ornaments feel solid, thread a piece of baker’s twine through the hole and tie a tight knot.
MINI-HEARTS-page-separator-logo-gluedtomycrafts

CLICK HERE TO PRINT THE DIRECTIONS FOR THIS CRAFT

If you've enjoyed our content or have any thoughts to share, we'd love to hear from you! Mention @gluedtomycrafts or tag #gluedtomycrafts on Instagram!


OUR PRIVACY POLICY

OUR COPYRIGHT POLICY

  • Email
  • Facebook
  • Instagram
  • Pinterest
  • Twitter
  • YouTube

Love our crafts?

Follow us on Google

Click & check the box to see us more in your search results!

LOOKING FOR SOMETHING?

EXPLORE OUR SITE:

© 2012–2026 Glued To My Crafts
All activities should be supervised by an adult at all times. Please refer to our safety guidelines for more information.


Please note that all the content of the website, including printables, are for classroom and personal use only. This means that any digital item you download from our site can be used for non-commercial use only. We kindly request that you do not reproduce or sell our creations. We appreciate your understanding and cooperation in respecting our content and intellectual property rights.

Accessibility Adjustments

Powered by OneTap

How long do you want to hide the toolbar?
Hide Toolbar Duration
Select your accessibility profile
Vision Impaired Mode
Enhances website's visuals
Seizure Safe Profile
Clear flashes & reduces color
ADHD Friendly Mode
Focused browsing, distraction-free
Blindness Mode
Reduces distractions, improves focus
Epilepsy Safe Mode
Dims colors and stops blinking
Content Modules
Font Size

Default

Line Height

Default

Color Modules
Orientation Modules