
Bring the world of Dr. Seuss to life with a fun and simple craft inspired by the iconic book, “The Lorax.” This project uses an everyday kitchen tool – a potato masher – to create the perfect fluffy texture for the Lorax’s face.
It’s an excellent activity for celebrating Dr. Seuss’s birthday, Earth Day, or any day that needs a splash of creative fun. This tutorial will guide you through making your own vibrant and textured Lorax character.
Craft Supplies:
- Potato Masher: A classic grid-style masher works best for this project.
- Orange Craft Paint: A bright, bold orange will bring your Lorax to life. Washable tempera paint is a great choice for kids.
- Paper Plate: This will serve as your paint palette.
- Cardstock Paper: We recommend light blue to make the orange pop, but white or any other color works too.
- Yellow Craft Foam or Cardstock: For creating the signature mustache and eyebrows.
- Large Googly Eyes: The bigger and wiggier, the better!
- Scissors: For cutting out the mustache and eyebrows.
- Glue: School glue or a glue stick will work perfectly.
- Optional: Black marker, glitter, or other embellishments.
Directions:
- First, squeeze a generous amount of orange paint onto your paper plate. Spread it around a little to create an even surface. This will make it easier to coat the potato masher evenly.
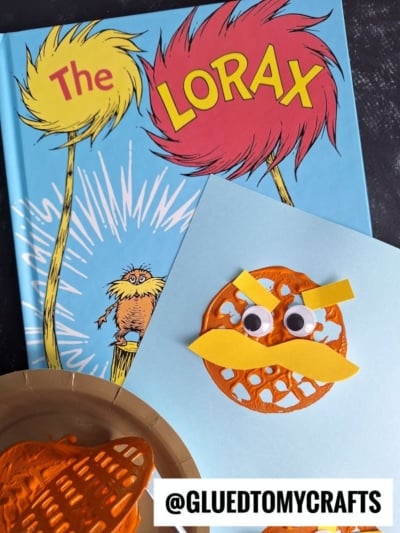
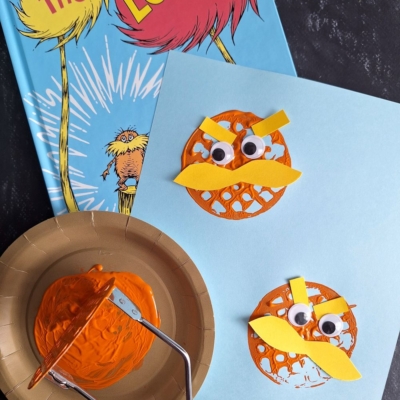
- Take your potato masher and press it firmly into the orange paint on the paper plate. Make sure the entire grid of the masher is covered in paint. Then, lift the masher and press it down onto your sheet of light blue cardstock. Wiggle it just a little to ensure a good transfer of paint. Lift the masher straight up to reveal a perfectly textured, round, orange shape. This will be the Lorax’s face! You can make one, two, or a whole page of them. Let the paint dry completely.
- While the paint is drying, it’s time to make the Lorax’s famous facial hair. Using your scissors, cut a large, bushy mustache shape out of the yellow craft foam or cardstock. A wavy, droopy shape works best. Next, cut out two small, rectangular pieces for the eyebrows.
- Once the orange paint is dry, it’s time to bring your character to life. Glue the large googly eyes onto the upper half of the stamped orange circle. Then, glue the big yellow mustache directly below the eyes. Finally, add the two small yellow eyebrows above the eyes. You can angle them slightly to give your Lorax a bit of personality – whether he looks grumpy, surprised, or wise is up to you!
- If you want to add more detail, you can use a black marker to draw a small nose or mouth beneath the mustache. A little bit of yellow or orange glitter sprinkled on the mustache can also add a magical touch.
- Allow your artwork to dry completely before displaying it proudly for all to see!
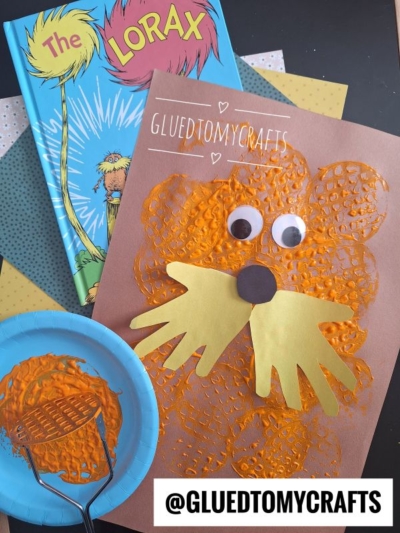
RELATED —> Popsicle Stick Lorax w/Handprint Beard Craft Idea
Recreating this Potato Masher Stamped Lorax is a fantastic way to spend an afternoon. The result is a vibrant piece of art that celebrates a beloved literary character and his important message.
We would love to see your finished Lorax crafts! Share a photo of your creation on social media and tag us. And if you’re looking for more ways to get creative, be sure to explore our other Dr. Seuss-inspired craft ideas for endless fun. Happy crafting!

Potato Masher Lorax Craft Tutorial for Kids
Create a fun Dr. Seuss craft with our easy tutorial! Use a potato masher and paint to make a unique, textured Lorax. Perfect for kids and families.
Here’s your checklist of supplies to bring this craft to life:
- Cardstock Paper
- Craft Paint
- Wiggle Eyes
- Embellishments
- School Glue
Prepare your creative haven by laying down a protective cover before the crafting magic begins!
Directions:
- First, squeeze a generous amount of orange paint onto your paper plate. Spread it around a little to create an even surface. This will make it easier to coat the potato masher evenly.
- Take your potato masher and press it firmly into the orange paint on the paper plate. Make sure the entire grid of the masher is covered in paint. Then, lift the masher and press it down onto your sheet of light blue cardstock. Wiggle it just a little to ensure a good transfer of paint. Lift the masher straight up to reveal a perfectly textured, round, orange shape. This will be the Lorax's face! You can make one, two, or a whole page of them. Let the paint dry completely.
- While the paint is drying, it's time to make the Lorax's famous facial hair. Using your scissors, cut a large, bushy mustache shape out of the yellow craft foam or cardstock. A wavy, droopy shape works best. Next, cut out two small, rectangular pieces for the eyebrows.
- Once the orange paint is dry, it's time to bring your character to life. Glue the large googly eyes onto the upper half of the stamped orange circle. Then, glue the big yellow mustache directly below the eyes. Finally, add the two small yellow eyebrows above the eyes. You can angle them slightly to give your Lorax a bit of personality - whether he looks grumpy, surprised, or wise is up to you!
- If you want to add more detail, you can use a black marker to draw a small nose or mouth beneath the mustache. A little bit of yellow or orange glitter sprinkled on the mustache can also add a magical touch.
- Allow your artwork to dry completely before displaying it proudly for all to see!
Grab our favorite books via our Amazon affiliate link! In our Amazon storefront you will find books, toys and craft supplies we absolutely love using for our Glued To My Crafts tutorials!
If you've enjoyed our content or have any thoughts to share, we'd love to hear from you! Mention @gluedtomycrafts or tag #gluedtomycrafts on Instagram!