
Summer days call for colorful, engaging activities that keep little hands busy and creative minds growing. If you need a simple afternoon project, we have the perfect solution. You can skip the expensive craft kits and head straight to your kitchen drawer.
This potato masher stamped ice cream cone craft brings imagination and sensory play together perfectly. It transforms an ordinary kitchen utensil into a fantastic art tool, allowing children to stamp textured, fluffy-looking ice cream scoops onto their paper.
You will learn exactly how to set up this activity, what materials you need, and why process art matters for early childhood development. Get ready to scoop up some fun with a craft that looks almost sweet enough to eat!
Materials You Will Need for Your Ice Cream Craft
You only need a few simple supplies to bring this summer craft to life. Gather the following items before you invite your little ones to the table:
- A metal or plastic potato masher
- Thick, washable acrylic or tempera paint (pink, brown, or white work great for ice cream flavors)
- A sturdy paper plate (to hold the paint)
- Light blue cardstock or heavy construction paper for the background
- Brown kraft paper or brown construction paper (for the cone)
- A black marker
- A washable school glue stick
- Craft scissors
- Fun toppings: Sequins, small felt hearts, glitter, or tiny pom-poms
Step-by-Step Instructions: Making Your Stamped Ice Cream
Setting up this craft takes only a few minutes. Follow these simple steps to ensure a smooth, fun, and creative crafting session.
Step 1: Prepare Your Craft Station
Start by clearing a flat surface and laying down some newspaper or a washable craft mat. Pour a generous mound of thick paint onto your paper plate. You want the paint pile to be wide enough to accommodate the entire base of the potato masher.
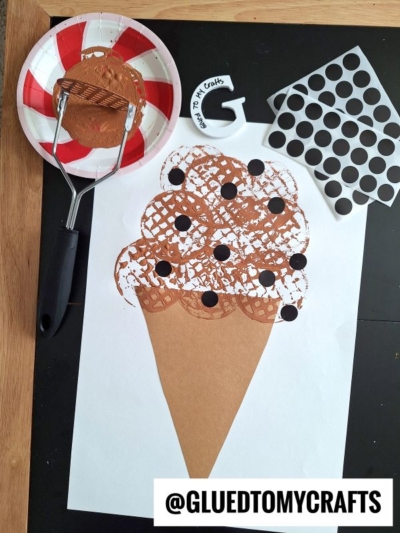
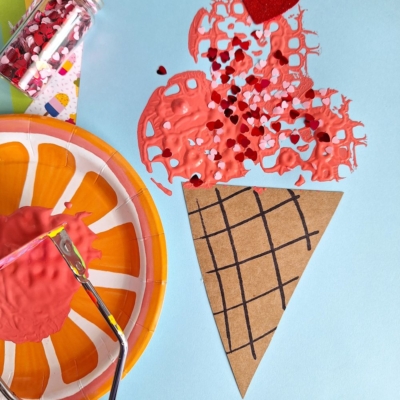
Step 2: Create the Waffle Cone
Grab your brown paper and help your child cut out a large triangle to serve as the ice cream cone. Once you have your triangle, use the black marker to draw a simple criss-cross grid pattern on it. This makes it look exactly like a real waffle cone. Use your glue stick to attach the cone to the bottom half of your light blue cardstock.
Step 3: Stamp the Ice Cream Scoops
Now comes the most exciting part. Have your child take the potato masher and press it firmly into the paint on the paper plate. Make sure the bottom is evenly coated. Then, guide them to stamp the loaded potato masher onto the cardstock, right above the paper cone. They can stamp one giant scoop or create a towering three-scoop sundae!
Step 4: Add Fun Toppings
While the paint is still wet, it is time to decorate. Provide a small bowl of sequins, felt hearts, or mini pom-poms. Let your kids sprinkle their “sprinkles” directly onto the wet paint. The thick paint acts as an adhesive, so you do not even need extra glue for this step. If you have a larger red felt heart or a red pom-pom, place it at the very top for the cherry.
Step 5: Let It Dry
Because this project uses thick, stamped paint, it will need ample time to dry. Set the artwork in a safe, flat space overnight.
RELATED —> Cupcake Liner Ice Cream Craft Idea
Making art should feel joyful, accessible, and free of strict rules. By using a potato masher, you remove the pressure of painting perfectly inside the lines. You empower kids to make bold, textured marks on their paper while celebrating the messy, wonderful process of childhood creativity.
Grab your supplies, clear off the kitchen table, and enjoy making some sweet summer memories with this adorable ice cream craft today. Happy crafting, my friends!

Potato Masher Stamped Ice Cream Cone Craft Idea
Here’s your checklist of supplies to bring this craft to life:
- Cardstock Paper
- Craft Paint
- Embellishments
- School Glue
Prepare your creative haven by laying down a protective cover before the crafting magic begins!
Directions:
- Start by clearing a flat surface and laying down some newspaper or a washable craft mat. Pour a generous mound of thick paint onto your paper plate. You want the paint pile to be wide enough to accommodate the entire base of the potato masher.
- Grab your brown paper and help your child cut out a large triangle to serve as the ice cream cone. Once you have your triangle, use the black marker to draw a simple criss-cross grid pattern on it. This makes it look exactly like a real waffle cone. Use your glue stick to attach the cone to the bottom half of your light blue cardstock.
- Now comes the most exciting part. Have your child take the potato masher and press it firmly into the paint on the paper plate. Make sure the bottom is evenly coated. Then, guide them to stamp the loaded potato masher onto the cardstock, right above the paper cone. They can stamp one giant scoop or create a towering three-scoop sundae!
- While the paint is still wet, it is time to decorate. Provide a small bowl of sequins, felt hearts, or mini pom-poms. Let your kids sprinkle their "sprinkles" directly onto the wet paint. The thick paint acts as an adhesive, so you do not even need extra glue for this step. If you have a larger red felt heart or a red pom-pom, place it at the very top for the cherry.
- Because this project uses thick, stamped paint, it will need ample time to dry. Set the artwork in a safe, flat space overnight.
CLICK HERE TO PRINT THE DIRECTIONS FOR THIS CRAFT