Spring brings a wonderful opportunity to brighten up our homes and classrooms with colorful art. When the weather starts warming up and the real flowers begin to bloom outside, you can capture that same magic indoors. If you want a cheerful, budget-friendly activity that kids will absolutely love, this pool noodle stamped tulip craft is the perfect fit.
This project uses basic craft supplies and gives a brilliant second life to an ordinary summer toy. By transforming a simple piece of foam into a custom paint stamp, children can easily create beautiful, textured floral masterpieces. We will show you exactly how to set up, execute, and customize this delightful spring activity.
Materials You Need for Pool Noodle Tulips
You likely already have most of these items hiding in your craft closet or kitchen. Here is exactly what you need to get started on your spring garden artwork:
- One pool noodle: Any color will work, as it simply acts as the stamp.
- A serrated knife or craft knife: For adult use only, to cut the pool noodle.
- Acrylic or washable tempera paint: Bright spring colors like orange, yellow, pink, and red work beautifully.
- A paper plate: A standard round paper plate makes the perfect disposable paint palette.
- Sturdy colored paper: Light blue or green cardstock provides a great contrasting background for bright flowers.
- A green permanent marker or craft marker: You will use this to draw the stems and leaves.
Step-by-Step Instructions
Ready to plant your paper garden? Follow these simple steps to help your little ones create their own stamped tulip art.
Step 1: Prep Your Pool Noodle Stamp
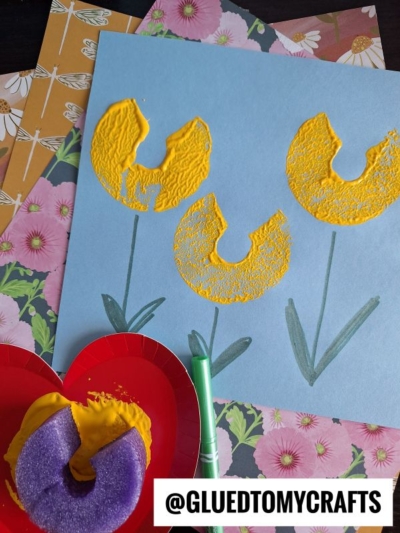
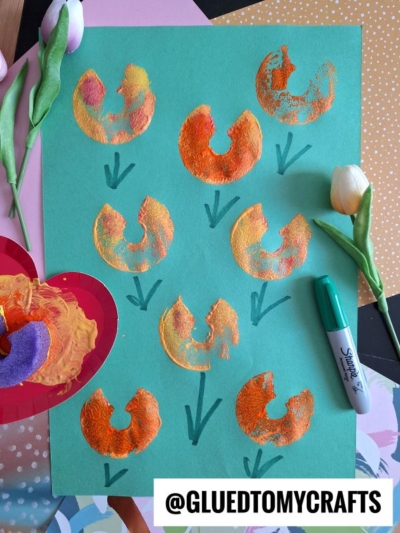
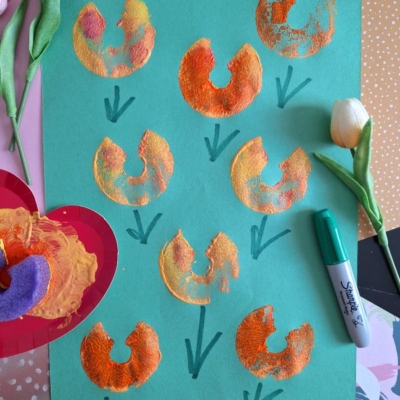
This step requires an adult. Take your pool noodle and slice off a piece about two inches thick. You want it to be thick enough for little hands to grip easily without getting their fingers completely covered in paint.
Once you have your foam circle, cut a small wedge out of the top. You want the final shape to look like a thick letter “C” or a crescent moon. This specific shape perfectly mimics the curved, slightly open petals of a blooming spring tulip.
Step 2: Set Up the Paint Station
Grab your paper plate and squirt a generous amount of paint right in the center. If you want to create beautiful, multi-dimensional flowers, try placing two colors right next to each other. For example, add a squirt of bright orange right beside a squirt of sunny yellow.
Place your green or blue background paper flat on the table. Make sure the kids are wearing their craft smocks, as stamping can sometimes get a little enthusiastic!
Step 3: Stamp the Tulip Heads
Now comes the fun part. Have your child take the shaped pool noodle stamp and dip the flat side directly into the paint. Encourage them to gently tap the stamp on an empty section of the plate once or twice to remove large clumps of excess paint.
Next, press the paint-covered foam firmly onto the colored paper. Lift the stamp straight up to reveal a beautiful, textured tulip head. Repeat this process across the paper to create a whole field of flowers. Leave a few inches of space beneath each stamped shape so you have room to add the stems later.
Step 4: Draw the Stems and Leaves
Give the paint a few minutes to dry. The porous texture of the sponge stamp usually leaves a thin, mottled layer of paint that dries relatively quickly.
Once the tulip heads are dry to the touch, hand your child the green marker. Have them draw a straight line down from the bottom of each stamped flower. Then, let them add two simple, pointed leaves at the base of each stem. This simple addition instantly transforms the abstract stamped shapes into a recognizable, beautiful spring garden.
RELATED —> Paper Plate & Paint Splat Tulip Craft

Creating beautiful art does not require expensive tools or complicated instructions. With a sliced-up pool noodle, some bright paint, and a little bit of imagination, your kids can welcome spring with a gorgeous homemade craft.
Gather your materials, set up your stamping station, and let the creative fun begin. We would love to see how your beautiful spring blooms turn out, so be sure to share this craft idea with your fellow parents and teachers!

Pool Noodle Stamped Tulip Flower Garden Craft Idea
Here’s your checklist of supplies to bring this craft to life:
- Cardstock Paper
- Craft Paint
- Embellishments
- Pool Noodle Slice
Prepare your creative haven by laying down a protective cover before the crafting magic begins!
Directions:
- This step requires an adult. Take your pool noodle and slice off a piece about two inches thick. You want it to be thick enough for little hands to grip easily without getting their fingers completely covered in paint.
- Once you have your foam circle, cut a small wedge out of the top. You want the final shape to look like a thick letter "C" or a crescent moon. This specific shape perfectly mimics the curved, slightly open petals of a blooming spring tulip.
- Grab your paper plate and squirt a generous amount of paint right in the center. If you want to create beautiful, multi-dimensional flowers, try placing two colors right next to each other. For example, add a squirt of bright orange right beside a squirt of sunny yellow.
- Place your green or blue background paper flat on the table. Make sure the kids are wearing their craft smocks, as stamping can sometimes get a little enthusiastic!
- Step 3: Stamp the Tulip Heads
- Now comes the fun part. Have your child take the shaped pool noodle stamp and dip the flat side directly into the paint. Encourage them to gently tap the stamp on an empty section of the plate once or twice to remove large clumps of excess paint.
- Next, press the paint-covered foam firmly onto the colored paper. Lift the stamp straight up to reveal a beautiful, textured tulip head. Repeat this process across the paper to create a whole field of flowers. Leave a few inches of space beneath each stamped shape so you have room to add the stems later.
- Give the paint a few minutes to dry. The porous texture of the sponge stamp usually leaves a thin, mottled layer of paint that dries relatively quickly.
- Once the tulip heads are dry to the touch, hand your child the green marker. Have them draw a straight line down from the bottom of each stamped flower. Then, let them add two simple, pointed leaves at the base of each stem. This simple addition instantly transforms the abstract stamped shapes into a recognizable, beautiful spring garden.
CLICK HERE TO PRINT THE DIRECTIONS FOR THIS CRAFT