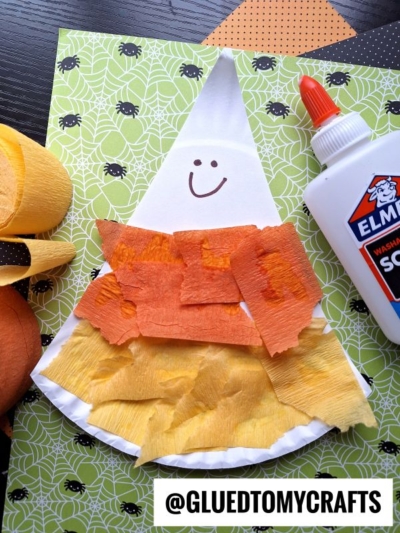
There’s something magical about candy corn. Those cheerful yellow, orange, and white stripes practically shout “Halloween is here!” And while the real candy might not last long in your house, this adorable paper plate version will stick around all season long.
This craft is a favorite here at @GLUEDTOMYCRAFTS because it checks all the right boxes. It uses supplies you probably already have in your craft drawer. It keeps little hands busy for a good chunk of time. And best of all, the tearing and gluing help build fine motor skills while your kids think they’re just having fun.
Whether you’re a parent looking for a rainy afternoon activity, a teacher planning a classroom project, or a caregiver hunting for something simple and mess-friendly, this candy corn craft is a winner. Let’s dive in!
Craft Supplies:
Gather these simple materials before you start:
- 1 white paper plate – the large, classic dinner-size works great
- Scissors – child-safe scissors are perfect for little helpers
- Orange crepe paper or streamers – for that middle stripe
- Yellow crepe paper or streamers – for the bottom stripe
- Elmer’s washable school glue – easy to clean and safe for kids
- A black marker – to draw on a happy little face
That’s it! No fancy tools, no expensive kits. Just craft-drawer basics.
Directions:
Step 1: Cut Your Candy Corn Shape
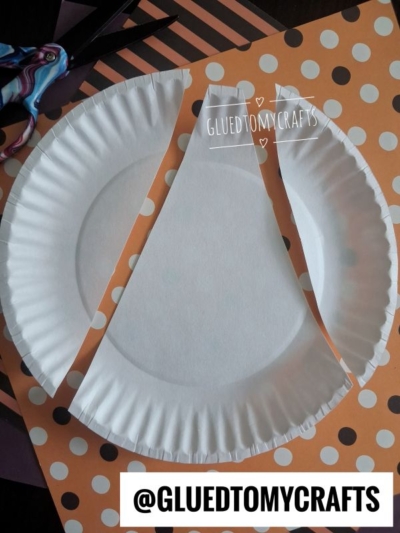
Start by cutting your white paper plate into a tall triangle, or wedge shape, just like a real piece of candy corn. Picture a slice of pizza with a rounded bottom edge.
Use the curved rim of the plate for the wide bottom of the triangle, then cut two straight lines up to a point at the top. If you’re working with younger kids, cut the shape out for them ahead of time. Older children can practice their scissor skills and do this part themselves.
Step 2: Glue On the Yellow Bottom
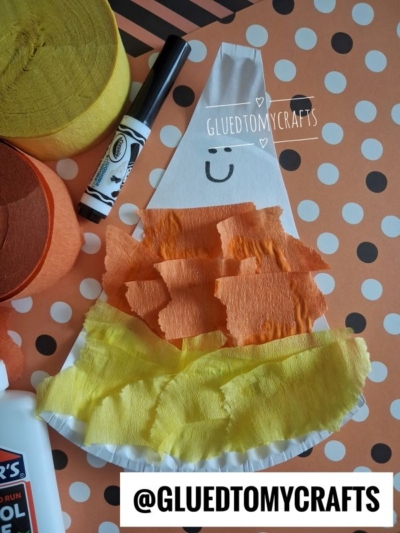
Now for the fun part. Tear your yellow crepe paper into small pieces, roughly the size of a quarter. There’s no need to be neat here. Torn edges give the finished craft a lovely textured look.
Cover the bottom third of your triangle with glue, then press the yellow pieces down one by one. Let them overlap and even hang slightly past the curved edge for extra fluff. This section becomes the bottom stripe of your candy corn.
Step 3: Add the Orange Middle
Next, move up to the middle section of your triangle. Tear your orange crepe paper into small pieces the same way you did with the yellow.
Spread glue across the middle third, then layer the orange pieces on top. Try to keep a clean line where the orange meets the yellow, but don’t stress about perfection. A little overlap only adds to the charm.
Step 4: Leave the Top White and Draw a Face
The pointed top of your triangle stays bare, showing off the plain white plate. This creates the classic white tip every candy corn is known for.
Once the glue has dried, grab your black marker and give your candy corn some personality. Draw two little dot eyes and a big curved smile. Just like that, your candy corn comes to life with a friendly grin!
RELATED —> Fork Painted Candy Corn Craft Idea For Fall
Most of all, remember that the real treat is the time spent crafting together. Don’t fuss over crooked lines or glue smudges. Those little imperfections are what make each candy corn one of a kind.
We’d love to see how yours turns out! Snap a photo of your finished crepe paper candy corn and tag us at @GLUEDTOMYCRAFTS so we can cheer on your tiny artists. Happy crafting, and happy Halloween!
