Spring has finally arrived, bringing a season of growth, blooming flowers, and plenty of crawling bugs. It is the perfect time to bring some of that outdoor magic inside with a creative art project. If you want a fresh and engaging activity for the little ones in your life, you are going to love this fork painted caterpillar craft.
Inspired by Eric Carle’s beloved children’s book, The Very Hungry Caterpillar, this simple process art activity is a fantastic way to spend an afternoon. Whether you are a parent, a teacher, or a caregiver, you will find this project incredibly easy to set up and highly rewarding for children.
It requires minimal supplies – most of which you probably already have in your kitchen or craft drawer – and offers a wonderful opportunity to blend story time with hands-on creativity.
Materials Needed for Your Caterpillar Craft
Before we start stamping, gather your supplies. You only need a handful of basic items to bring these friendly spring bugs to life.
- Construction Paper or Cardstock: Feel free to use whatever colors you have available.
- Green Craft Paint: Washable tempera or acrylic paint works perfectly.
- A Plastic Fork: A sturdy plastic fork makes an excellent stamping tool. The tines create the perfect ribbed texture for the caterpillar’s body.
- A Small Paper Plate: Use this as your paint palette.
- Googly Eyes: Grab a sheet of adhesive googly eyes in various sizes.
- A Green Marker: You will use this to draw the little antennae on the caterpillar’s head.
Step-by-Step Instructions for Fork Painting
Ready to get crafty? Follow these simple steps to help your kids create their textured masterpieces.
Step 1: Prep Your Workspace
Set up your crafting area by laying down some newspaper or a protective craft mat to catch any stray paint splatters. Place your construction paper in the center of the table. Squeeze a generous dollop of green paint onto your paper plate. Keep your plastic fork, marker, and googly eyes within easy reach. If you are doing this in a classroom setting, you can easily set up multiple stations with a plate and fork at each one.
Step 2: Load the Fork with Paint
Show your child how to dip the back of the plastic fork into the green paint. You want to make sure the tines are evenly coated, but not dripping globally. You can gently tap the fork against the edge of the paper plate to remove any excess paint. This step is a great lesson in portion control for little hands!
Step 3: Stamp the Caterpillar Body
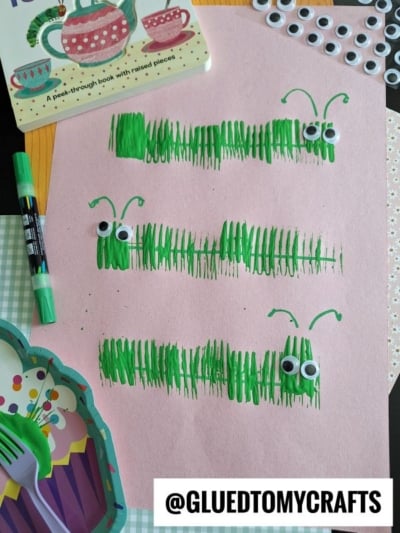
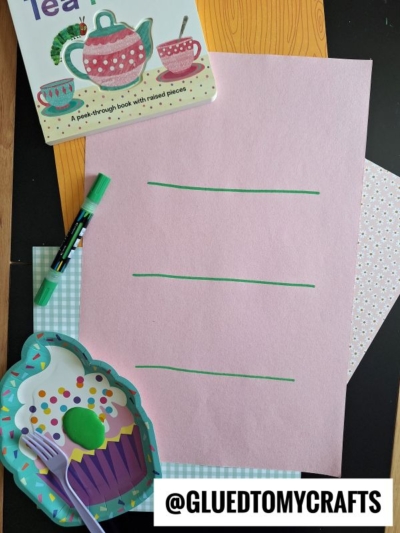
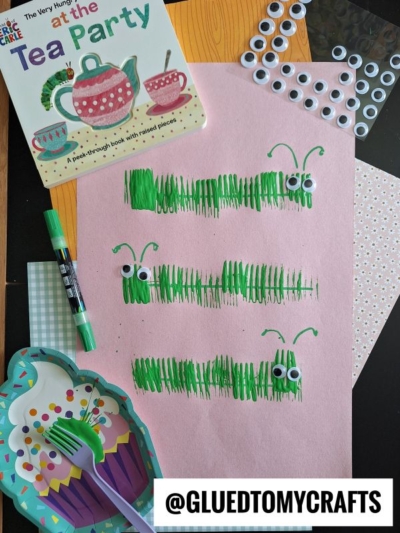
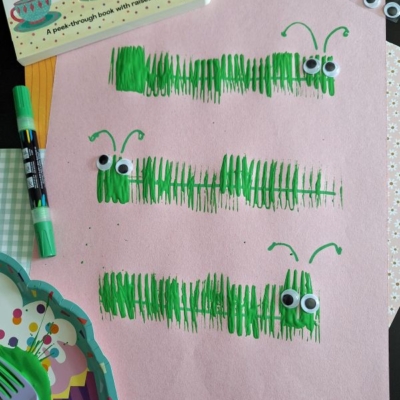
Before your child begins, have an adult use a marker to draw several long, horizontal lines on the paper as guides for where the caterpillars will go.
Now for the best part! Have your child press the painted fork firmly onto the pink paper, following along the drawn lines. When they lift the fork, it will leave behind a textured, ribbed print. To build the caterpillar’s body, they should stamp the fork repeatedly in a horizontal line. They can make the bugs as long or as short as they want.
Encourage them to experiment with the angle of the fork. They can create caterpillars crawling straight across the page, wiggling upward, or curving around the paper. Let them stamp two or three different bugs on the same page for a fun, lively scene.
Step 4: Add the Details
Once the caterpillar bodies are stamped, set the paper aside for a few minutes so the paint can dry. If you are impatient, a quick blast with a hairdryer on the cool setting speeds up the process.
After the green paint is dry to the touch, it is time to bring the caterpillars to life. Have your child peel and stick two googly eyes onto the first fork stamp (the “head” of the caterpillar). Finally, take your green marker and draw two curly antennae extending from the top of the head.
RELATED —> Potato Masher Caterpillar Craft Idea
This fork painted caterpillar craft is a wonderful way to celebrate spring, engage with classic children’s literature, and develop essential fine motor skills. Plus, the finished artwork looks absolutely adorable hanging on the refrigerator or a classroom bulletin board.
We would absolutely love to see how your wiggly, fork-stamped caterpillars turned out! Snap a photo of your child’s finished artwork and share it with us on social media. Tag us in your posts and let us know what your favorite part of the activity was. Happy crafting, my friends!

Fork Painted Caterpillar Craft Idea For Kids
Here’s your checklist of supplies to bring this craft to life:
- Cardstock Paper
- Craft Paint
- Embellishments
Prepare your creative haven by laying down a protective cover before the crafting magic begins!
Directions:
- Set up your crafting area by laying down some newspaper or a protective craft mat to catch any stray paint splatters. Place your construction paper in the center of the table. Squeeze a generous dollop of green paint onto your paper plate. Keep your plastic fork, marker, and googly eyes within easy reach. If you are doing this in a classroom setting, you can easily set up multiple stations with a plate and fork at each one.
- Show your child how to dip the back of the plastic fork into the green paint. You want to make sure the tines are evenly coated, but not dripping globally. You can gently tap the fork against the edge of the paper plate to remove any excess paint. This step is a great lesson in portion control for little hands!
- Before your child begins, have an adult use a marker to draw several long, horizontal lines on the paper as guides for where the caterpillars will go.
- Now for the best part! Have your child press the painted fork firmly onto the pink paper, following along the drawn lines. When they lift the fork, it will leave behind a textured, ribbed print. To build the caterpillar's body, they should stamp the fork repeatedly in a horizontal line. They can make the bugs as long or as short as they want.
- Encourage them to experiment with the angle of the fork. They can create caterpillars crawling straight across the page, wiggling upward, or curving around the paper. Let them stamp two or three different bugs on the same page for a fun, lively scene.
- Once the caterpillar bodies are stamped, set the paper aside for a few minutes so the paint can dry. If you are impatient, a quick blast with a hairdryer on the cool setting speeds up the process.
- After the green paint is dry to the touch, it is time to bring the caterpillars to life. Have your child peel and stick two googly eyes onto the first fork stamp (the "head" of the caterpillar). Finally, take your green marker and draw two curly antennae extending from the top of the head.
CLICK HERE TO PRINT THE DIRECTIONS FOR THIS CRAFT