Looking for a fun and easy craft for kids to recreate this summer? This pool noodle stamped fish project is creative, colorful, and uses simple supplies you likely have at home. Kids love the stamping process, and every fish turns out unique!
Materials You Need:
Before we start stamping, you need to gather a few basic supplies. You probably already have most of these items tucked away in your craft closet.
Here is the complete supply list for your underwater adventure:
- One pool noodle: You only need a small section, about two inches thick.
- Serrated knife: For an adult to cut the noodle segment safely.
- Washable paint: Acrylic or tempera paint works beautifully. We recommend bright colors like orange, pink, or yellow.
- Paper plates: These serve as the perfect disposable paint palettes.
- Light blue cardstock or construction paper: This acts as your ocean canvas.
- Large googly eyes: To give your fish some personality.
- Markers: Grab a few for drawing details on your paper.
- School glue: A glue stick or liquid craft glue will work.
Step-by-Step Instructions:
Now that you have your supplies ready, it is time to start crafting. Follow these simple steps to help your kids create an entire school of colorful, stamped fish.
Step 1: Prepare Your Stamping Station
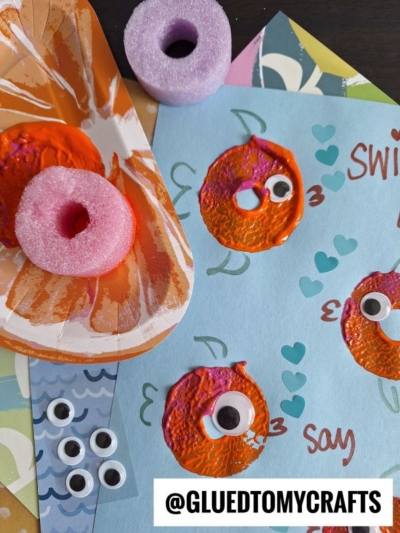
- First, an adult must carefully cut a two-inch slice off the end of the pool noodle. A serrated bread knife cuts through the foam cleanly and quickly. You can cut a few slices so that multiple children can craft at the same time, or so you have different stamps for different colors.
- Next, squirt your washable paints onto a paper plate. You do not need to mix the colors perfectly. Leaving the orange and pink slightly separated on the plate creates a wonderful marbled effect when you stamp it onto the paper.
Step 2: Dip and Stamp the Fish Bodies
- Hand the foam noodle slice to your child. Instruct them to dip one flat end of the noodle directly into the paint. Have them wiggle it slightly to ensure the entire foam ring is coated in a thick layer of color.
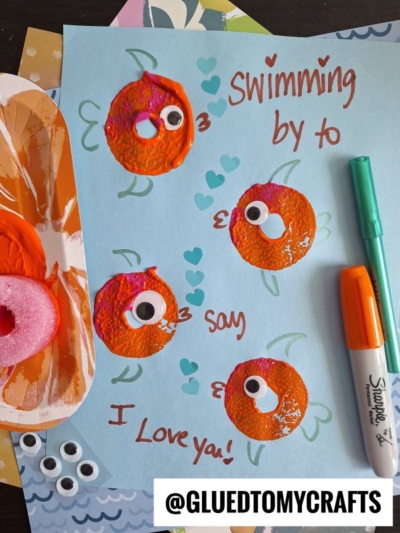
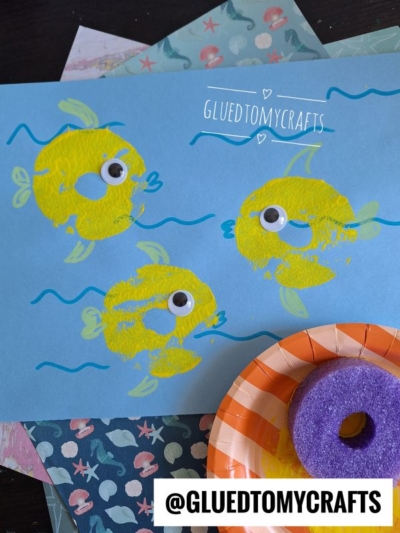
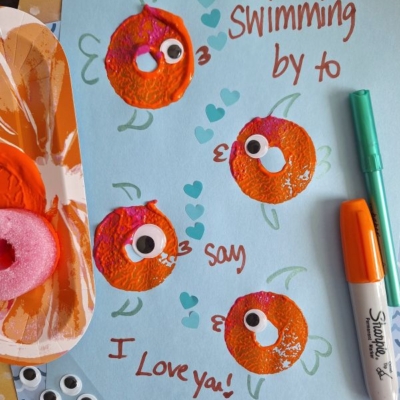
- Now, have them press the paint-covered noodle firmly onto the light blue paper. They should lift it straight up to reveal a perfect, colorful ring. This ring forms the main body of the fish.
- Repeat this process three or four times across the paper to create a whole family of swimming fish.
- Let the paint dry completely before moving on to the next step.
Step 3: Bring Your Fish to Life
- Once the paint feels dry to the touch, it is time to add some personality. Grab your googly eyes and your glue.
- Place a small dot of glue on the side of each painted ring. Press a large googly eye onto the glue. Adding the eye immediately transforms the simple circle into a recognizable creature. Kids love choosing exactly where the fish should look!
Step 4: Add Fins and Flippers
- Next, take out your colored markers. Use any color marker to draw small, curved fins on the top and bottom of the stamped circle.
- Then, use another color to draw a tail on the back of the fish. A fun and easy trick is to draw the number “3” right against the back edge of the circle. This instantly looks like a puckered fish tail. You can also draw a tiny little “w” shape at the front of the circle to create funny fish lips.
Step 5: Clean Up and Display
- Cleaning up after this craft is incredibly straightforward. Simply toss the paper plate palette. Wash the foam noodle stamps in the sink with warm water and dish soap, let them dry, and save them for your next process art adventure.
- Once your pool noodle stamped fish craft is completely dry, hang it proudly on the refrigerator or frame it for the playroom wall.
RELATED —> Pool Noodle Stamped Snow Tubing Bears
We hope you and your little ones had a fantastic time making these colorful stamped fish. Crafting together is such a wonderful way to build memories, and we always love seeing how each child brings their unique imagination to the table.
Come join the conversation on our Facebook page, post a picture of your finished craft, and say hello. We absolutely cannot wait to see the beautiful ocean scenes your family created!

Pool Noodle Stamped Fish Craft Idea
Grab some paint and foam to create an adorable pool noodle stamped fish craft with your kids. This simple tutorial is perfect for parents and teachers!
Here’s your checklist of supplies to bring this craft to life:
- Pool Noodle Slice
- Cardstock Paper
- Craft Paint
- Embellishments
- Paper Plate
Prepare your creative haven by laying down a protective cover before the crafting magic begins!
Directions:
- First, an adult must carefully cut a two-inch slice off the end of the pool noodle. A serrated bread knife cuts through the foam cleanly and quickly. You can cut a few slices so that multiple children can craft at the same time, or so you have different stamps for different colors.
- Next, squirt your washable paints onto a paper plate. You do not need to mix the colors perfectly. Leaving the orange and pink slightly separated on the plate creates a wonderful marbled effect when you stamp it onto the paper.
- Hand the foam noodle slice to your child. Instruct them to dip one flat end of the noodle directly into the paint. Have them wiggle it slightly to ensure the entire foam ring is coated in a thick layer of color.
- Now, have them press the paint-covered noodle firmly onto the light blue paper. They should lift it straight up to reveal a perfect, colorful ring. This ring forms the main body of the fish.
- Repeat this process three or four times across the paper to create a whole family of swimming fish.
- Let the paint dry completely before moving on to the next step.
- Once the paint feels dry to the touch, it is time to add some personality. Grab your googly eyes and your glue.
- Place a small dot of glue on the side of each painted ring. Press a large googly eye onto the glue. Adding the eye immediately transforms the simple circle into a recognizable creature. Kids love choosing exactly where the fish should look!
- Next, take out your colored markers. Use any color marker to draw small, curved fins on the top and bottom of the stamped circle.
- Then, use another color to draw a tail on the back of the fish. A fun and easy trick is to draw the number "3" right against the back edge of the circle. This instantly looks like a puckered fish tail. You can also draw a tiny little "w" shape at the front of the circle to create funny fish lips.
- Cleaning up after this craft is incredibly straightforward. Simply toss the paper plate palette. Wash the foam noodle stamps in the sink with warm water and dish soap, let them dry, and save them for your next process art adventure.
- Once your pool noodle stamped fish craft is completely dry, hang it proudly on the refrigerator or frame it for the playroom wall.
Grab our favorite books via our Amazon affiliate link! In our Amazon storefront you will find books, toys and craft supplies we absolutely love using for our Glued To My Crafts tutorials!
If you've enjoyed our content or have any thoughts to share, we'd love to hear from you! Mention @gluedtomycrafts or tag #gluedtomycrafts on Instagram!