
The holiday season brings a wonderful opportunity to gather around the kitchen table and make memories through crafting. If you want a joyful, budget-friendly activity to keep little hands busy, we have the perfect project for you. This paper bag and handprint angel craft transforms simple household items into a charming Christmas decoration.
Children love seeing their handprints turn into something magical. This project combines painting, cutting, and sparkling decorations, offering a delightful sensory experience for young crafters.
Materials You Need for Your Angel
Gathering your supplies beforehand ensures a smooth and enjoyable crafting session. For this paper bag angel craft, you will need the following items:
- Brown paper lunch bags: The standard size works best. The bottom flap of the bag will serve as the angel’s face.
- Pink acrylic paint or craft paint: This will give the angel’s dress a bright, cheerful pop of color.
- White cardstock or heavy construction paper: You will use this to trace and cut out your child’s handprints for the wings.
- Gold pipe cleaners: These metallic stems will bend easily to form the angel’s glowing halo.
- Glitter: A mix of gold and multi-colored star-shaped glitter adds that essential holiday sparkle.
- Markers or crayons: For drawing on the face and hair.
- Basic crafting tools: Keep a pair of kid-friendly scissors, a paint brush, and a strong craft glue or glue stick nearby.
- Tape (optional): A small piece of clear tape helps secure the halo firmly to the back of the bag.
Step-by-Step Instructions
Follow these simple steps to bring your paper bag angel to life. Remember to lay down some old newspapers or a plastic tablecloth to catch any stray paint or glitter.
Step 1: Paint the Angel’s Dress
Lay the brown paper bag flat on your work surface. The folded bottom flap of the bag should face upward and point toward you—this flap will become the head.
Take your pink paint and coat the lower portion of the paper bag. Leave the top flap (the face) completely unpainted. You can apply a solid coat of pink or let your child use a sponge brush to create a fun, textured look.
Step 2: Add the Holiday Sparkle
While the pink paint remains wet, it is time for the best part – the glitter! Have your child sprinkle the gold and star-shaped glitter directly onto the wet paint. The wet paint acts as an adhesive, gripping the glitter as it dries. Once you finish sprinkling, set the bag aside and allow the paint to dry completely. This usually takes about thirty to forty-five minutes.
Step 3: Create the Handprint Wings
While you wait for the angel’s dress to dry, you can work on the wings. Grab your white cardstock and a pencil. Gently trace your child’s left and right hands.
Once you have clear outlines, use your scissors to cut out both handprints. These personal little handprints will serve as the lovely, feathery wings for your angel. If your child is old enough, let them practice their cutting skills on this step.
Step 4: Draw the Angel’s Face
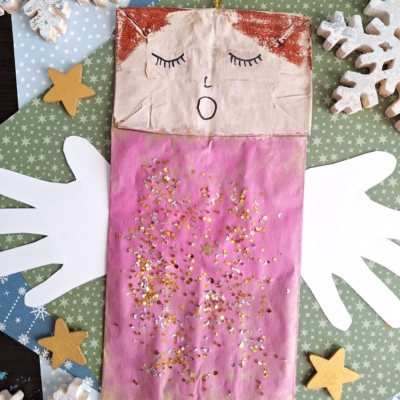
Once the pink paint dries, focus on the unpainted top flap of the paper bag. Use a black marker to draw a sweet, peaceful face. Draw two small, closed arches for the eyes, and add tiny lines for eyelashes. Draw a small circular “O” shape for a singing mouth.
Next, use your reddish-brown markers or crayons to color the top corners of the flap, framing the face with beautiful hair.
Step 5: Craft the Golden Halo
Take a gold pipe cleaner and bend one end into a small circle to form the halo. Twist the end around the stem to secure the loop. Leave a straight tail of about two to three inches extending down from the circle.
Attach this tail to the back of the paper bag, positioning it so the golden halo hovers just above the angel’s painted head. You can use craft glue, but a piece of clear tape often holds the wire more securely.
Step 6: Assemble the Angel
Now, bring all the pieces together. Take the two white handprint wings and glue them to the back of the paper bag. Position them so the fingers point outward, extending past the sides of the pink dress. Press down firmly and let the glue set. Your adorable paper bag and handprint angel is now complete! Allow it all to dry completely before playing/displaying proudly!
RELATED —> “A” is for Angel Ornament
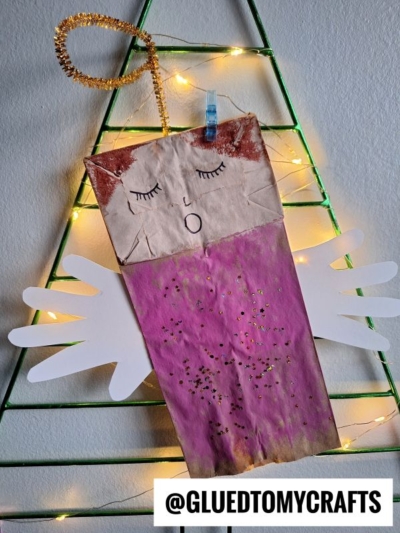
Crafting offers a wonderful way to slow down and connect during the frantic holiday season. This paper bag and handprint angel craft requires minimal supplies but delivers maximum joy. By combining the rustic charm of a brown paper bag with bright paint, sparkling glitter, and the personal touch of your child’s handprints, you create a decoration full of character and love.
Gather your supplies, clear off the kitchen table, and invite your family to make a whole choir of sweet paper bag angels today! Happy crafting, my friends!

Easy Paper Bag Handprint Angel Craft for Christmas
Here’s your checklist of supplies to bring this craft to life:
- Brown Paper Bag
- Cardstock Paper
- Craft Paint
- Pipe Cleaners
- Embellishments
Prepare your creative haven by laying down a protective cover before the crafting magic begins!
Directions:
- Lay the brown paper bag flat on your work surface. The folded bottom flap of the bag should face upward and point toward you—this flap will become the head.
- Take your pink paint and coat the lower portion of the paper bag. Leave the top flap (the face) completely unpainted. You can apply a solid coat of pink or let your child use a sponge brush to create a fun, textured look.
- While the pink paint remains wet, it is time for the best part - the glitter! Have your child sprinkle the gold and star-shaped glitter directly onto the wet paint. The wet paint acts as an adhesive, gripping the glitter as it dries. Once you finish sprinkling, set the bag aside and allow the paint to dry completely. This usually takes about thirty to forty-five minutes.
- While you wait for the angel's dress to dry, you can work on the wings. Grab your white cardstock and a pencil. Gently trace your child's left and right hands.
- Once you have clear outlines, use your scissors to cut out both handprints. These personal little handprints will serve as the lovely, feathery wings for your angel. If your child is old enough, let them practice their cutting skills on this step.
- Once the pink paint dries, focus on the unpainted top flap of the paper bag. Use a black marker to draw a sweet, peaceful face. Draw two small, closed arches for the eyes, and add tiny lines for eyelashes. Draw a small circular "O" shape for a singing mouth.
- Next, use your reddish-brown markers or crayons to color the top corners of the flap, framing the face with beautiful hair.
- Take a gold pipe cleaner and bend one end into a small circle to form the halo. Twist the end around the stem to secure the loop. Leave a straight tail of about two to three inches extending down from the circle.
- Attach this tail to the back of the paper bag, positioning it so the golden halo hovers just above the angel's painted head. You can use craft glue, but a piece of clear tape often holds the wire more securely.
- Now, bring all the pieces together. Take the two white handprint wings and glue them to the back of the paper bag. Position them so the fingers point outward, extending past the sides of the pink dress. Press down firmly and let the glue set. Your adorable paper bag and handprint angel is now complete! Allow it all to dry completely before playing/displaying proudly!
CLICK HERE TO PRINT THE DIRECTIONS FOR THIS CRAFT