Finding an easy, low-mess craft that keeps kids engaged can sometimes feel like searching for a shooting star. If you need a simple activity that yields adorable results, you will absolutely love this “Love You To The Moon and Back” aluminum foil craft.
Perfect for parents and teachers alike, this project requires minimal setup and uses basic supplies you likely already have tucked away in your kitchen and craft closet. Tearing and crumpling the foil provides excellent fine motor skill practice for little hands, while the open-ended decorating step encourages boundless creativity.
By the end of this quick tutorial, you will have exactly what you need to guide your kids through creating a textured, shimmering moon masterpiece that makes a perfect heartfelt gift for Valentine’s Day, Mother’s Day, or just because.
Craft Supplies:
Gathering your supplies takes only a minute or two. You will need the following items to get started:
- Dark paper: Black, dark blue, or dark gray cardstock works best to represent the night sky.
- Aluminum foil: Standard kitchen foil is perfect.
- Glue: A standard bottle of liquid school glue (like Elmer’s) works much better than a glue stick for holding the textured foil in place.
- Markers: White, silver, or gold chalk markers show up beautifully on the dark paper.
- Scissors: For trimming the paper or cutting out decorative shapes.
- Optional decorations: Hearts and star stickers
Directions:
Follow these simple steps to help your little ones bring their textured moon to life.
- Start by laying your piece of dark cardstock flat on the table.
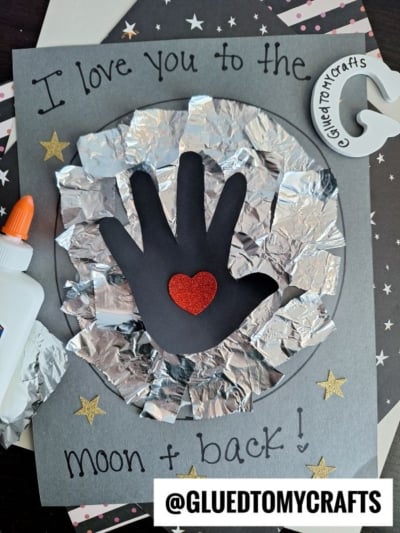
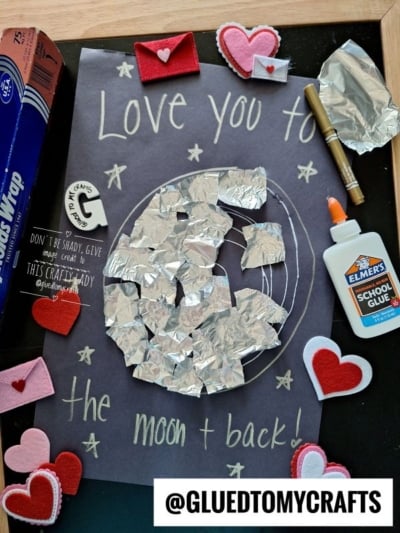
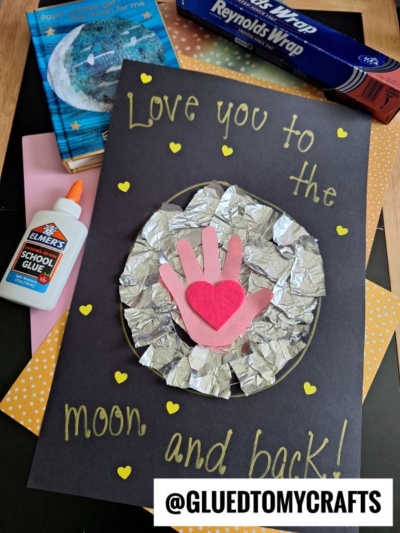
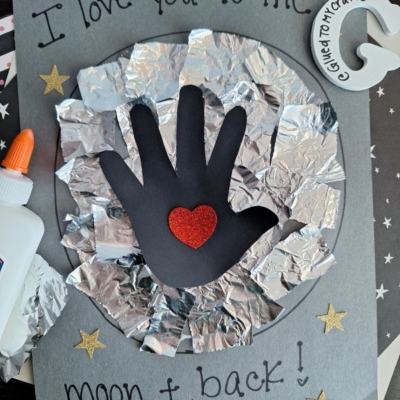
- Grab your white or metallic marker and draw a large circle right in the center of your dark paper. This circle serves as the guide for your child. It does not need to be perfectly round. A slightly uneven circle actually gives the finished moon a more natural, organic look.
- Now comes the most fun part for the kids! Hand them a sheet of aluminum foil and instruct them to tear it into small pieces. Once they have a pile of torn foil, have them gently crumple each piece into a small, textured ball. Do not let them smash the foil too tightly; a loose crumple creates those wonderful craters and shadows that make the moon look realistic.
- Help your child apply a generous layer of liquid school glue inside the drawn circle. They can squeeze the glue directly onto the paper, filling the circle entirely. Next, have them press their crumpled foil pieces into the wet glue. Encourage them to pack the foil pieces closely together until the entire circle is filled with a shiny, textured surface.
- Once the moon is securely glued in place, it is time to personalize the artwork. Use your bright markers to write the phrase, “Love you to the moon + back!” around the foil moon.
- Add stars: Stick golden glitter stars around the sky, or draw them using your metallic markers.
- Include a handprint: Cut a handprint out of black paper and glue it directly over the foil moon for an incredibly cute, personalized silhouette.
- Attach hearts: Glue small felt or paper hearts around the text to emphasize the loving theme.
- Allow your piece to dry completely before displaying/gifting away proudly!
RELATED —> Aluminum Foil & Torn Paper Fish Craft Idea
This aluminum foil craft proves that you do not need expensive supplies or complicated techniques to make beautiful, meaningful art with children. The tearing, crumpling, and gluing provide excellent sensory input, and the finished product serves as a sweet keepsake.
Grab a roll of foil from your kitchen drawer, lay out some dark paper, and invite your kids to the table. They will love building their very own glowing moon, and you will love the memories you make together. Happy crafting, my friends!!!

Aluminum Foil Moon Craft for Kids
Create a beautiful "Love You to the Moon and Back" aluminum foil craft with your kids. Get simple step-by-step instructions and material lists here.
Here’s your checklist of supplies to bring this craft to life:
- Cardstock Paper
- Aluminum Foil
- Embellishments
- School Glue
Prepare your creative haven by laying down a protective cover before the crafting magic begins!
Directions:
- Start by laying your piece of dark cardstock flat on the table.
- Grab your white or metallic marker and draw a large circle right in the center of your dark paper. This circle serves as the guide for your child. It does not need to be perfectly round. A slightly uneven circle actually gives the finished moon a more natural, organic look.
- Now comes the most fun part for the kids! Hand them a sheet of aluminum foil and instruct them to tear it into small pieces. Once they have a pile of torn foil, have them gently crumple each piece into a small, textured ball. Do not let them smash the foil too tightly; a loose crumple creates those wonderful craters and shadows that make the moon look realistic.
- Help your child apply a generous layer of liquid school glue inside the drawn circle. They can squeeze the glue directly onto the paper, filling the circle entirely. Next, have them press their crumpled foil pieces into the wet glue. Encourage them to pack the foil pieces closely together until the entire circle is filled with a shiny, textured surface.
- Once the moon is securely glued in place, it is time to personalize the artwork. Use your bright markers to write the phrase, "Love you to the moon + back!" around the foil moon.
- Add stars: Stick golden glitter stars around the sky, or draw them using your metallic markers.
- Include a handprint: Cut a handprint out of black paper and glue it directly over the foil moon for an incredibly cute, personalized silhouette.
- Attach hearts: Glue small felt or paper hearts around the text to emphasize the loving theme.
- Allow your piece to dry completely before displaying/gifting away proudly!
CLICK HERE TO PRINT THE DIRECTIONS FOR THIS CRAFT
If you've enjoyed our content or have any thoughts to share, we'd love to hear from you! Mention @gluedtomycrafts or tag #gluedtomycrafts on Instagram!