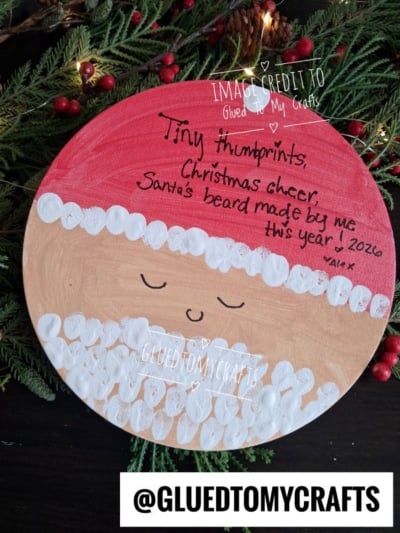
Some ornaments come from the store. The best ones come from little hands.
This Thumbprint Santa Beard Keepsake turns your child’s tiny prints into a jolly, rosy-cheeked Santa they’ll be proud to hang on the tree. Each white thumbprint becomes a puff of Santa’s fluffy beard, so no two keepsakes ever look the same. Add a sweet handwritten poem, the year, and your child’s name, and you’ve made something you’ll unwrap with a smile for many Christmases to come.
This craft works well at the kitchen table with one child or in a classroom with twenty. It’s simple enough for toddlers and still fun for older kids. And years from now, when those little thumbs aren’t so little anymore, you’ll be glad you saved this moment in paint.
Craft Supplies:
Gather everything before you call the kids over. Little crafters get wiggly fast, so having supplies ready makes the process smoother.
- Circular wooden disc or round canvas (a 4–6 inch wood slice, wooden round, or sturdy cardboard circle works well)
- Red paint (acrylic or craft paint)
- Peach or skin-tone paint
- White finger paint or washable white paint for the thumbprints
- Black permanent marker (a fine tip works best for details and lettering)
- Paintbrushes (one medium flat brush and one small brush)
- Pencil for light guidelines
- Paper plate or palette for paint
- Baby wipes or a damp paper towel for quick thumb cleanups
- Newspaper or a plastic tablecloth to protect your work surface
Optional extras:
- Clear sealer (spray sealer or a brush-on matte or gloss sealer)
- Ribbon, twine, or a sawtooth hanger for display
- Small drill or hot glue gun (adult use only) for attaching a hanger
- Pink paint or blush for rosy cheeks
Directions:
- Lay your wooden disc flat. With a pencil, lightly draw a curved line about 40% of the way down from the top. Everything above this line becomes Santa’s hat.
- Next, draw a second curved line a little more than halfway down. The space between the two lines will be Santa’s face. The bottom section is saved for his beard. Keep the lines light. Paint will cover them, and they don’t need to be perfect. Santa’s a pretty forgiving guy.
- Using your medium brush, paint the top section of the disc red. Older kids can do this part themselves. For younger children, you may want to handle it and let them help with the next steps.
- Add a second coat if the wood grain shows through. Let it dry fully, which usually takes about 15 to 20 minutes for craft paint.
- Once the red is dry, paint the middle section with your peach or skin-tone paint. Bring the color all the way down to the bottom edge of the disc. That way, any gaps between the beard thumbprints will show a soft face color instead of bare wood.
- Let this layer dry completely before moving on. Thumbprints on wet paint tend to smear and blend, and you want each print to stay crisp.
- Now the fun begins. Squeeze a small puddle of white finger paint onto a paper plate. Have your child press their thumb into the paint, then gently press it onto the line where the red hat meets the face.
- Keep pressing prints side by side across the whole line to form Santa’s fluffy hat trim. A light, firm press works better than a heavy smoosh.
- For a finishing touch, add one single white thumbprint at the very top of the hat. Just like that, Santa has a pom-pom.
- This is where Santa really comes to life. Have your child fill the bottom section of the disc with white thumbprints. Encourage them to overlap the prints and stack them in layers. The more prints, the fuller and fluffier the beard looks.
- Don’t worry about perfect rows. A slightly messy beard looks more natural and full of character. Leave a little peach space above the beard for Santa’s face details.
- Want to make it even more special? Let siblings each add a few prints to the same beard. It becomes a family Santa.
- Set the disc aside to dry for at least 30 minutes. Thick thumbprints can take a little longer, so give them time.
- Once everything is dry, grab your black marker. Draw two small curved arches for Santa’s closed, happy eyes. Then add a small U-shaped curve in the center for his nose.
- That’s it. Simple lines give Santa a sweet, peaceful look, like he’s dreaming of cookies and milk.
- This step turns a cute craft into a treasured keepsake. Using a fine black marker, write a short poem on the red hat section. Here’s a sweet one that fits perfectly: Tiny thumbprints, Christmas cheer, Santa’s beard made by me this year! [Year] ❤ [Child’s Name]
- Write it in pencil first if you’re nervous about spacing. Older kids may want to write their own name. Shaky letters and backward “S’s” only add to the charm.
- Once your Santa is fully dry (wait a few hours to be safe), protect it with a clear sealer. A spray sealer is quick, but an adult should apply it outdoors or in a well-ventilated space. Brush-on sealers work well too. Apply light coats so the marker doesn’t smear. Sealing is especially important if you used washable finger paint, since it can flake or rub off over time.
- Now keepsake canvas is complete! Display and/or proudly!
RELATED —> Cotton Ball & Popsicle Stick Santa Craft Idea

Our unique Thumbprint Santa Beard Keepsake idea is more than a holiday decoration. It’s a snapshot of this season, these little hands, and the joy of making something together. Whether you craft it at home, in a classroom, or at a holiday party, it’s sure to become a favorite.
So grab your paints, roll up those sleeves, and let the thumbprints fly. Santa’s beard is waiting. Happy crafting, my friends!