
The kitchen drawer holds one of the best holiday craft tools you own. That trusty spatula you use for pancakes makes a perfect stamp for painting a pile of colorful Christmas presents.
This easy craft is quick to set up, simple to clean up, and full of festive fun. Kids dip a spatula in craft paint, stamp present shapes onto paper, and top each one with a shiny gift bow. The result is a sweet, sparkly scene of wrapped gifts that looks like it came straight from Santa’s sleigh.
It works for toddlers, preschoolers, and big kids too. Whether you’re at home, in a classroom, or running a holiday playdate, this activity is sure to bring smiles.
Craft Supplies:
Gather these simple supplies before you start:
- Construction paper in any festive color
- A spatula with a flat, rectangular head (a plastic or silicone turner works best)
- Washable paint (we used red and green)
- A paper plate to hold the paint
- Small metallic package gift bows in red, gold, and green (the mini stick-on kind)
- Optional: glue dots or craft glue, a smock, paper towels, and a table cover
Pick the right spatula: Look for one with a smooth, solid head. Spatulas with slots or holes still work, but they’ll leave fun striped patterns in the paint. That can be a cool look too!
Directions:
Step 1: Set Up Your Craft Space
Cover your table with newspaper, a plastic tablecloth, or an old sheet. Put a smock or old T-shirt on your little crafter. Keep paper towels or a damp cloth close by for quick cleanups.
Step 2: Prepare the Paint
Squeeze a puddle of red paint and a puddle of green paint onto the paper plate. Place them side by side so they touch a little in the middle. This lets the colors swirl together when you dip, giving each present a pretty, blended look.
Step 3: Dip the Spatula
Hold the spatula by the handle and press the flat head into the paint. Show your child how to wiggle it gently so the whole surface gets covered. Aim for an even coat. Too much paint can smear, and too little can leave gaps.
Step 4: Stamp Your First Present
Lay the painted side of the spatula flat onto the construction paper. Press down firmly and hold for a second or two. Then lift it straight up. Ta-da! A perfect present shape appears.
Step 5: Keep Stamping
Dip again and stamp more presents across the page. Scatter them around, stack them in a pile, or line them up in a row like gifts under the tree. Five or six presents fill a standard sheet nicely, but there’s no wrong number.
Encourage kids to try different tricks:
- Dip in just red for a solid red gift
- Dip in just green for a solid green gift
- Swirl both for a mixed, marbled look
- Turn the spatula sideways for tall or wide presents
Step 6: Let the Paint Dry
Set the paper aside to dry. This usually takes 20 to 30 minutes, depending on how thick the paint is. Use this time to wash the spatula and tidy up. It’s also a great moment for a holiday story!
Step 7: Add the Gift Bows
Now for the best part. Peel the backing off a small metallic gift bow and press it into the center of each painted present. Mix up the colors with red, gold, and green bows for extra sparkle.
If the bow’s sticky back doesn’t hold well on the paper, add a glue dot or a small dab of craft glue underneath. Press and hold for a few seconds.
Step 8: Admire Your Christmas Presents
Step back and enjoy your festive pile of wrapped gifts! Each one now looks ready to be tucked under the tree.
RELATED —> Spatula Stamped Smores Craft Idea For Kids
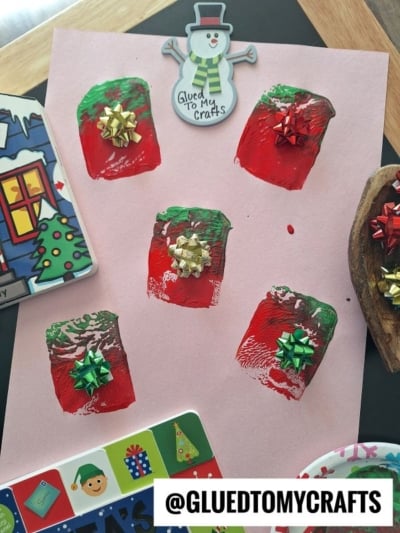
That’s all it takes to turn a simple kitchen spatula into a holiday art tool! This craft is cheerful, budget-friendly, and a wonderful way to make memories together this season.
We’d love to see your spatula stamped presents! Snap a photo of your little artist’s masterpiece and share it with friends, family, or your favorite craft community. Every pile of painted gifts is special, and yours might inspire someone else to grab a spatula and start stamping.
Happy crafting, and Merry Christmas! 🎁
