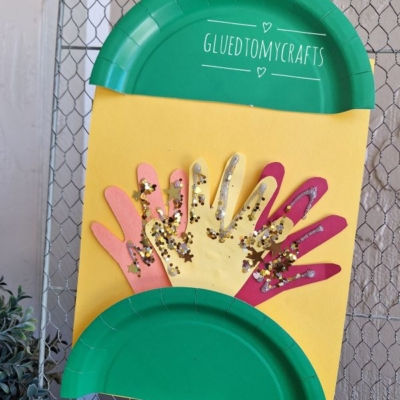
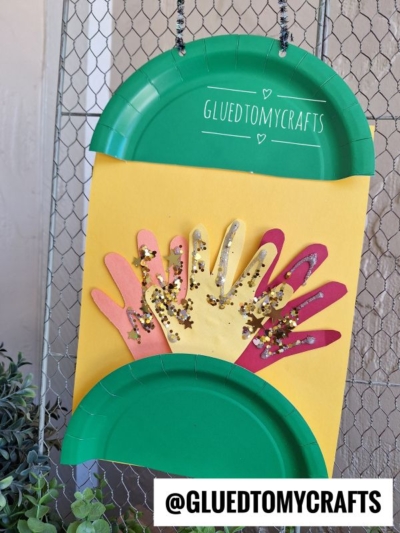
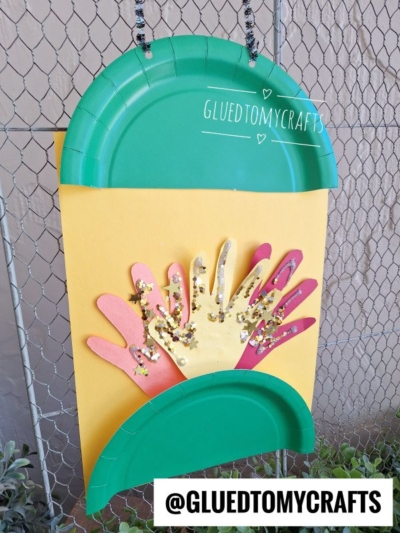
Summer camp is all about sunshine, laughter, and making things with your own two hands. This handprint lantern craft checks every box. It’s bright, it’s cheerful, and it turns a couple of ordinary paper plates into a glittery keepsake kids will be proud to hang up.
The best part? Each lantern includes handprint cutouts, so no two ever look the same. It’s a wonderful way to capture how little (or big!) those hands are this summer. Whether you’re a parent looking for a rainy-day activity, a teacher planning a group project, or a camp counselor wrangling a dozen excited kids, this craft is easy to set up and even easier to love!
Craft Supplies:
Here’s everything you’ll need to make one lantern. For a group, just multiply the amounts.
- Green paper plates (1 per lantern)
- Yellow construction paper (1 sheet for the base)
- Colored construction paper for the handprints (try orange, yellow, and red for a sunny mix)
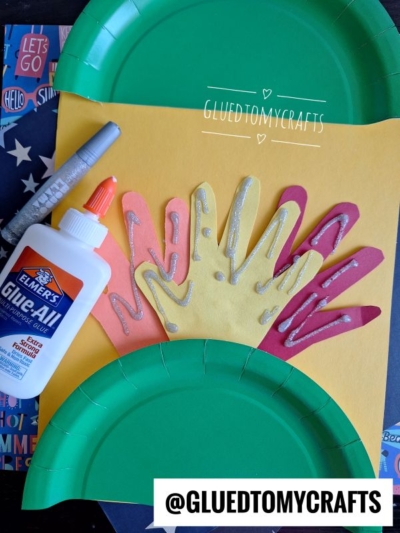
- Elmer’s glue
- Loose craft glitter or glitter glue pen
- Gold star sequins
- A pipe cleaner (chenille stem) for the hanger
- Scissors
- A hole punch
A quick tip before you start: cover your work surface with newspaper or a plastic tablecloth. Glitter glue and sequins have a way of traveling, and an easy cleanup keeps everyone happy.
Directions:
Step 1: Trace and Cut the Handprints
Have each child press a hand flat on a sheet of colored construction paper, fingers spread wide. Trace around it with a pencil. Repeat this two more times using different colors, so you end up with three handprints in all.
Cut out each handprint carefully along the lines. For younger kids, an adult can do the cutting while the little ones pick their favorite colors.
Step 2: Decorate the Handprints
Now for the sparkle. Grab the glitter glue pen and draw swirls, dots, and squiggly lines across each handprint. There’s no wrong way to do this, so let kids get creative.
While the glue is still wet, press a few gold star sequins onto each hand. The damp glue will hold them in place as they dry. Set the handprints aside to dry while you build the lantern frame.
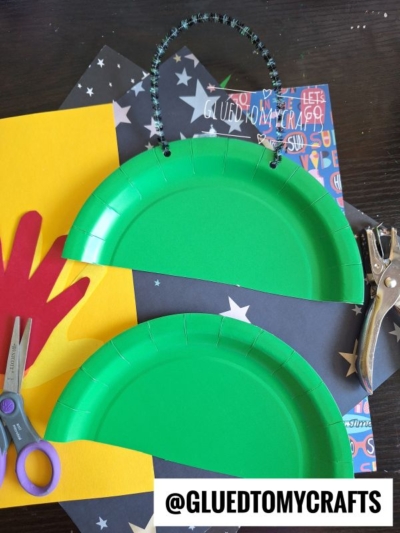
Step 3: Cut the Paper Plates in Half
Take your two green paper plates and cut each one straight down the middle. These plate halves will become the top and bottom of your lantern, framing the handprints like a cheerful little basket.
Step 4: Build the Base
Lay your yellow construction paper down vertically. This bright sheet is the heart of your lantern.
Spread a thin line of Elmer’s glue along the straight edge of one green plate half and press it to the top of the yellow paper, with the curved edge facing up. Glue the second plate half to the bottom of the yellow paper, with its curved edge facing down. You should now have a yellow rectangle framed by green on top and bottom.
Step 5: Glue the Handprints in a Fan Pattern
Once your decorated handprints are dry, arrange them in the center of the yellow paper. Fan them out like a peacock’s tail: angle one hand to the left, keep one straight up in the middle, and angle the last one to the right.
When you’re happy with the layout, glue each handprint down. Tuck the bottoms slightly behind the lower green plate so they look like they’re growing right out of it.
Step 6: Add the Hanger
Use your hole punch to make two small holes near the top edge of the upper green plate, one on each side.
Thread one end of the pipe cleaner through each hole and twist the ends to secure them. This creates a sturdy loop for hanging. Bend it into a nice arch, and your lantern is ready to display.
Helpful Tips:
- Plan ahead for groups. Pre-cut the paper plates before camp starts to save time and keep little hands away from scissors.
- Let the glue dry fully. Glitter glue needs a little patience. Decorate the handprints first so they can dry while you assemble the frame.
- Mix up the colors. Swap in blues, purples, or reds to match your camp theme or each child’s personality.
- Write the date on the back. Years from now, families will love seeing exactly how small those hands once were.
- Hang them together. A row of these lanterns strung across a fence or window makes a stunning camp display.
RELATED —> Paint Splat Camping Lantern Craft Idea

That’s all there is to it! In just a few simple steps, you’ve turned everyday supplies into a sparkly, one-of-a-kind lantern that celebrates summer and the kids who made it.
So roll up your sleeves, spread out the glitter, and watch those little faces light up with pride. Happy crafting, and have a wonderful summer at camp!
RELATED —> Popsicle Stick Camping Lantern Craft Idea

Paper Plate and Handprint Camping Lantern Craft Idea
Here’s your checklist of supplies to bring this craft to life:
Prepare your creative haven by laying down a protective cover before the crafting magic begins!
Directions:
- Have each child press a hand flat on a sheet of colored construction paper, fingers spread wide. Trace around it with a pencil. Repeat this two more times using different colors, so you end up with three handprints in all.
- Cut out each handprint carefully along the lines. For younger kids, an adult can do the cutting while the little ones pick their favorite colors.
- Now for the sparkle. Grab the glitter glue pen and draw swirls, dots, and squiggly lines across each handprint. There's no wrong way to do this, so let kids get creative.
- While the glue is still wet, press a few gold star sequins onto each hand. The damp glue will hold them in place as they dry. Set the handprints aside to dry while you build the lantern frame.
- Take your two green paper plates and cut each one straight down the middle. These plate halves will become the top and bottom of your lantern, framing the handprints like a cheerful little basket.
- Lay your yellow construction paper down vertically. This bright sheet is the heart of your lantern.
- Spread a thin line of Elmer's glue along the straight edge of one green plate half and press it to the top of the yellow paper, with the curved edge facing up. Glue the second plate half to the bottom of the yellow paper, with its curved edge facing down. You should now have a yellow rectangle framed by green on top and bottom.
- Once your decorated handprints are dry, arrange them in the center of the yellow paper. Fan them out like a peacock's tail: angle one hand to the left, keep one straight up in the middle, and angle the last one to the right.
- When you're happy with the layout, glue each handprint down. Tuck the bottoms slightly behind the lower green plate so they look like they're growing right out of it.
- Use your hole punch to make two small holes near the top edge of the upper green plate, one on each side.
- Thread one end of the pipe cleaner through each hole and twist the ends to secure them. This creates a sturdy loop for hanging. Bend it into a nice arch, and your lantern is ready to display.
CLICK HERE TO PRINT THE DIRECTIONS FOR THIS CRAFT