Discover how to make a popsicle stick and paper plate camping lantern with your kids. Perfect for summer fun, creativity, and bonding time!

Are you looking for a fun and creative summer craft idea to keep your kids engaged this summer season? This popsicle stick and paper plate camping lantern craft is perfect for sparking creativity while offering a hands-on project for the whole family to enjoy!
Whether you’re planning a camping adventure or just love the idea of bringing the outdoors into your home, this craft is easy, inexpensive, and packed with summer vibes. Not to mention – super unique too!


This popsicle stick lantern craft is as fun to make as it is to look at. Follow these steps to ensure your lantern turns out great!
Craft Supplies:
You don’t need to break the bank to make this lantern craft. Most of the materials can be picked up at your local craft store, or you might already have them lying around the house.
- Jumbo Popsicle Sticks {9 per craft}
- School Glue
- Yellow Craft Paint
- Green Craft Paint
- Small Paper Plate {2 per craft}
- Paint Brush
- Scissors
- Yellow/Red/Orange Cardstock Paper
- Gold Pipe Cleaner {1 per craft}
- Single Hole Punch
Directions:
Ensure you’re working in an area where spills and messes are easy to clean. Lay a protective layer (like an old newspaper) to protect your surface.
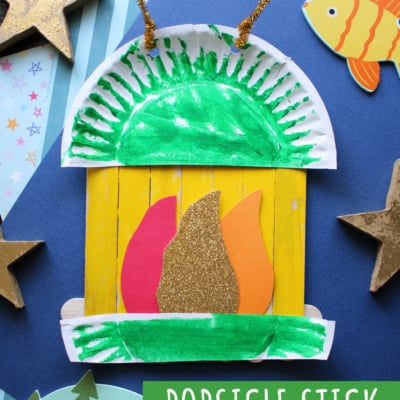
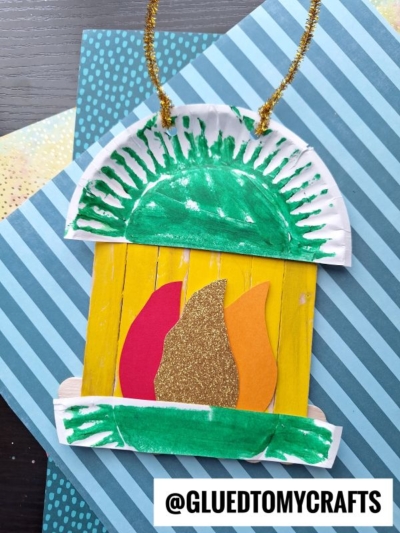
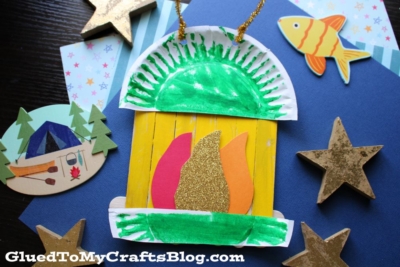
- Start by gluing popsicle sticks together to form a “fence” design. Lay seven sticks side by side, then secure them by gluing two additional sticks horizontally across the top and bottom, creating a square.
- Set the structure aside to dry completely.
- Once the glue has dried and the sticks are firmly in place, it’s time to paint. Squeeze some yellow craft paint onto a small paper plate.
- Use a foam paintbrush to paint the popsicle stick frame, representing the glowing “light” inside the lantern. Allow the paint to dry before moving to the next step.
- Take a clean paper plate and scissors. Using the example image as a guide, cut the plate to create the lantern’s top and bottom. Start by cutting the plate in half.
- Set one half aside and work with the other. Cut this second half into two smaller sections, discarding the curved piece.
- Paint both remaining paper plate pieces using your chosen second paint color. Let the paint dry completely.
- Once dry, punch two holes in the larger piece and thread a pipe cleaner through them to create a handle for the lantern.
- Next, cut out a few flame shapes from leftover paper scraps to complete the lantern’s details.
- Now it’s time to assemble! Begin by gluing the paper flames inside the popsicle stick frame.
- Finally, attach the painted paper plate pieces to the top and bottom of the popsicle stick frame.
- Add embellishments like glitter, sequins, or stickers to add some sparkle and personality to your creations.
- And there you have it! A charming lantern crafted from popsicle sticks and a simple paper plate. Enjoy your creation!
RELATED —> Stained Glass Camping Lantern

AFFILIATE LINK – PAIR OUR CRAFT IDEA WITH THIS BOOK RECOMMENDATION
This camping lantern popsicle stick craft doesn’t just keep your kids entertained; it also brings the spirit of summer camping trips right into your home. It’s all about sparking creativity, teaching new skills, and spending quality time together. Plus, these paper plate lanterns make adorable keepsakes that capture a special memory.
BTW – we’d love to see how your camping lanterns turned out! Tag us on social media and share your kids’ creative masterpiece with the world. #GluedTomyCrafts
Stay tuned for more fun and easy crafts to keep your little ones inspired all summer long! Happy crafting, my friends!

Popsicle Stick Camping Lantern Craft Idea
Discover how to make a popsicle stick and paper plate camping lantern with your kids. Perfect for summer fun, creativity, and bonding time!
Here’s your checklist of supplies to bring this craft to life:
- 9 Jumbo Popsicle Sticks
- Craft Paint yellow and green
- 1 Small Paper Plate
- Cardstock Paper red, orange and glitter
- 1 Pipe Cleaner gold
- School Glue
Prepare your creative haven by laying down a protective cover before the crafting magic begins!
Directions:
- Start by gluing popsicle sticks together to form a "fence" design. Lay seven sticks side by side, then secure them by gluing two additional sticks horizontally across the top and bottom, creating a square.
- Set the structure aside to dry completely.
- Once the glue has dried and the sticks are firmly in place, it’s time to paint. Squeeze some yellow craft paint onto a small paper plate.
- Use a foam paintbrush to paint the popsicle stick frame, representing the glowing "light" inside the lantern. Allow the paint to dry before moving to the next step.
- Take a clean paper plate and scissors. Using the example image as a guide, cut the plate to create the lantern's top and bottom. Start by cutting the plate in half.
- Set one half aside and work with the other. Cut this second half into two smaller sections, discarding the curved piece.
- Paint both remaining paper plate pieces using your chosen second paint color. Let the paint dry completely.
- Once dry, punch two holes in the larger piece and thread a pipe cleaner through them to create a handle for the lantern.
- Next, cut out a few flame shapes from leftover paper scraps to complete the lantern’s details.
- Now it’s time to assemble! Begin by gluing the paper flames inside the popsicle stick frame.
- Finally, attach the painted paper plate pieces to the top and bottom of the popsicle stick frame.
- Add embellishments like glitter, sequins, or stickers to add some sparkle and personality to your creations.
- And there you have it! A charming lantern crafted from popsicle sticks and a simple paper plate. Enjoy your creation!

If you've enjoyed our content or have any thoughts to share, we'd love to hear from you! Mention @gluedtomycrafts or tag #gluedtomycrafts on Instagram!