Make a cute paper plate ant craft with kids using simple supplies like black circles, googly eyes, and glue. Perfect for parents, teachers, and preschool activities!
Kids are natural explorers, and ants are one of the first bugs they notice crawling through the grass. This paper plate ant craft turns that curiosity into a hands-on activity that’s simple, affordable, and genuinely fun to make.
Whether you’re planning a summer afternoon project, a classroom lesson on insects, or just looking for a way to spend a creative hour together, this craft checks all the boxes!
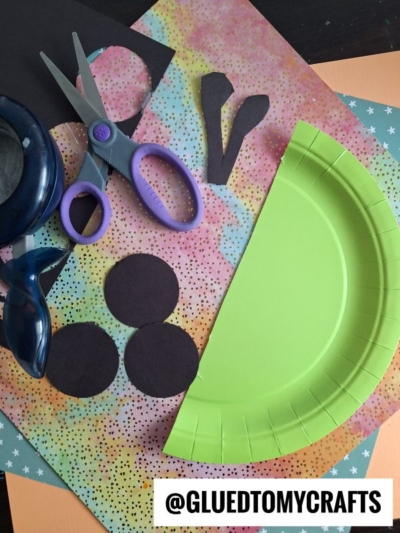
Craft Supplies:
Gather these supplies before you start. Having everything on the table ahead of time keeps little hands busy and the project moving.
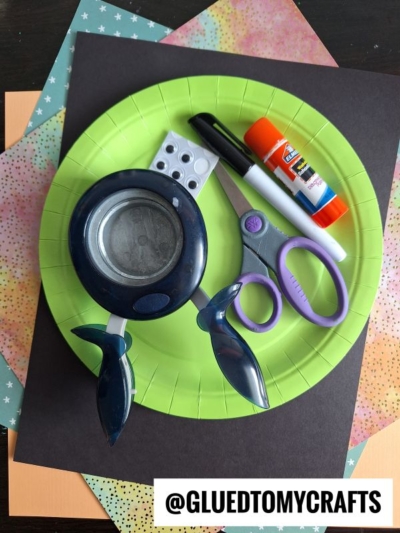
- 1 green paper plate
- Black cardstock or construction paper
- Scissors (adult-supervised for younger kids)
- A circle punch or round stencil to cut circles
- Glue stick or white craft glue
- A black marker
- Googly eyes (2 per ant)
The circle punch is the star tool here. It makes cutting three perfectly uniform circles a breeze, even for smaller kids who want to help. If you don’t have one, tracing a bottle cap or a coin and cutting by hand works just as well.
Directions:
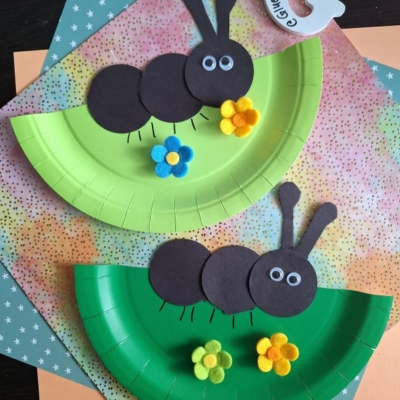
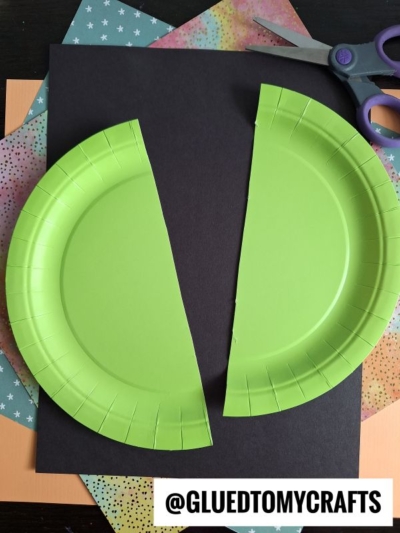
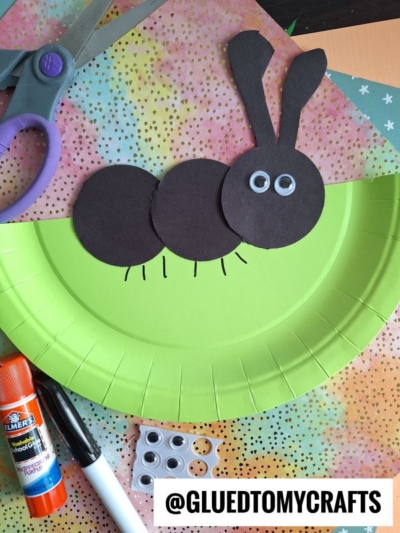
- Start by cutting your green paper plate in half. Place the curved (bumpy rimmed) edge at the bottom so it faces you. This half becomes your ant’s grassy hill or leaf — the little scene where the ant lives.
- Using your circle punch, cut three circles from the black cardstock. These three circles will become the ant’s body. Make sure all three are the same size so the ant looks proportional.
- Cut two thin, slightly curved strips from the black cardstock for the antennae. They should be about two to three inches long. You can curve one end slightly upward to give them that classic antenna look, or keep them straight – both work well.
- Lay the three black circles in a row on a flat surface. Overlap the edges slightly so they connect like a chain – this is the ant’s body. The far-right circle will be the head.
- Apply glue to the back of each circle and press them onto the flat (straight-cut) top edge of the green paper plate. Position the ant so it looks like it’s sitting on top of the grass or leaf. Hold each circle in place for a few seconds to let the glue set.
- Glue the two antennae to the top of the head circle. Angle them outward in a slight V shape for a natural look. Tuck the base of each antenna just under the edge of the circle so the glue catches on both surfaces.
- Press two googly eyes onto the head circle. Place them side by side near the top of the circle so there’s room for the antennae above. If you’re using self-adhesive googly eyes, just peel and stick. For non-adhesive ones, a dot of craft glue under each eye does the job.
- Using the black marker, draw six short legs on the green paper plate just below the ant’s body. Three on each side, pointing slightly downward and outward. Keep the lines bold and simple. Kids can do this step themselves with a little guidance on where to place the legs.
- Now comes the decorating. Press or glue small felt flowers, foam stickers, or paper cutout flowers onto the green plate around the ant. This makes the scene feel lively and colorful – like the ant is exploring a real garden. You can also let kids draw little rocks, ladybugs, or blades of grass directly onto the plate with markers. Every finished craft ends up looking a little different, which makes them proud to show off their unique version.
- Allow your piece to dry completely before displaying it proudly for all to see!
RELATED —> Wooden Spoon Ant Craft Idea

We hope you and your little ones love making this paper plate ant craft as much as we do. It’s a simple, fun activity that’s ready in no time – so grab your supplies and give it a try today!
And if you come back to this craft again – maybe next spring, or the next time someone asks “what can we make today?” – don’t hesitate to mix things up. Try red paper for a fire ant, add a tiny backpack made from folded paper, or set the scene on a paper plate picnic blanket. The basic template is simple enough to reinvent as many times as you like.
On that note, happy crafting my friends!
RELATED —> Thumbprint & Tape Resistant Ant Farm Canvas

Paper Plate and Circle Punch Ant Craft Idea
Make a cute paper plate ant craft with kids using simple supplies like black circles, googly eyes, and glue. Perfect for parents, teachers, and preschool activities!
Here’s your checklist of supplies to bring this craft to life:
- Large Paper Plate
- Cardstock Paper
- Wiggle Eyes
- Embellishments
- School Glue
Prepare your creative haven by laying down a protective cover before the crafting magic begins!
Directions:
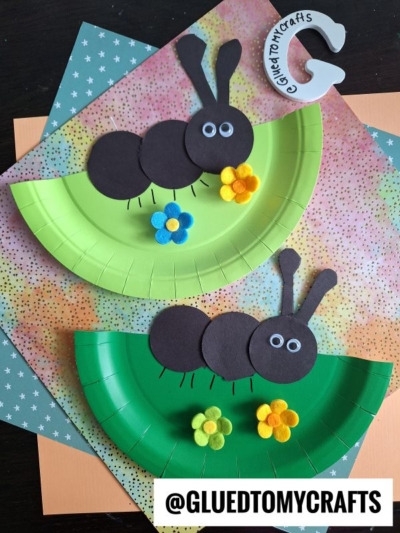
- Start by cutting your green paper plate in half. Place the curved (bumpy rimmed) edge at the bottom so it faces you. This half becomes your ant's grassy hill or leaf — the little scene where the ant lives.
- Using your circle punch, cut three circles from the black cardstock. These three circles will become the ant's body. Make sure all three are the same size so the ant looks proportional.
- Cut two thin, slightly curved strips from the black cardstock for the antennae. They should be about two to three inches long. You can curve one end slightly upward to give them that classic antenna look, or keep them straight - both work well.
- Lay the three black circles in a row on a flat surface. Overlap the edges slightly so they connect like a chain - this is the ant's body. The far-right circle will be the head.
- Apply glue to the back of each circle and press them onto the flat (straight-cut) top edge of the green paper plate. Position the ant so it looks like it's sitting on top of the grass or leaf. Hold each circle in place for a few seconds to let the glue set.
- Glue the two antennae to the top of the head circle. Angle them outward in a slight V shape for a natural look. Tuck the base of each antenna just under the edge of the circle so the glue catches on both surfaces.
- Press two googly eyes onto the head circle. Place them side by side near the top of the circle so there's room for the antennae above. If you're using self-adhesive googly eyes, just peel and stick. For non-adhesive ones, a dot of craft glue under each eye does the job.
- Using the black marker, draw six short legs on the green paper plate just below the ant's body. Three on each side, pointing slightly downward and outward. Keep the lines bold and simple. Kids can do this step themselves with a little guidance on where to place the legs.
- Now comes the decorating. Press or glue small felt flowers, foam stickers, or paper cutout flowers onto the green plate around the ant. This makes the scene feel lively and colorful - like the ant is exploring a real garden. You can also let kids draw little rocks, ladybugs, or blades of grass directly onto the plate with markers. Every finished craft ends up looking a little different, which makes them proud to show off their unique version.
- Allow your piece to dry completely before displaying it proudly for all to see!
CLICK HERE TO PRINT THE DIRECTIONS FOR THIS CRAFT
If you've enjoyed our content or have any thoughts to share, we'd love to hear from you! Mention @gluedtomycrafts or tag #gluedtomycrafts on Instagram!