Make a cheerful lemon butterfly with your kids using just cupcake liners, yellow stickers, and a black marker. It's an easy summer craft for all ages!
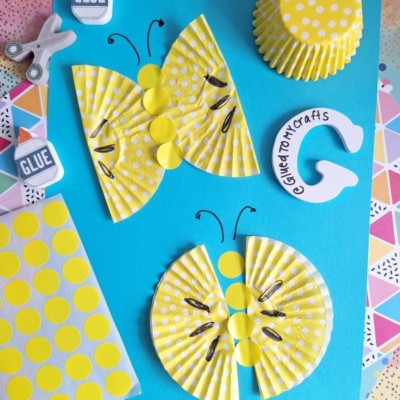
Summer is the perfect time to slow down, spread out some craft supplies, and make something colorful together. This cupcake liner lemon butterfly craft is one of those sweet little projects that looks impressive but takes only minutes to put together — no special skills required.
Whether you’re a parent looking for a rainy-day activity, a teacher planning a summer school art lesson, or a caregiver searching for something fun and mess-friendly, this one checks all the boxes. Kids ages 3 and up can join in, and the finished butterflies are cheerful enough to brighten any fridge, bulletin board, or classroom wall.
Craft Supplies:
Gather these simple supplies before you start. Most of them are things you probably already have at home or can find at any dollar store.
- Yellow cupcake liners (2 per butterfly)
- Small yellow circle stickers or yellow paper circles — for the butterfly’s body (you’ll need about 4 per butterfly)
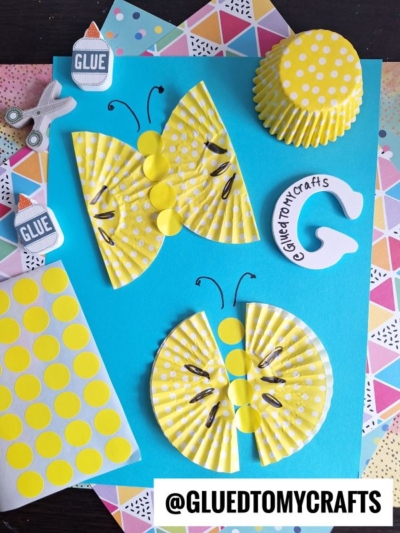
- Blue cardstock or construction paper — this serves as your background and makes the yellow colors pop
- Black marker — for drawing antennae and adding wing details
- Glue stick or white school glue
- Scissors (adult supervision for younger kids)
- Optional: googly eyes, glitter glue, or extra stickers for decorating
That’s it! No expensive materials, no complicated tools.
Directions:
- Start by laying your blue cardstock flat on a table. This is your canvas. Blue works beautifully here because it mimics a bright summer sky and makes the yellow wings stand out vividly. Cut it to whatever size you like — a half sheet works well for a single butterfly.
- Take one yellow cupcake liner and gently flatten it with your hand. Then fold it in half so it looks like a half-circle. Repeat with the second liner.
- Place the two folded liners on your blue paper with the flat (folded) edges facing each other in the center. This creates the left and right wings of your butterfly. Adjust the angle of each wing slightly upward to give your butterfly a natural, in-flight look.
- Once you’re happy with the placement, lift each wing carefully and apply glue to the back along the folded edge. Press the wings firmly onto the blue paper and hold for a few seconds. Let them dry slightly before moving on.
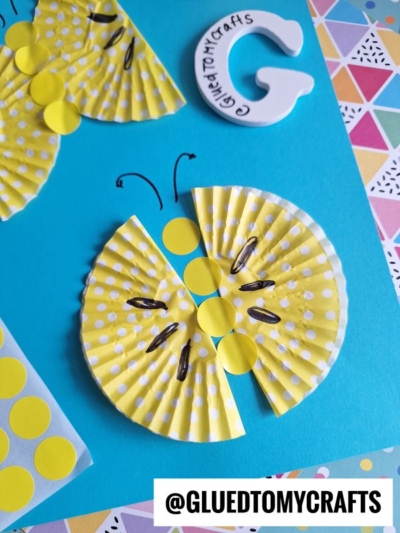
- Line up 4 small yellow circle stickers (or glued paper circles) vertically down the center of your butterfly, right where the two wings meet. These circles form the body and give the craft that clean, finished look.
- Press each sticker down firmly, or if you’re using paper circles, dab a small amount of glue on the back of each one before placing it in a straight line.
- Using your black marker, draw two curved antennae from the top of the body upward. Add a small curled swirl or circle at the tip of each antenna — this little detail makes the butterfly look full of personality.
- Use the black marker to draw simple accents on the wings. This gives the look of a lemon slice. A few curved lines, dots, or scalloped edges along the outer edge of each cupcake liner are all you need. You’re not going for perfection — you’re going for fun.
- Give your butterfly a few minutes to dry fully, then step back and admire it. Your lemon butterfly craft is done and ready to display!
RELATED —> Torn Paper Lemon Craft – “You’re the Zest!”

The best summer crafts are the ones that are simple enough to actually do, colorful enough to be worth keeping, and fun enough that kids ask to make them again. This lemon butterfly checks every one of those boxes.
Set up a little craft station with these supplies, put on some music, and let the creativity flow. You might be surprised how much joy comes from two little cupcake liners and a black marker. Happy crafting – and happy summer! 🌟

Cupcake Liner Lemon Butterfly Craft Idea For Kids To Make This Summer
Make a cheerful lemon butterfly with your kids using just cupcake liners, yellow stickers, and a black marker. It's an easy summer craft for all ages!
Here’s your checklist of supplies to bring this craft to life:
- Cardstock Paper
- Cupcake Liners
- Dot Stickers
- Embellishments
- School Glue
Prepare your creative haven by laying down a protective cover before the crafting magic begins!
Directions:
- Start by laying your blue cardstock flat on a table. This is your canvas. Blue works beautifully here because it mimics a bright summer sky and makes the yellow wings stand out vividly. Cut it to whatever size you like — a half sheet works well for a single butterfly.
- Take one yellow cupcake liner and gently flatten it with your hand. Then fold it in half so it looks like a half-circle. Repeat with the second liner.
- Place the two folded liners on your blue paper with the flat (folded) edges facing each other in the center. This creates the left and right wings of your butterfly. Adjust the angle of each wing slightly upward to give your butterfly a natural, in-flight look.
- Once you're happy with the placement, lift each wing carefully and apply glue to the back along the folded edge. Press the wings firmly onto the blue paper and hold for a few seconds. Let them dry slightly before moving on.
- Line up 4 small yellow circle stickers (or glued paper circles) vertically down the center of your butterfly, right where the two wings meet. These circles form the body and give the craft that clean, finished look.
- Press each sticker down firmly, or if you're using paper circles, dab a small amount of glue on the back of each one before placing it in a straight line.
- Using your black marker, draw two curved antennae from the top of the body upward. Add a small curled swirl or circle at the tip of each antenna — this little detail makes the butterfly look full of personality.
- Use the black marker to draw simple accents on the wings. This gives the look of a lemon slice. A few curved lines, dots, or scalloped edges along the outer edge of each cupcake liner are all you need. You're not going for perfection — you're going for fun.
- Give your butterfly a few minutes to dry fully, then step back and admire it. Your lemon butterfly craft is done and ready to display!
CLICK HERE TO PRINT THE DIRECTIONS FOR THIS CRAFT
If you've enjoyed our content or have any thoughts to share, we'd love to hear from you! Mention @gluedtomycrafts or tag #gluedtomycrafts on Instagram!