Summer brings long afternoons and plenty of free time for kids to explore their creativity. Keeping little hands busy does not have to mean buying expensive craft kits or setting up complicated projects. You can make an adorable sea creature using simple, everyday household supplies.
This paper plate turtle craft is a perfect afternoon activity to beat the summer heat while helping young children build essential fine motor skills! Let’s get crafting!
Craft Supplies:
You only need a few basic items to bring this colorful turtle to life. Gather these materials before you begin:
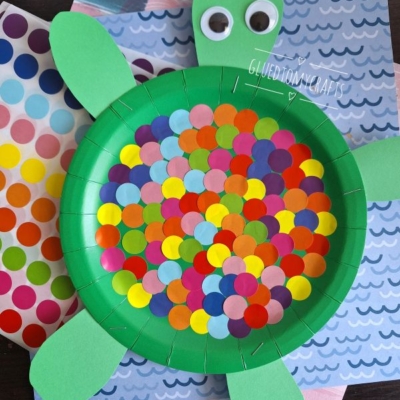
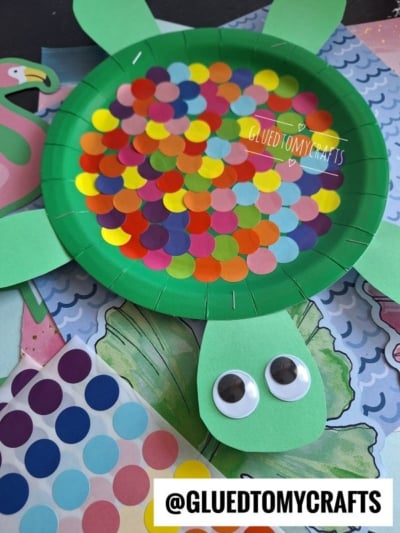
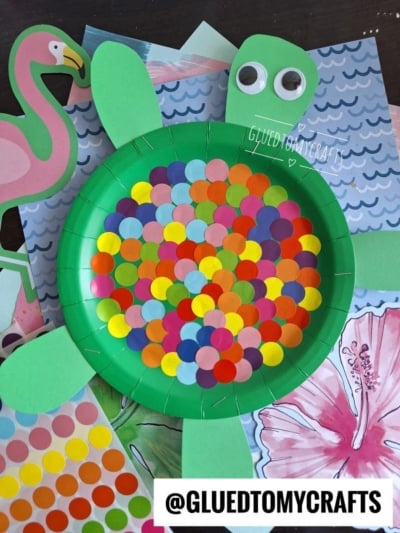
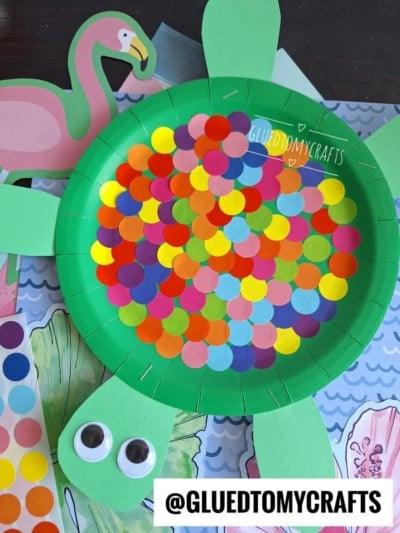
- Green paper plate: This forms the base of the turtle’s shell.
- Colorful dot stickers: Use a variety of colors (red, orange, yellow, blue, pink, and purple) to create a bright mosaic pattern.
- Light green cardstock: You will use this to cut out the head, flippers, and tail.
- Large googly eyes: Two plastic googly eyes give the turtle its fun personality.
- Stapler and staples: For securing the paper limbs to the plate.
- Scissors: To cut out the cardstock shapes.
- Glue stick: To attach the googly eyes to the head.
Directions:
Step 1: Prepare the Turtle Shell
Take your green paper plate and lay it right-side up on the table.
Step 2: Decorate with Dot Stickers
Hand over the colorful dot stickers to your child. Let them peel and stick the dots all over the flat center of the paper plate. Encourage them to overlap the stickers to create a scale-like pattern. Peeling the stickers is an excellent way for toddlers and preschoolers to practice their pincer grasp and improve fine motor control.
Step 3: Cut Out the Head and Limbs
While your child decorates the shell, grab your light green cardstock. Cut out a rounded, teardrop shape for the turtle’s head. Next, cut out four smaller oval shapes to act as the flippers and one small triangle for the tail.
Step 4: Add the Face
Use a glue stick to attach the two large googly eyes onto the rounded cardstock head. Press down firmly so they stay in place.
Step 5: Assemble the Turtle
Once the shell is full of colorful dots, it is time to put everything together. Tuck the base of the head under the rim of the paper plate and staple it in place. Repeat this process for the four flippers (placing two near the top and two near the bottom) and the tail at the back. Now displaying the beautiful rainbow colored turtle for all to see!
RELATED —> Torn Paper Turtle Craft Idea For Kids
This paper plate and dot sticker turtle is a fantastic, mess-free project that guarantees summer fun. It requires minimal prep work, cleans up in seconds, and leaves your kids with a vibrant piece of art they can be proud of.
Grab your paper plates and sticker sheets, and let your kids dive into this creative ocean-themed project!
Did you and your kids try this craft? We would love to see how your colorful turtles turned out! Snap a picture and share your creations with us on social media using the tag @GluedToMyCrafts. Happy crafting, my friends!

Paper Plate & Dot Sticker Turtle Craft Idea
Here’s your checklist of supplies to bring this craft to life:
- Cardstock Paper
- Large Paper Plate
- Dot Stickers
- Embellishments
Prepare your creative haven by laying down a protective cover before the crafting magic begins!
Directions:
- Take your green paper plate and lay it right-side up on the table.
- Hand over the colorful dot stickers to your child. Let them peel and stick the dots all over the flat center of the paper plate. Encourage them to overlap the stickers to create a scale-like pattern. Peeling the stickers is an excellent way for toddlers and preschoolers to practice their pincer grasp and improve fine motor control.
- While your child decorates the shell, grab your light green cardstock. Cut out a rounded, teardrop shape for the turtle's head. Next, cut out four smaller oval shapes to act as the flippers and one small triangle for the tail.
- Use a glue stick to attach the two large googly eyes onto the rounded cardstock head. Press down firmly so they stay in place.
- Once the shell is full of colorful dots, it is time to put everything together. Tuck the base of the head under the rim of the paper plate and staple it in place. Repeat this process for the four flippers (placing two near the top and two near the bottom) and the tail at the back. Now displaying the beautiful rainbow colored turtle for all to see!
CLICK HERE TO PRINT THE DIRECTIONS FOR THIS CRAFT