Glued To My Crafts

Join thousands of others who have gotten GLUED to our craft tutorials!

  • Home
  • Safety Guidelines
  • Seasonal Themes
    • New Years
    • Valentine’s Day
    • St. Patrick’s Day
    • Spring
    • Easter
    • Mother’s Day
    • Summer
    • Father’s Day
    • Patriotic
    • Halloween
    • Thanksgiving
    • Fall
    • Winter
    • Christmas
    • Snowmen
    • Story Time
  • About Us
  • Amazon Storefront
  • Monthly Themes
    • January Craft Ideas
    • February Craft Ideas
    • March Craft Ideas
    • April Craft Ideas
    • May Craft Ideas
    • June Craft Ideas
    • July Craft Ideas
    • August Craft Ideas
    • September Crafts
    • October Crafts
    • November Crafts
    • December Crafts
  • Collection Posts
    • 20+ Creative Paper Bag Craft Ideas for Kids to Enjoy Today
    • 20+ Plastic Egg Stamp Crafts for Spring Fun
    • 50+ Creative Thumbprint Craft Ideas for Spring Fun
    • Craft Ideas for Kids Using Egg Stickers
    • Thumbs Up! 50+ Creative Thumbprint Crafts for Kids
    • 40+ Insect Craft Ideas For Kids
    • 50+ Craft Ideas For Kids Using A Plastic Fork As A Paint Brush
    • 30+ Puffy Paint Craft Ideas For Kids To Try Today!
    • 20+ Fun and Easy Paper Bowl Crafts for Kids
    • Pete The Cat Craft Ideas: Fun & Easy Projects for Kids
    • Transform Coffee Filters into 40+ Stunning DIY Projects
    • Transform Crepe Paper Streamers into 60+ Stunning Crafts
    • Pie Server Stamped Craft Ideas Kids Will Adore
    • Paint Splat Pie Craft Idea For Kids

Paper Plate Chicken Craft Idea For Kids

When engaging in craft activities, it is important for young children to have adult supervision at ALL times. It is also recommended to use supplies that are suitable for your child's age. Feel free to modify materials or steps to meet your specific requirements. Please refer to our safety guidelines for more information.

As an Amazon Associate I earn from qualifying purchases. This post may contain affiliate links. For more information, please see our disclosure policy.

UPDATE FOR 2026 - To reduce storage costs and download fees, we recently made some changes to our website. The password for all our files this year is GLUEDTOMYCRAFTS2026. No sign-up is required to download our free printables! You can enjoy our printables without creating an account or paying for Box.com. Simply follow the download instructions on our FAQ PAGE.

A paper plate is decorated to look like a chicken with red and yellow paper for the beak, wattle, and comb, a large googly eye, and is placed on yellow paper and shredded brown paper.

Kids love animal crafts, and parents love projects that do not require an emergency trip to the craft store. This simple paper plate chicken is the perfect activity for a rainy afternoon, a farm-themed classroom lesson, or just some creative weekend fun.

By using everyday household items like basic white paper plates and colorful construction paper, you can help your little ones build an adorable feathered friend in minutes. Creating this craft also helps young children practice their fine motor skills through cutting, gluing, and placing small shapes.

Craft Supplies:

One of the best parts about this craft is how budget-friendly it is. You likely already have everything you need in your kitchen or craft bin. Gather the following supplies:

  • One standard white paper plate (the thin, inexpensive ones work best)
  • Construction paper in red and yellow (or orange)
  • One large plastic googly eye
  • Scissors
  • A stapler (or a glue stick)

Directions:

Follow these simple steps to bring your paper plate farm animal to life. If you are working with a large group of kids, you might want to pre-cut the construction paper shapes ahead of time.

Step 1: Prepare the body and wing
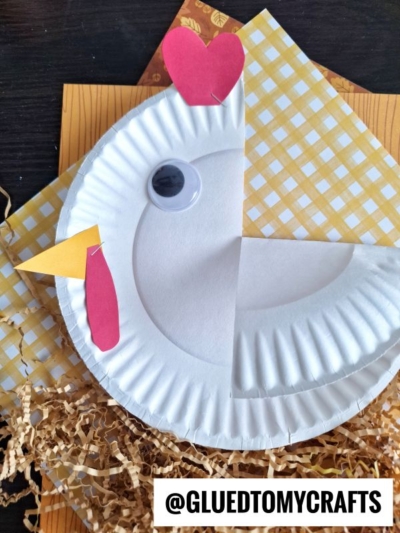
Take one white paper plate. Carefully cut a short slit from the edge of the plate toward the center, stopping about halfway. Gently fold this section down to make a wing that sticks out from the side of the plate.

Step 2: Create and shape the wing
After making the small slit in your paper plate as described above, gently fold the cut section downward so it lays angled out from the body – this flap will form your chicken’s wing. There’s no need for extra plates or gluing here! The simple fold creates a fun, dimensional effect and gives your chicken a playful, “flapping” wing.

Step 3: Cut out the facial features
Grab your construction paper and scissors. Cut a small yellow triangle for the beak. Next, cut a long, rounded red oval for the wattle (the little red pouch under a chicken’s beak) and a bright red heart shape for the comb.

Step 4: Assemble the chicken’s face
Staple or glue the yellow triangle beak to the left edge of your main paper plate, pointing outward. Attach the red wattle just below the beak. Finally, attach the red heart right side up at the top center of the plate to act as the chicken’s comb.

Step 5: Add the eye and display
Glue your large googly eye onto the upper-left area of the main plate, right above the beak. Add any other embellishments you see fit and display it proudly for ALL to see!

RELATED —> Fork Painted Chicken Craft Idea

A childrens book called Barnyard Dance! sits behind a paper plate chicken craft with a googly eye, red heart comb, and yellow beak, all on floral and star-patterned paper. @GLUEDTOMYCRAFTS is written at the bottom.

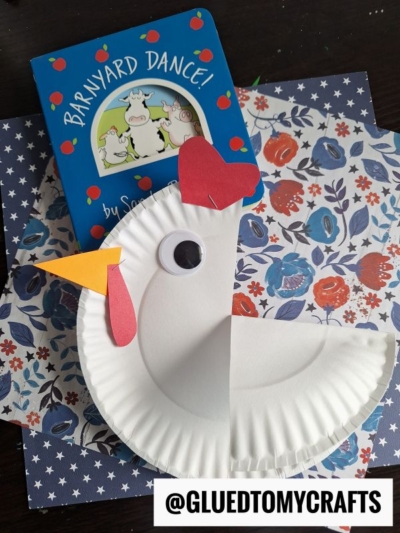
Recreating this super easy paper plate chicken is a wonderful way to encourage creativity without creating a massive mess. It is a highly approachable project that brings joy and a sense of accomplishment to crafters of all ages. Now that you have a cute new farm animal sitting in your home or classroom, you can easily create a whole flock!

Grab your paper plates, round up the kids, and get crafting today. Try this out this weekend, and be sure to display your little chicken proudly on the fridge or a classroom bulletin board! Happy crafting, my friends!

RELATED —> Handprint Chicken Puppet Craft

A blue text on a white background, perfect for creating a charming the places you'll go keepsake.

Craft Activity Safety Guidelines:

Always Ensure Adult Supervision - Young children should be supervised at all times when engaging in craft activities. This is essential to keep them safe and ensure materials are used correctly. Use Age-Appropriate Supplies - Choose craft supplies that are suitable for your child’s age. Check labels for recommendations and avoid items with small parts or sharp edges for younger children. Modify as Needed - Feel free to adapt materials or steps to meet your child's abilities and safety needs. For example, substitute scissors with safety scissors if necessary. Keep an Eye on Allergies - Be mindful of potential allergens in craft materials like glue, paint, or certain fabrics. Opt for non-toxic and hypoallergenic options whenever possible. Organize and Secure Supplies - Keep all craft tools and materials organized. Store sharp objects, small parts, and potentially hazardous items out of reach when not in use. Following these guidelines will ensure that crafts remain fun, creative, and, most importantly, safe for everyone involved!


OUR PRIVACY POLICY

OUR COPYRIGHT POLICY

  • Email
  • Facebook
  • Instagram
  • Pinterest
  • Twitter
  • YouTube

LOOKING FOR SOMETHING?

EXPLORE OUR SITE:

© 2012–2026 Glued To My Crafts
All activities should be supervised by an adult at all times. Please refer to our safety guidelines for more information.


Please note that all the content of the website, including printables, are for classroom and personal use only. This means that any digital item you download from our site can be used for non-commercial use only. We kindly request that you do not reproduce or sell our creations. We appreciate your understanding and cooperation in respecting our content and intellectual property rights.

Accessibility Adjustments

Powered by OneTap

How long do you want to hide the toolbar?
Hide Toolbar Duration
Select your accessibility profile
Vision Impaired Mode
Enhances website's visuals
Seizure Safe Profile
Clear flashes & reduces color
ADHD Friendly Mode
Focused browsing, distraction-free
Blindness Mode
Reduces distractions, improves focus
Epilepsy Safe Mode
Dims colors and stops blinking
Content Modules
Font Size

Default

Line Height

Default

Color Modules
Orientation Modules