Gather the kids and clear off the kitchen table. We are making a lovely, textured craft that combines messy art with a sweet keepsake. This paint splat bird nest craft pairs the unpredictable fun of squishing paint with the personal touch of a child’s handprint.
It is a fantastic way to spend an afternoon making memories and colorful art!
Kids love the surprise of squishing paint between folded paper to see what shape emerges, and you will cherish the adorable handprint bird resting inside!
Craft Supplies:
Here is everything you need to know to make this charming little bird nest.
- Cardstock paper (light blue makes a great sky background)
- Brown craft paint (dimensional fabric paint or standard acrylic works great)
- Craft yarn (cream, brown, or tan)
- Construction paper (for the handprint bird cutout)
- Scissors
- Craft glue
Directions:
Before we dive in, let’s keep the workspace clean. Lay down some old newspapers or a disposable tablecloth to protect your furniture. Have the kids wear paint smocks or old t-shirts to protect their clothing. Keep a damp paper towel nearby for quick hand wiping!
- Take your base piece of cardstock and fold it directly down the middle. Crease it well, and then open it back up so it lays flat on the table.
- Grab your brown craft paint and squeeze a generous amount onto just one side of the fold. You can make a circle, a squiggle, or a random blob. The less perfect it is, the better the final nest will look.
- Fold the paper back over along the crease you made earlier. Use your hands to press down and gently smooth the paper outward from the center. This squishes the brown paint around inside, creating a fantastic, textured splat.
- Carefully peel the two sides of the paper apart to reveal your symmetrical paint splat. This forms the base of your bird nest. Set the paper aside in a safe spot and let the paint dry completely.
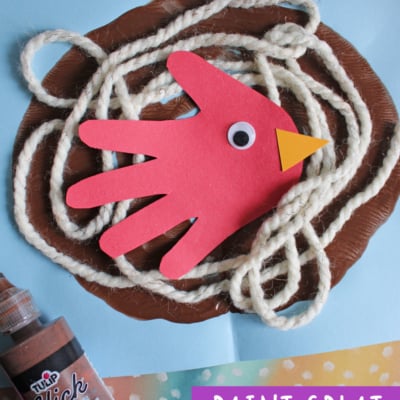
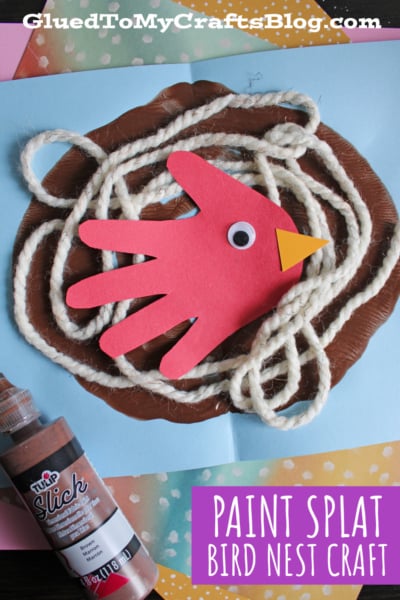
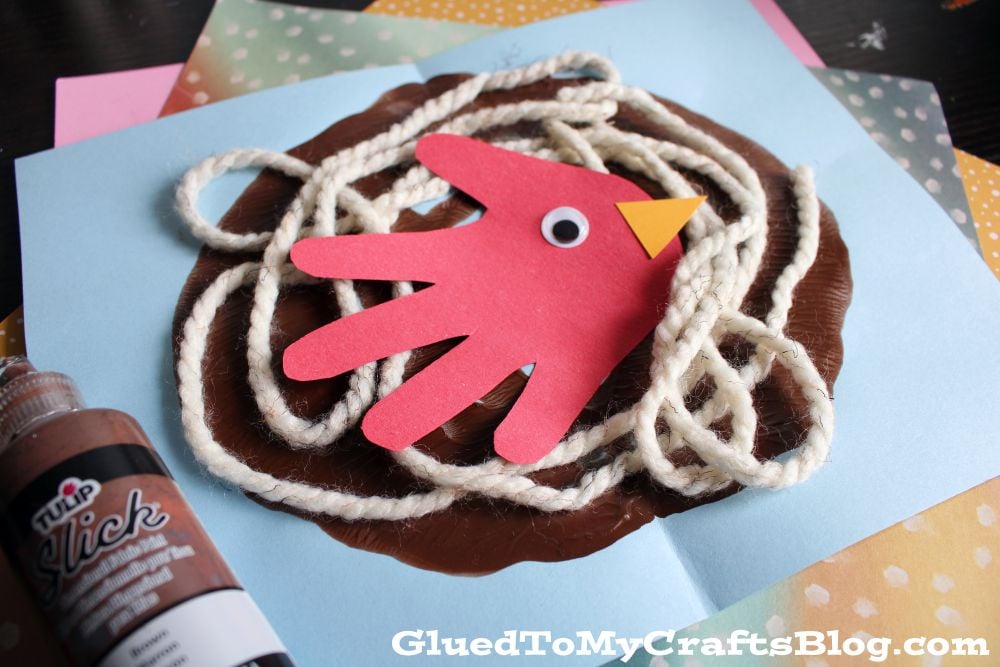
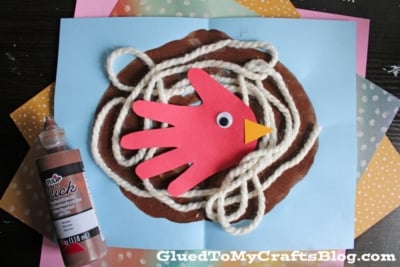
- Once the paint is dry, apply a generous amount of craft glue right over the center of your brown paint splat. Take a handful of craft yarn and coil it around in a messy, circular pattern on top of the glue. The tangled yarn creates a wonderful 3D texture that looks just like a real bird nest.
- Trace your child’s hand onto a bright piece of construction paper and cut it out. Position the handprint so the palm faces the top and the fingers point slightly downward to mimic tail feathers. Glue this handprint directly onto the yarn nest. You can finish your bird by gluing on a small paper beak and a googly eye.
Tips for Customization:
Make this craft uniquely yours with a few fun twists. Try using multiple colors of paint for a magical, rainbow nest. Mix different textures of yarn, or even substitute the yarn for shredded brown paper or real twigs from your yard. You can also let your kids decorate the background around the nest with markers, stickers, or cotton ball clouds.
RELATED —> Paper Plate Bird Nest Craft for Spring

We hope you and your little one have a wonderful time crafting together, and enjoy the bright, textured art that comes to life in front of your eyes! Don’t forget to share your finished bird nest crafts with friends and family – or display them proudly at home for all to see.
Projects like this are a wonderful way to nurture creativity, ignite new ideas, and make lasting memories. Remember, every craft is unique – so keep exploring, keep imagining, and let your creativity soar beyond the nest! Happy crafting, my friends!

Paint Splat Bird Nest Craft Idea For Spring
Here’s your checklist of supplies to bring this craft to life:
- Craft Paint
- Cardstock Paper
- Craft Yarn
- Embellishments
- School Glue
Prepare your creative haven by laying down a protective cover before the crafting magic begins!
Directions:
- Take your base piece of cardstock and fold it directly down the middle. Crease it well, and then open it back up so it lays flat on the table.
- Grab your brown craft paint and squeeze a generous amount onto just one side of the fold. You can make a circle, a squiggle, or a random blob. The less perfect it is, the better the final nest will look.
- Fold the paper back over along the crease you made earlier. Use your hands to press down and gently smooth the paper outward from the center. This squishes the brown paint around inside, creating a fantastic, textured splat.
- Carefully peel the two sides of the paper apart to reveal your symmetrical paint splat. This forms the base of your bird nest. Set the paper aside in a safe spot and let the paint dry completely.
- Once the paint is dry, apply a generous amount of craft glue right over the center of your brown paint splat. Take a handful of craft yarn and coil it around in a messy, circular pattern on top of the glue. The tangled yarn creates a wonderful 3D texture that looks just like a real bird nest.
- Trace your child's hand onto a bright piece of construction paper and cut it out. Position the handprint so the palm faces the top and the fingers point slightly downward to mimic tail feathers. Glue this handprint directly onto the yarn nest. You can finish your bird by gluing on a small paper beak and a googly eye.

CLICK HERE TO PRINT THE DIRECTIONS FOR THIS CRAFT