Glued To My Crafts

Join thousands of others who have gotten GLUED to our craft tutorials!

  • Home
  • Safety Guidelines
  • Seasonal Themes
    • New Years
    • Valentine’s Day
    • St. Patrick’s Day
    • Spring
    • Easter
    • Mother’s Day
    • Summer
    • Father’s Day
    • Patriotic
    • Halloween
    • Thanksgiving
    • Fall
    • Winter
    • Christmas
    • Snowmen
    • Story Time
  • About Us
  • Amazon Storefront
  • Monthly Themes
    • January Craft Ideas
    • February Craft Ideas
    • March Craft Ideas
    • April Craft Ideas
    • May Craft Ideas
    • June Craft Ideas
    • July Craft Ideas
    • August Craft Ideas
    • September Crafts
    • October Crafts
    • November Crafts
    • December Crafts
  • Collection Posts
    • 20+ Creative Paper Bag Craft Ideas for Kids to Enjoy Today
    • 20+ Plastic Egg Stamp Crafts for Spring Fun
    • 30+ Creative Thumbprint Craft Ideas for Spring Fun
    • Craft Ideas for Kids Using Egg Stickers
    • Thumbs Up! 50+ Creative Thumbprint Crafts for Kids
    • 40+ Insect Craft Ideas For Kids
    • 50+ Craft Ideas For Kids Using A Plastic Fork As A Paint Brush
    • 30+ Puffy Paint Craft Ideas For Kids To Try Today!
    • 20+ Fun and Easy Paper Bowl Crafts for Kids
    • Pete The Cat Craft Ideas: Fun & Easy Projects for Kids
    • Transform Coffee Filters into 40+ Stunning DIY Projects
    • Transform Crepe Paper Streamers into 60+ Stunning Crafts
    • Pie Server Stamped Craft Ideas Kids Will Adore
    • Paint Splat Pie Craft Idea For Kids

Easy Paper Plate Bird Nest Craft for Spring

When engaging in craft activities, it is important for young children to have adult supervision at ALL times. It is also recommended to use supplies that are suitable for your child's age. Feel free to modify materials or steps to meet your specific requirements. Please refer to our safety guidelines for more information.

As an Amazon Associate I earn from qualifying purchases. This post may contain affiliate links. For more information, please see our disclosure policy.

UPDATE FOR 2026 - To reduce storage costs and download fees, we recently made some changes to our website. The password for all our files this year is GLUEDTOMYCRAFTS2026. No sign-up is required to download our free printables! You can enjoy our printables without creating an account or paying for Box.com. Simply follow the download instructions on our FAQ PAGE.

Welcome spring with this fun paper plate and paper strip bird nest craft! Perfect for kids, parents, and teachers. Get the simple tutorial now.
SKIP THE FLUFF AND PRINT THE DIRECTIONS
A paper plate craft featuring a yellow handprint turkey with googly eyes, an orange beak, and legs, surrounded by brown paper strips, on top of colored paper. Text at the bottom reads @GLUEDTOMYCRAFTS.

A paper plate craft featuring a yellow handprint turkey with googly eyes, an orange beak, and legs, surrounded by brown paper strips, on top of colored paper. Text at the bottom reads @GLUEDTOMYCRAFTS.

Spring brings chirping birds, blooming flowers, and the perfect excuse to break out the craft supplies. If you want a fun, hands-on activity to celebrate the changing seasons with your kids, this paper plate bird nest craft is a fantastic choice.

This simple project uses basic materials you likely already have at home or in your classroom. It helps little ones practice fine motor skills through cutting and pasting while sparking conversations about nature. You will walk away with an adorable piece of springtime art to display on your fridge or bulletin board.

Ready to get crafty? Let’s dive into the steps!

Craft Supplies:

Before you start, gather your crafting supplies. You can easily substitute items based on what you have sitting in your craft bin.

Here is your materials list:

  • White paper plates (fluted edges work great)
  • Brown paper bags or brown construction paper
  • Washable school glue
  • Kid-safe scissors
  • Colorful cardstock or construction paper (for the bird)
  • Googly eyes
  • Orange paper scraps (for the beak and feet)

Directions:

This craft is incredibly forgiving, making it perfect for toddlers and elementary students alike. Follow these simple steps to build your nest.

1. Prep the Nest Materials

Start by letting the kids cut the brown paper bags or brown construction paper into small, rectangular strips. These strips will act as the twigs and mud that make up the bird’s nest. Cutting the paper provides excellent scissor practice for little hands.

2. Build the Bird Nest

Take your paper plate and apply a generous amount of washable school glue to the bottom half. Have the children press their brown paper strips into the glue. They can overlap the pieces and arrange them haphazardly to create a natural, textured nest look. Let this dry slightly before moving on.

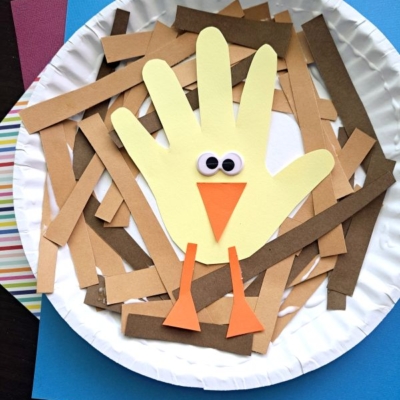
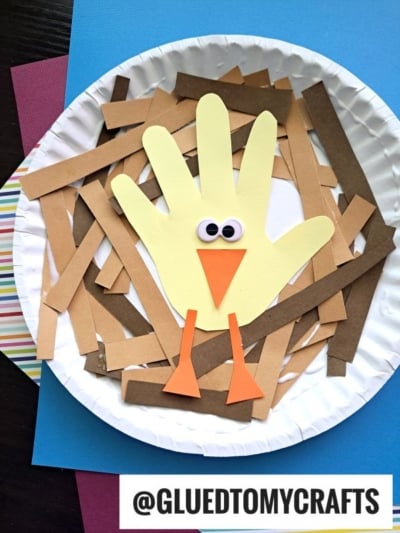
3. Create Your Little Bird

While the nest dries, it is time to make the bird! Trace your child’s hand on a piece of brightly colored cardstock (yellow, purple, or blue look wonderful). Cut out the handprint. The palm will become the bird’s body, and the fingers will fan out to look like feathers.

4. Bring the Bird to Life

Grab your glue again and attach two googly eyes near the top of the handprint. Cut a small triangle from your orange paper scrap and glue it just below the eyes for a beak. You can also cut out two small webbed feet and attach them to the bottom of the palm.

5. Put the Bird in Its Nest

Finally, apply glue to the back of your handprint bird. Press the bird firmly onto the top half of the paper plate, tucking the bottom of the bird slightly behind the brown paper strips. This makes it look like the chick is sitting snugly inside its nest.

Tips for Customizing Your Craft

You can easily adapt this project to fit different ages or themes. Try these fun variations:

  • Add real feathers: Stick a few craft feathers behind the handprint to give your bird extra texture.
  • Make speckled eggs: Instead of a handprint bird, have kids cut out oval shapes from pastel paper. Use markers to draw speckles on them, and glue a clutch of eggs into the nest.
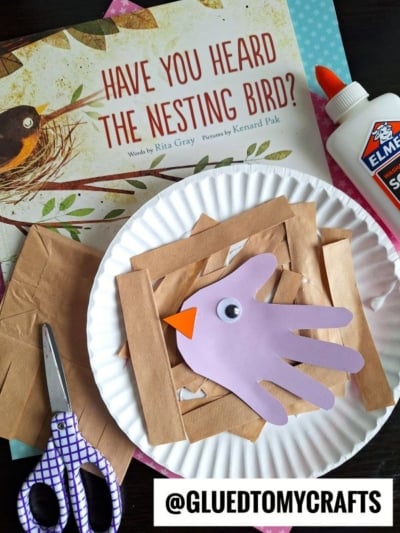
  • Go wild with colors: Birds come in all shapes and colors. Encourage kids to pick their favorite bright colors or use patterned scrap paper for their handprints.

RELATED —> Torn Paper Bird Nest Craft for Kids

A children’s craft setup features a paper plate with a hand-shaped purple cutout and brown paper strips resembling a nest, purple scissors, glue, and the book Have You Heard the Nesting Bird? in the background.

This paper plate bird nest craft offers a wonderful way to spend an afternoon connecting with your kids or students. It celebrates the beauty of spring and gives children a proud sense of accomplishment when they see their finished artwork.

We would love to see how your beautiful bird nests turned out! Snap a picture of your finished crafts and share them with us on social media. Happy crafting!

Stacey Glued To My Crafts website signature

A paper plate craft featuring a yellow handprint turkey with googly eyes, an orange beak, and legs, surrounded by brown paper strips, on top of colored paper. Text at the bottom reads @GLUEDTOMYCRAFTS.
PRINT

Easy Paper Plate Bird Nest Craft for Spring

Welcome spring with this fun paper plate and paper strip bird nest craft! Perfect for kids, parents, and teachers. Get the simple tutorial now.

Here’s your checklist of supplies to bring this craft to life:

  • Large Paper Plate
  • Cardstock Paper
  • Embellishments
  • Scissors
  • School Glue

Prepare your creative haven by laying down a protective cover before the crafting magic begins!

Directions:

  • Prep the Nest Materials- Start by letting the kids cut the brown paper bags or brown construction paper into small, rectangular strips. These strips will act as the twigs and mud that make up the bird's nest. Cutting the paper provides excellent scissor practice for little hands.
  • Build the Bird Nest - Take your paper plate and apply a generous amount of washable school glue to the bottom half. Have the children press their brown paper strips into the glue. They can overlap the pieces and arrange them haphazardly to create a natural, textured nest look. Let this dry slightly before moving on.
  • Create Your Little Bird - While the nest dries, it is time to make the bird! Trace your child's hand on a piece of brightly colored cardstock (yellow, purple, or blue look wonderful). Cut out the handprint. The palm will become the bird's body, and the fingers will fan out to look like feathers.
  • Bring the Bird to Life - Grab your glue again and attach two googly eyes near the top of the handprint. Cut a small triangle from your orange paper scrap and glue it just below the eyes for a beak. You can also cut out two small webbed feet and attach them to the bottom of the palm.
  • Put the Bird in Its Nest - Finally, apply glue to the back of your handprint bird. Press the bird firmly onto the top half of the paper plate, tucking the bottom of the bird slightly behind the brown paper strips. This makes it look like the chick is sitting snugly inside its nest.
MINI-HEARTS-page-separator-logo-gluedtomycrafts

CLICK HERE TO PRINT THE DIRECTIONS FOR THIS CRAFT

If you've enjoyed our content or have any thoughts to share, we'd love to hear from you! Mention @gluedtomycrafts or tag #gluedtomycrafts on Instagram!

Craft Activity Safety Guidelines:

Always Ensure Adult Supervision - Young children should be supervised at all times when engaging in craft activities. This is essential to keep them safe and ensure materials are used correctly. Use Age-Appropriate Supplies - Choose craft supplies that are suitable for your child’s age. Check labels for recommendations and avoid items with small parts or sharp edges for younger children. Modify as Needed - Feel free to adapt materials or steps to meet your child's abilities and safety needs. For example, substitute scissors with safety scissors if necessary. Keep an Eye on Allergies - Be mindful of potential allergens in craft materials like glue, paint, or certain fabrics. Opt for non-toxic and hypoallergenic options whenever possible. Organize and Secure Supplies - Keep all craft tools and materials organized. Store sharp objects, small parts, and potentially hazardous items out of reach when not in use. Following these guidelines will ensure that crafts remain fun, creative, and, most importantly, safe for everyone involved!


OUR PRIVACY POLICY

OUR COPYRIGHT POLICY

  • Email
  • Facebook
  • Instagram
  • Pinterest
  • Twitter
  • YouTube

LOOKING FOR SOMETHING?

EXPLORE OUR SITE:

© 2012–2026 Glued To My Crafts
All activities should be supervised by an adult at all times. Please refer to our safety guidelines for more information.


Please note that all the content of the website, including printables, are for classroom and personal use only. This means that any digital item you download from our site can be used for non-commercial use only. We kindly request that you do not reproduce or sell our creations. We appreciate your understanding and cooperation in respecting our content and intellectual property rights.

Accessibility Adjustments

Powered by OneTap

How long do you want to hide the toolbar?
Hide Toolbar Duration
Select your accessibility profile
Vision Impaired Mode
Enhances website's visuals
Seizure Safe Profile
Clear flashes & reduces color
ADHD Friendly Mode
Focused browsing, distraction-free
Blindness Mode
Reduces distractions, improves focus
Epilepsy Safe Mode
Dims colors and stops blinking
Content Modules
Font Size

Default

Line Height

Default

Color Modules
Orientation Modules