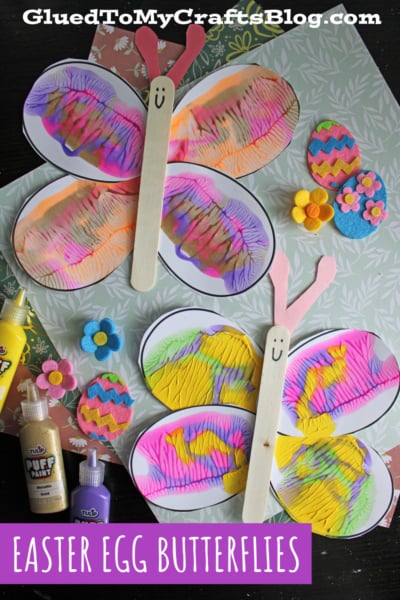
Make a fun butterfly craft with popsicle sticks & paint splats! This easy tutorial includes a free printable, perfect for a family-friendly Easter activity.
Get ready to transform simple craft supplies into something magical with our Popsicle Stick & Paint Splat Easter Egg Butterfly Craft! This project is a wonderful way to welcome the bright and cheerful feelings of spring or add a creative touch to your Easter festivities.
It combines the fun of paint splatting with a clever use for classic egg shapes, resulting in a beautiful butterfly that is unique to every little artist.
This craft is not only full of creative possibility but is also incredibly simple to put together, making it perfect for an afternoon of family fun. To get you started with ease, we’ve included a free printable Easter egg template. Just grab your paint, some popsicle sticks, and our handy printable to let your creativity take flight!
Craft Supplies:
- Mini Egg Printable – from our landing page
- White Cardstock Paper
- Tulip Puffy Paint {two to three different colors}
- Craft Scissors
- Jumbo Craft Sticks {one per butterfly craft}
- Scrapbook Paper
- School Glue
- Embellishments
Directions:
This craft can get a little messy, which is part of the fun! Lay down some newspaper or a plastic tablecloth to protect your work surface. A large tray is also a great way to keep the paint contained and makes cleanup a breeze.
- Print and Prep: Next up, print out the free egg printable. You will want four egg shapes for each butterfly you plan to make.
- The Fold: Go ahead and fold your paper piece in half, ensuring the egg designs are on the inside. This crease is essential for the paint transfer magic that happens next!
- Add Color: Unfold your paper and squeeze small dots of your chosen paint colors onto one side of the egg designs on the printable. You don’t need a lot of paint – just a few drops of each color scattered inside the outlines will do the trick. Too much paint might make the paper soggy, so keep the drops small.
- Squish and Swirl: Once the paint is down, go ahead and fold your piece of paper together again along the crease you made earlier. Be sure to rub your hand all over the folded piece. Really squish that paint around! This ensures the paint spreads out and covers your egg designs nicely.
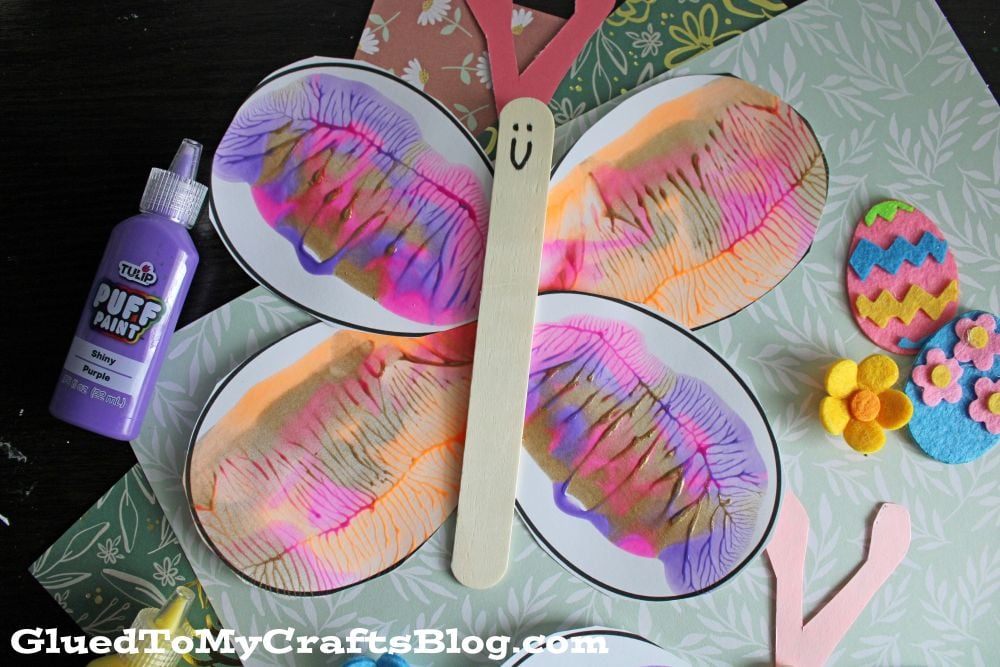
- The Reveal: Now, carefully unfold your piece of paper to reveal your “paint splatter” eggs! It’s always a fun surprise to see how the colors have mixed and marbled together. Set the paper aside to allow it to dry completely.
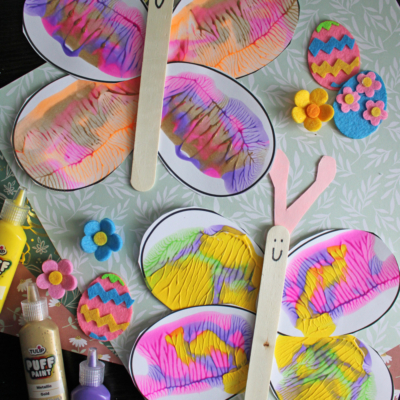
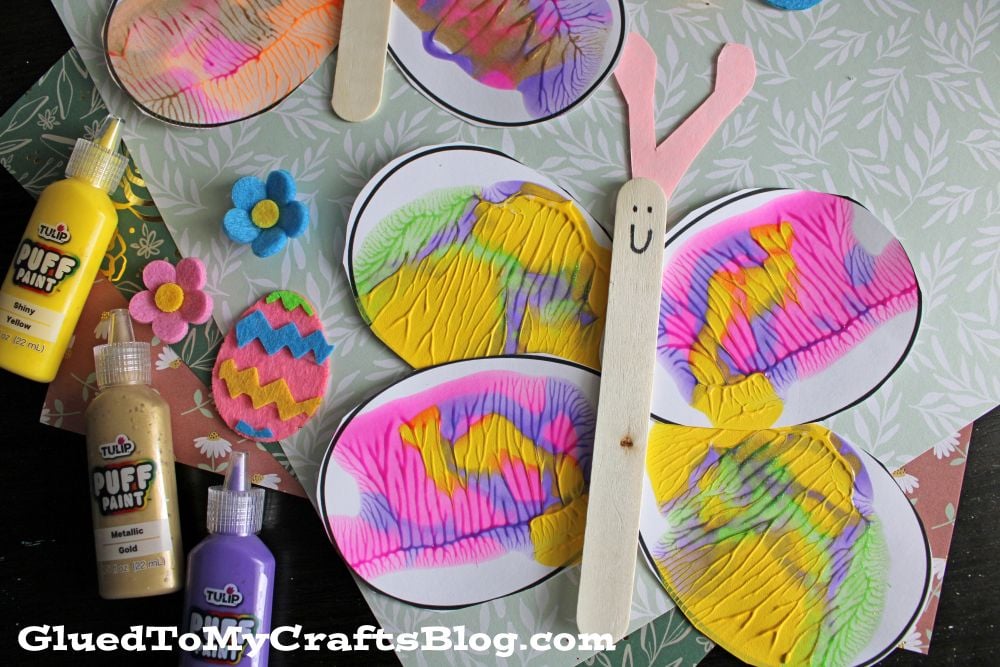
- Cut the Wings: Once the paint is totally dry, use scissors to carefully cut out your colorful eggs. These are going to be your beautiful butterfly wings.
- Assemble the Wings: Arrange four of your cut-out eggs on a flat surface to form a butterfly shape. You’ll want two eggs on the left and two on the right, with the pointed ends of the eggs all meeting in the center. Glue the tips of the eggs together so they stay in place.
- Add the Body: Take a popsicle stick and glue it vertically right down the center where all the egg “wings” meet. This creates the body of your butterfly and holds everything together securely.
- Decorate: Now for the finishing touches! You can glue small googly eyes onto the top of the popsicle stick and tape small pieces of pipe cleaner to the back of the stick for antennae. Feel free to use markers, glitter, or stickers to give your butterfly some extra personality.
- Display: Set your masterpiece aside to let the glue dry completely before playing with it or hanging it up. These colorful butterflies look amazing taped to a window or hung from the ceiling to welcome spring!
RELATED —> Paper Plate Butterfly Craft Idea
And there you have it – a beautiful, one-of-a-kind butterfly brought to life with a splash of color and a touch of imagination! This craft is more than just a fun project; it’s an opportunity for families to create together, make memories, and celebrate the arrival of spring. The best part is that every single butterfly will have its own special pattern, making each one a unique work of art.
We hope you had a wonderful time making these colorful creations. Don’t forget to display your finished butterflies proudly on the fridge, in a window, or as a cheerful addition to your Easter decorations. We would love to see how your paint splat butterflies turned out, so be sure to share them with us by tagging us on Facebook & Instagram!

Paint Splat Easter Egg Butterflies
Make a fun butterfly craft with popsicle sticks & paint splats! This easy tutorial includes a free printable, perfect for a family-friendly Easter activity.
Here’s your checklist of supplies to bring this craft to life:
- Cardstock Paper white
- Blank Egg Printable
- Jumbo Popsicle Sticks
- Tulip Puffy Paint
- Embellishments
Prepare your creative haven by laying down a protective cover before the crafting magic begins!
Directions:
- Print and Prep: Next up, print out the free egg printable. You will want four egg shapes for each butterfly you plan to make.
- The Fold: Go ahead and fold your paper piece in half, ensuring the egg designs are on the inside. This crease is essential for the paint transfer magic that happens next!
- Add Color: Unfold your paper and squeeze small dots of your chosen paint colors onto one side of the egg designs on the printable. You don't need a lot of paint - just a few drops of each color scattered inside the outlines will do the trick. Too much paint might make the paper soggy, so keep the drops small.
- Squish and Swirl: Once the paint is down, go ahead and fold your piece of paper together again along the crease you made earlier. Be sure to rub your hand all over the folded piece. Really squish that paint around! This ensures the paint spreads out and covers your egg designs nicely.
- The Reveal: Now, carefully unfold your piece of paper to reveal your "paint splatter" eggs! It’s always a fun surprise to see how the colors have mixed and marbled together. Set the paper aside to allow it to dry completely.
- Cut the Wings: Once the paint is totally dry, use scissors to carefully cut out your colorful eggs. These are going to be your beautiful butterfly wings.
- Assemble the Wings: Arrange four of your cut-out eggs on a flat surface to form a butterfly shape. You’ll want two eggs on the left and two on the right, with the pointed ends of the eggs all meeting in the center. Glue the tips of the eggs together so they stay in place.
- Add the Body: Take a popsicle stick and glue it vertically right down the center where all the egg "wings" meet. This creates the body of your butterfly and holds everything together securely.
- Decorate: Now for the finishing touches! You can glue small googly eyes onto the top of the popsicle stick and tape small pieces of pipe cleaner to the back of the stick for antennae. Feel free to use markers, glitter, or stickers to give your butterfly some extra personality.
- Display: Set your masterpiece aside to let the glue dry completely before playing with it or hanging it up. These colorful butterflies look amazing taped to a window or hung from the ceiling to welcome spring!


NEED MORE HELP DOWNLOADING OUR FREE PRINTABLES? PLEASE REFER TO OUR FAQ PAGE
If you've enjoyed our content or have any thoughts to share, we'd love to hear from you! Mention @gluedtomycrafts or tag #gluedtomycrafts on Instagram!