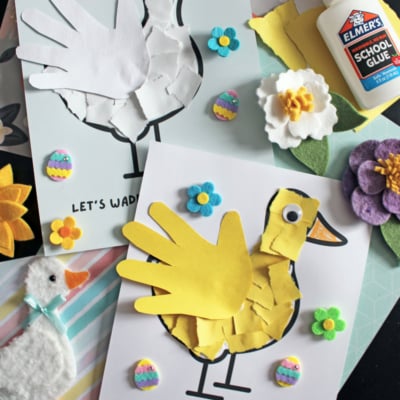
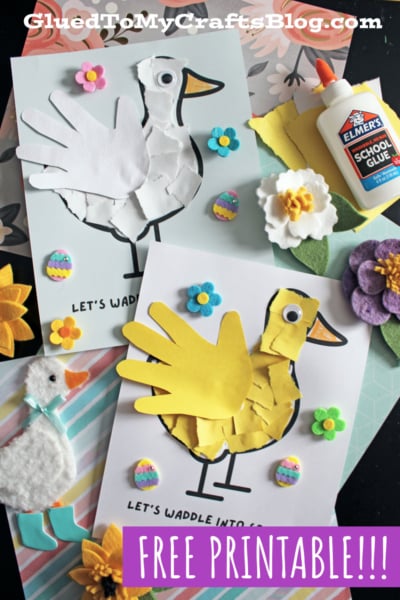
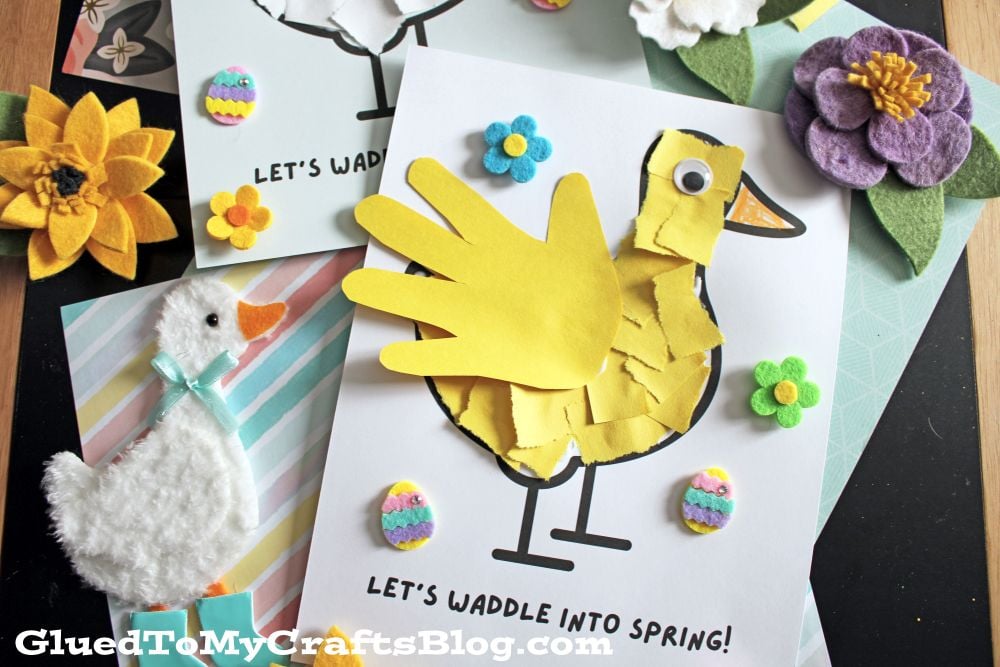
Waddle into spring with this fun torn paper duck craft for kids. Get step-by-step instructions and a free printable template for an easy, adorable activity.
Spring is a season of new beginnings, vibrant colors, and cheerful energy. It’s the perfect time to bring some of that brightness indoors with fun, hands-on activities for kids. If you’re looking for a simple yet adorable project, this Torn Paper Duck Craft is a wonderful choice. It combines sensory play, fine motor skill development, and creative expression into one delightful package.
This craft is perfect for toddlers, preschoolers, and early elementary-aged children. The process of tearing paper is fantastic for strengthening little hand muscles, and the handprint wing adds a personal touch that makes each creation a unique keepsake. Best of all, we’ve included a free printable duck template to make getting started as easy as can be.
Let’s gather our materials and get ready to waddle into spring with this charming duck craft.
Craft Supplies:
One of the best parts about this project is that it uses simple supplies you might already have in your craft bin. Here’s what you’ll need to bring your duck to life:
- SPRING DUCK PRINTABLE {on our landing page}
- Cardstock Paper {white or colored}
- Yellow or White Construction Paper
- School Glue
- Scissors
- Googly Eyes
Directions:
- First download and print the FREE spring duck template listed above, on a single piece of cardstock paper. You will need to print ONE for each craft you want to do with your child.
- Now help your child cut/tear their second sheet of paper into small pieces.
- Next grab the school glue and put a good amount of glue ALL over the inside of the duck design on the printable.
- Have children place their paper pieces on top of the glue {adding more if needed} until the shape is completely covered.
- Once the body is covered in torn paper, it’s time to add the wing. Take another piece of construction paper that matches the color you chose for the duck’s body. Place your child’s hand flat on the paper and trace around it with a pencil. This will become the duck’s wing.
- Carefully cut out the handprint shape. This is a great chance for older kids to practice their scissor skills with supervision.
- Apply glue to the palm area of the handprint cutout and press it firmly onto the center of the duck’s body. The fingers of the handprint should point toward the duck’s tail.
- The final step is to add the googly eye and any other embellishments you see fit.
- Once done decorating, set aside to let it all dry completely before displaying/gifting proudly!
- Don’t forget to share pictures of your adorable duck craft with us! #gluedtomycrafts
RELATED —> Handprint Duck – You Quack Me Up Keepsake
And there you have it! A cheerful, hand-made duck ready to welcome the new season. This Torn Paper Duck Craft is more than just an activity; it’s an opportunity to create memories with your children. The combination of tearing, gluing, and personalizing makes it an engaging project for a wide range of ages.
Display your finished ducks on the fridge, hang them in a window, or use them to decorate for a spring party. They also make wonderful, heartfelt gifts for grandparents or teachers. We hope you and your little ones have a fantastic time waddling into spring with this fun and easy craft idea.

Torn Paper "Waddling Into Spring" Duck Craft Idea
Waddle into spring with this fun torn paper duck craft for kids. Get step-by-step instructions and a free printable template for an easy, adorable activity.
Here’s your checklist of supplies to bring this craft to life:
- School Glue
Prepare your creative haven by laying down a protective cover before the crafting magic begins!
Directions:
- First download and print the FREE spring duck template listed above, on a single piece of cardstock paper. You will need to print ONE for each craft you want to do with your child.
- Now help your child cut/tear their second sheet of paper into small pieces.
- Next grab the school glue and put a good amount of glue ALL over the inside of the duck design on the printable.
- Have children place their paper pieces on top of the glue {adding more if needed} until the shape is completely covered.
- Once the body is covered in torn paper, it’s time to add the wing. Take another piece of construction paper that matches the color you chose for the duck's body. Place your child's hand flat on the paper and trace around it with a pencil. This will become the duck's wing.
- Carefully cut out the handprint shape. This is a great chance for older kids to practice their scissor skills with supervision.
- Apply glue to the palm area of the handprint cutout and press it firmly onto the center of the duck's body. The fingers of the handprint should point toward the duck's tail.
- The final step is to add the googly eye and any other embellishments you see fit.
- Once done decorating, set aside to let it all dry completely before displaying/gifting proudly!
- Don't forget to share pictures of your adorable duck craft with us! #gluedtomycrafts


NEED MORE HELP DOWNLOADING OUR FREE PRINTABLES? PLEASE REFER TO OUR FAQ PAGE
If you've enjoyed our content or have any thoughts to share, we'd love to hear from you! Mention @gluedtomycrafts or tag #gluedtomycrafts on Instagram!