Looking for a fun winter craft for kids? Learn how to make an adorable snow tubing penguin with paper plates. Get our easy step-by-step tutorial now!
When the winter winds start to blow and the days get shorter, it’s the perfect time to gather inside for some cozy crafting fun.
Creating something with your own hands is a wonderful way to spend a chilly afternoon, and this snow tubing penguin craft is sure to bring smiles to your little ones’ faces.
It’s an easy, low-mess activity that combines the fun of paper plates with the charm of a playful winter animal.

Get ready to transform simple craft supplies into a delightful scene of a penguin enjoying a ride down a snowy hill. This project is great for developing fine motor skills and letting kids express their creativity.
Craft Supplies:
Here is a list of the materials you’ll need to get started on your snow tubing penguin:
- Penguin Printable – on our landing page
- White Cardstock Paper
- Blue or Gray Cardstock Paper
- Paint Crayons
- Scissors
- Small Paper Plate
- Crayons, Markers or Paint Crayons
- School Glue or Glue Stick
- Embellishments
Most of these supplies are easy to find in your home or at a local craft store. Customization is encouraged, so feel free to substitute or add materials depending on what you have on hand!
Directions:
Follow these simple steps to bring your adorable penguin craft to life:
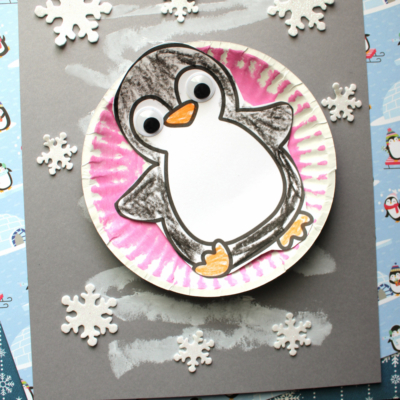
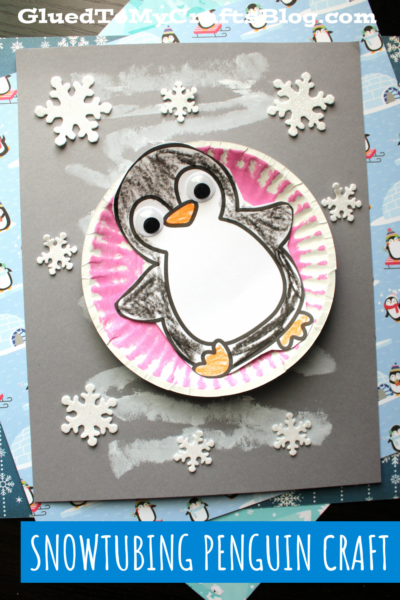
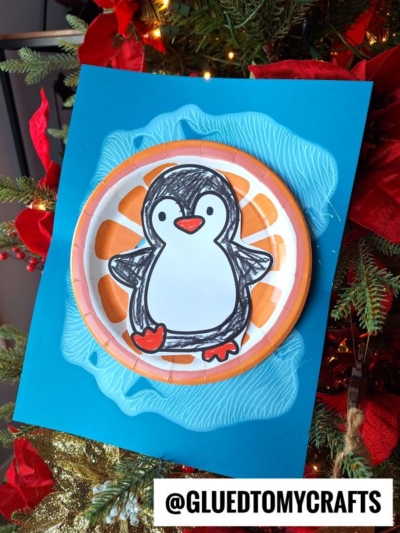
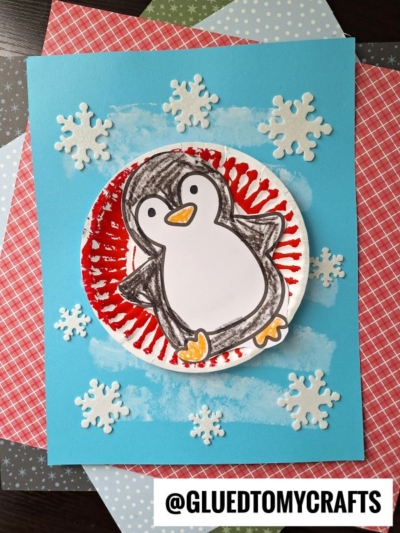
- First things first. We are going to download and print out the FREE provided printable listed above. One print gives you two opportunities to recreate this craft.
- Use your choice of coloring medium or embellishments, you are going to decorate ONE of the penguin body shapes in the printable. Go ahead and customize it however you like.
- Once done decorating it, use scissors to trim out the shape.
- Discard excess paper and set aside the paper piece for now.
- Now grab your small paper plate and choice of coloring medium.
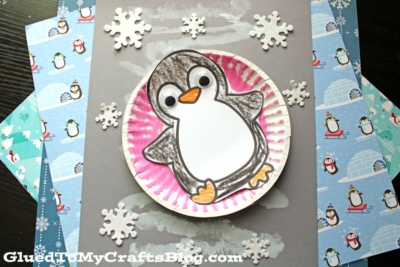
- Go ahead and decorate the rim {only the rim} of the paper plate, to create the opening for the penguin friend to sit in. My best suggestion is to imagine a donut and design from there.
- When done, set it aside for now.
- Next grab a single sheet of colored cardstock paper and a white paint crayon.
- Draw/paint a few swirls of “snow” on the paper.
- Now go ahead and now glue the “paper plate snow tube” to the center of your decorated cardstock paper.
- Follow that up by gluing your decorated penguin to the center of the float. You want it to look like he is floating and relaxing in it.
- At this point you can also add other embellishments {like fun snowflake stickers, glitter, rhinestones} that you see fit to really make it your own.
- Allow it to dry completely and then display your penguin sledding artwork proudly for all to see!
RELATED —> Paint Splat Snow Tubing Snowman
We hope you and your family have a fantastic time making this paper plate snow tubing penguin. It’s a simple, joyful craft that’s perfect for capturing the spirit of winter.
We would love to see your creations! Share a photo of your finished penguin craft with us and spread the creative fun. Happy crafting, my friends!

Paper Plate Snow Tubing Penguin Craft Idea
Looking for a fun winter craft for kids? Learn how to make an adorable snow tubing penguin with paper plates. Get our easy step-by-step tutorial now!
Here’s your checklist of supplies to bring this craft to life:
Prepare your creative haven by laying down a protective cover before the crafting magic begins!
Directions:
- First things first. We are going to download and print out the FREE provided printable listed above. One print gives you two opportunities to recreate this craft.
- Use your choice of coloring medium or embellishments, you are going to decorate ONE of the penguin body shapes in the printable. Go ahead and customize it however you like.
- Once done decorating it, use scissors to trim out the shape.
- Discard excess paper and set aside the paper piece for now.
- Now grab your small paper plate and choice of coloring medium.
- Go ahead and decorate the rim {only the rim} of the paper plate, to create the opening for the penguin friend to sit in. My best suggestion is to imagine a donut and design from there.
- When done, set it aside for now.
- Next grab a single sheet of colored cardstock paper and a white paint crayon.
- Draw/paint a few swirls of "snow" on the paper.
- Now go ahead and now glue the "paper plate snow tube" to the center of your decorated cardstock paper.
- Follow that up by gluing your decorated penguin to the center of the float. You want it to look like he is floating and relaxing in it.
- At this point you can also add other embellishments {like fun snowflake stickers, glitter, rhinestones} that you see fit to really make it your own.
- Allow it to dry completely and then display your penguin sledding artwork proudly for all to see!


NEED MORE HELP DOWNLOADING OUR FREE PRINTABLES? PLEASE REFER TO OUR FAQ PAGE
If you've enjoyed our content or have any thoughts to share, we'd love to hear from you! Mention @gluedtomycrafts or tag #gluedtomycrafts on Instagram!