Create a winter wonderland indoors with this Paper Plate Snow Tubing Snowman Craft! Fun, easy, and perfect for kids - get step-by-step instructions here.


Craft time is the perfect way to keep kids entertained during chilly winter days! If you’re looking for a creative and festive activity, this paper plate snow tubing snowman is sure to be a hit. It’s easy to make, budget-friendly, and lets kids explore their creativity while celebrating all the magic of winter.
Let’s jump (or rather, slide) into everything you’ll need and a step-by-step guide to creating this adorable snowman craft!

Crafting doesn’t have to be complicated to be meaningful. This Paper Plate Snow Tubing Snowman Craft brings together creativity, simplicity, and a whole lot of fun for kids of all ages. It’s a chance to spend quality time together, celebrate the season, and create something your little ones can be proud of.
Craft Supplies:
Before you get started, gather these simple, kid-friendly materials:
- SMALL Snowman Body Printable – on our landing page
- White Cardstock Paper
- Blue Cardstock Paper
- Various Paper Scraps
- White Puffy Paint {affiliate link}
- Scissors
- Small Paper Plate
- Crayons, Markers or Paint Crayons
- School Glue or Glue Stick
- Embellishments
Most of these supplies are easy to find in your home or at a local craft store. Customization is encouraged, so feel free to substitute or add materials depending on what you have on hand!
Directions:
- First things first. We are going to download and print out the FREE provided printable listed above. One print gives you two opportunities to recreate this craft.
- Use your choice of coloring medium or embellishments, you are going to decorate ONE of the body shapes in the printable. Go ahead and customize the snowman however you like.
- Once done decorating it, use scissors to trim out the shape.
- Discard excess paper and set aside the paper piece for now.
- Now grab your small paper plate and choice of coloring medium.
- Go ahead and decorate the rim {only the rim} of the paper plate, to create the opening for the snowman to sit in. My best suggestion is to imagine a donut and design from there.
- When done, set it aside for now.
- Next grab a single sheet of blue cardstock paper and the puffy paint.
- Fold the paper in half {hamburger style.}
- Open it back up and squirt a few lines of white paint on ONE side.
- Fold it back up and “squish” the paint in between the paper to make a snowy scene.
- Open it back up to reveal the “paint splat” design.
- If desired, sprinkle loose craft glitter on top of the wet paint.
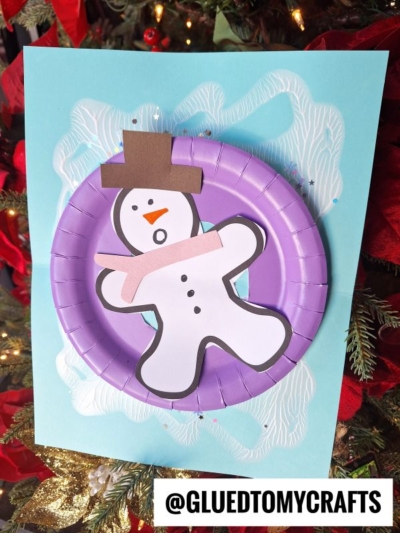
- Now go ahead and now glue the “paper plate snow tube” to the center of your decorated blue cardstock paper.
- Follow that up by gluing your decorated snowman to the center of the float. You want it to look like he is floating and relaxing in it.
- At this point you can also add other embellishments {like fun snowflake stickers, glitter, rhinestones} that you see fit to really make it your own.
- Allow it to dry completely and then display your snowman snow tubing artwork proudly for all to see!
RELATED —> Popsicle Stick Snow Tubing Snowman
There’s nothing quite like bringing a winter wonderland to life with a simple, creative craft. This Paper Plate & Paint Splat Snow Tubing Snowman craft idea is sure to delight kids of all ages while letting their creativity shine. It’s the perfect activity for chilly afternoons or snowy weekends when everyone is looking for something fun to do indoors.
If crafting these snowmen has got your fingers itching for more creative ideas, stay tuned! We have a library full of fun and festive crafts to explore this season.
Happy crafting, and may your winter be as joyful as a day on the slopes!

Paper Plate Snow Tubing Snowman Craft for Kids
Create a winter wonderland indoors with this Paper Plate Snow Tubing Snowman Craft! Fun, easy, and perfect for kids - get step-by-step instructions here.
Here’s your checklist of supplies to bring this craft to life:
- Cardstock Paper blue
- Small Paper Plate
- Snowman Printable - landing page
- Tulip Puffy Paint white
- Embellishments
- School Glue
Prepare your creative haven by laying down a protective cover before the crafting magic begins!
Directions:
- First things first. We are going to download and print out the FREE provided printable listed above. One print gives you two opportunities to recreate this craft.
- Use your choice of coloring medium or embellishments, you are going to decorate ONE of the body shapes in the printable. Go ahead and customize the snowman however you like.
- Once done decorating it, use scissors to trim out the shape.
- Discard excess paper and set aside the paper piece for now.
- Now grab your small paper plate and choice of coloring medium.
- Go ahead and decorate the rim {only the rim} of the paper plate, to create the opening for the snowman to sit in. My best suggestion is to imagine a donut and design from there.
- When done, set it aside for now.
- Next grab a single sheet of blue cardstock paper and the puffy paint.
- Fold the paper in half {hamburger style.}
- Open it back up and squirt a few lines of white paint on ONE side.
- Fold it back up and "squish" the paint in between the paper to make a snowy scene.
- Open it back up to reveal the "paint splat" design.
- If desired, sprinkle loose craft glitter on top of the wet paint.
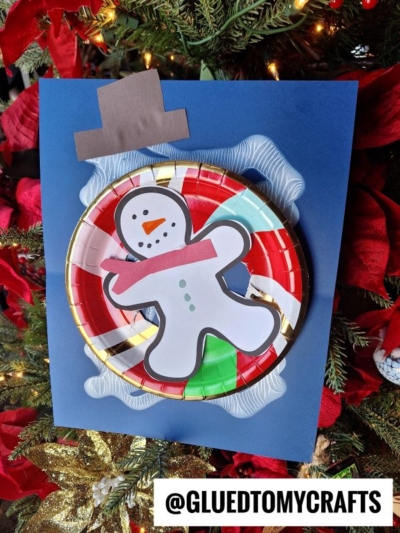
- Now go ahead and now glue the "paper plate snow tube" to the center of your decorated blue cardstock paper.
- Follow that up by gluing your decorated snowman to the center of the float. You want it to look like he is floating and relaxing in it.
- At this point you can also add other embellishments {like fun snowflake stickers, glitter, rhinestones} that you see fit to really make it your own.
- Allow it to dry completely and then display your snowman snow tubing artwork proudly for all to see!


NEED HELP DOWNLOADING OUR FREE PRINTABLES? PLEASE REFER TO OUR FAQ PAGE
If you've enjoyed our content or have any thoughts to share, we'd love to hear from you! Mention @gluedtomycrafts or tag #gluedtomycrafts on Instagram!